
Quick Overview: QuickSwap for Token Launches
To add liquidity to QuickSwap, you'll need a liquidity pool - without one, your token exists but can't be traded. QuickSwap, Polygon's premier DEX, has established itself as a leading platform for token launches on Polygon, offering fast transactions, minimal fees, and a trusted Automated Market Maker (AMM) model. With billions in trading volume and seamless integration with major analytics platforms like DexTools and DexScreener, QuickSwap ensures your token gains immediate market visibility and liquidity.
Why Choose QuickSwap for Token Launch?
Cost-Effective Operations
Operating on Polygon, QuickSwap offers significantly lower transaction costs compared to Ethereum-based DEXes. This cost advantage allows projects to manage their liquidity more actively and enables traders to participate with lower capital requirements, making it an ideal choice for launching tokens on a budget.
Proven Reliability
QuickSwap's battle-tested smart contracts and straightforward mechanics make it a reliable choice for projects prioritizing stability and security. The protocol has maintained consistent operation since launch, processing massive trading volumes while maintaining high uptime - key factors for a successful token launch on Polygon.
Universal Compatibility
QuickSwap V2 pools support virtually any token implementation, including complex tokenomics with taxes or custom transfer logic. This flexibility is particularly valuable for projects with innovative token mechanics, ensuring a smooth token launch process.
QuickSwap V2 vs. V3
When launching your token on QuickSwap, you'll need to choose between V2 and V3 pools. Here's what you need to know:
QuickSwap V2
- Traditional pool design with uniform liquidity distribution
- Simple setup and management - ideal for new token launches
- Full support for tokens with tax mechanisms or custom logic such as liquidity tax or dividends
- Standard 0.3% trading fee
- Best choice for initial launches due to proven stability
QuickSwap V3
- Concentrated liquidity for higher capital efficiency
- Multiple fee tiers (0.01%, 0.05%, 0.3%, 1%)
- Requires active position management
- Better suited for established tokens with stable price ranges
- Limited support for tokens with complex mechanics
For most new token launches, V2 is recommended due to its simplicity and universal compatibility. V3's advanced features are typically more valuable for existing projects that can benefit from active liquidity management.
How to Add Liquidity to QuickSwap V2 - Step by Step
A successful liquidity addition starts with having the right pieces in place before you touch the interface. Here's what you'll need:
- Your ERC-20 token contract address and a sufficient amount of your token in your wallet
- Collateral in POL, USDC, or another token to pair with your token inside the liquidity pool
- Enough POL to cover transaction fees on Polygon
How you proceed from here depends on how your token was originally set up:
- QuickSwap V2 Pre-configured: If you designated QuickSwap as your default exchange during token creation on 20lab, an empty liquidity pool has already been deployed and tied to your contract. Head straight to your dashboard to add initial liquidity.
- Manual Setup Required: If QuickSwap wasn't selected during creation - or your token was built outside of 20lab entirely - the ERC-20 add liquidity tool lets you spin up a new pool and fund it without ever leaving the platform.
Adding Liquidity with 20lab Default Exchange Feature
When QuickSwap V2 is set as your default exchange on 20lab, the groundwork is already done - your token contract is connected to an empty pool and ready to receive its first deposit.

Adding liquidity takes just a few steps:
- Open your 20lab owner dashboard and locate your token in the list.
- Find the DEX section - it will display your connected pool and "QuickSwap".
- Hit the "Manage liquidity" button to launch the liquidity tool directly tied to your main pool, where you can both add and remove liquidity as needed.
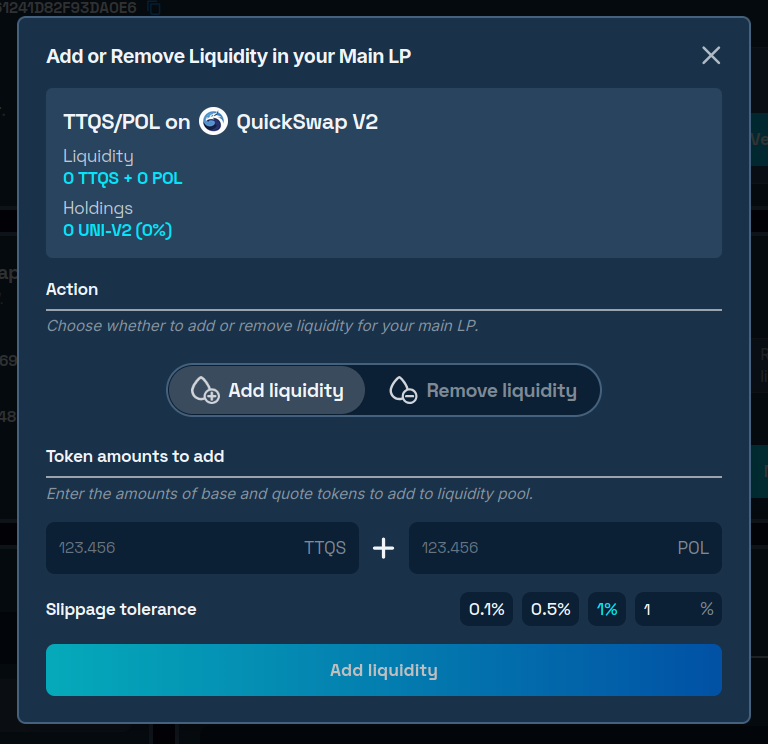
The pool starts empty with no price set. Here's how to bring it to life:
- Enter the amounts of your token and collateral in POL you'd like to deposit.
- Sign the approval transaction to authorize your token for use by the DEX contract.
- Submit the second transaction to complete the deposit.
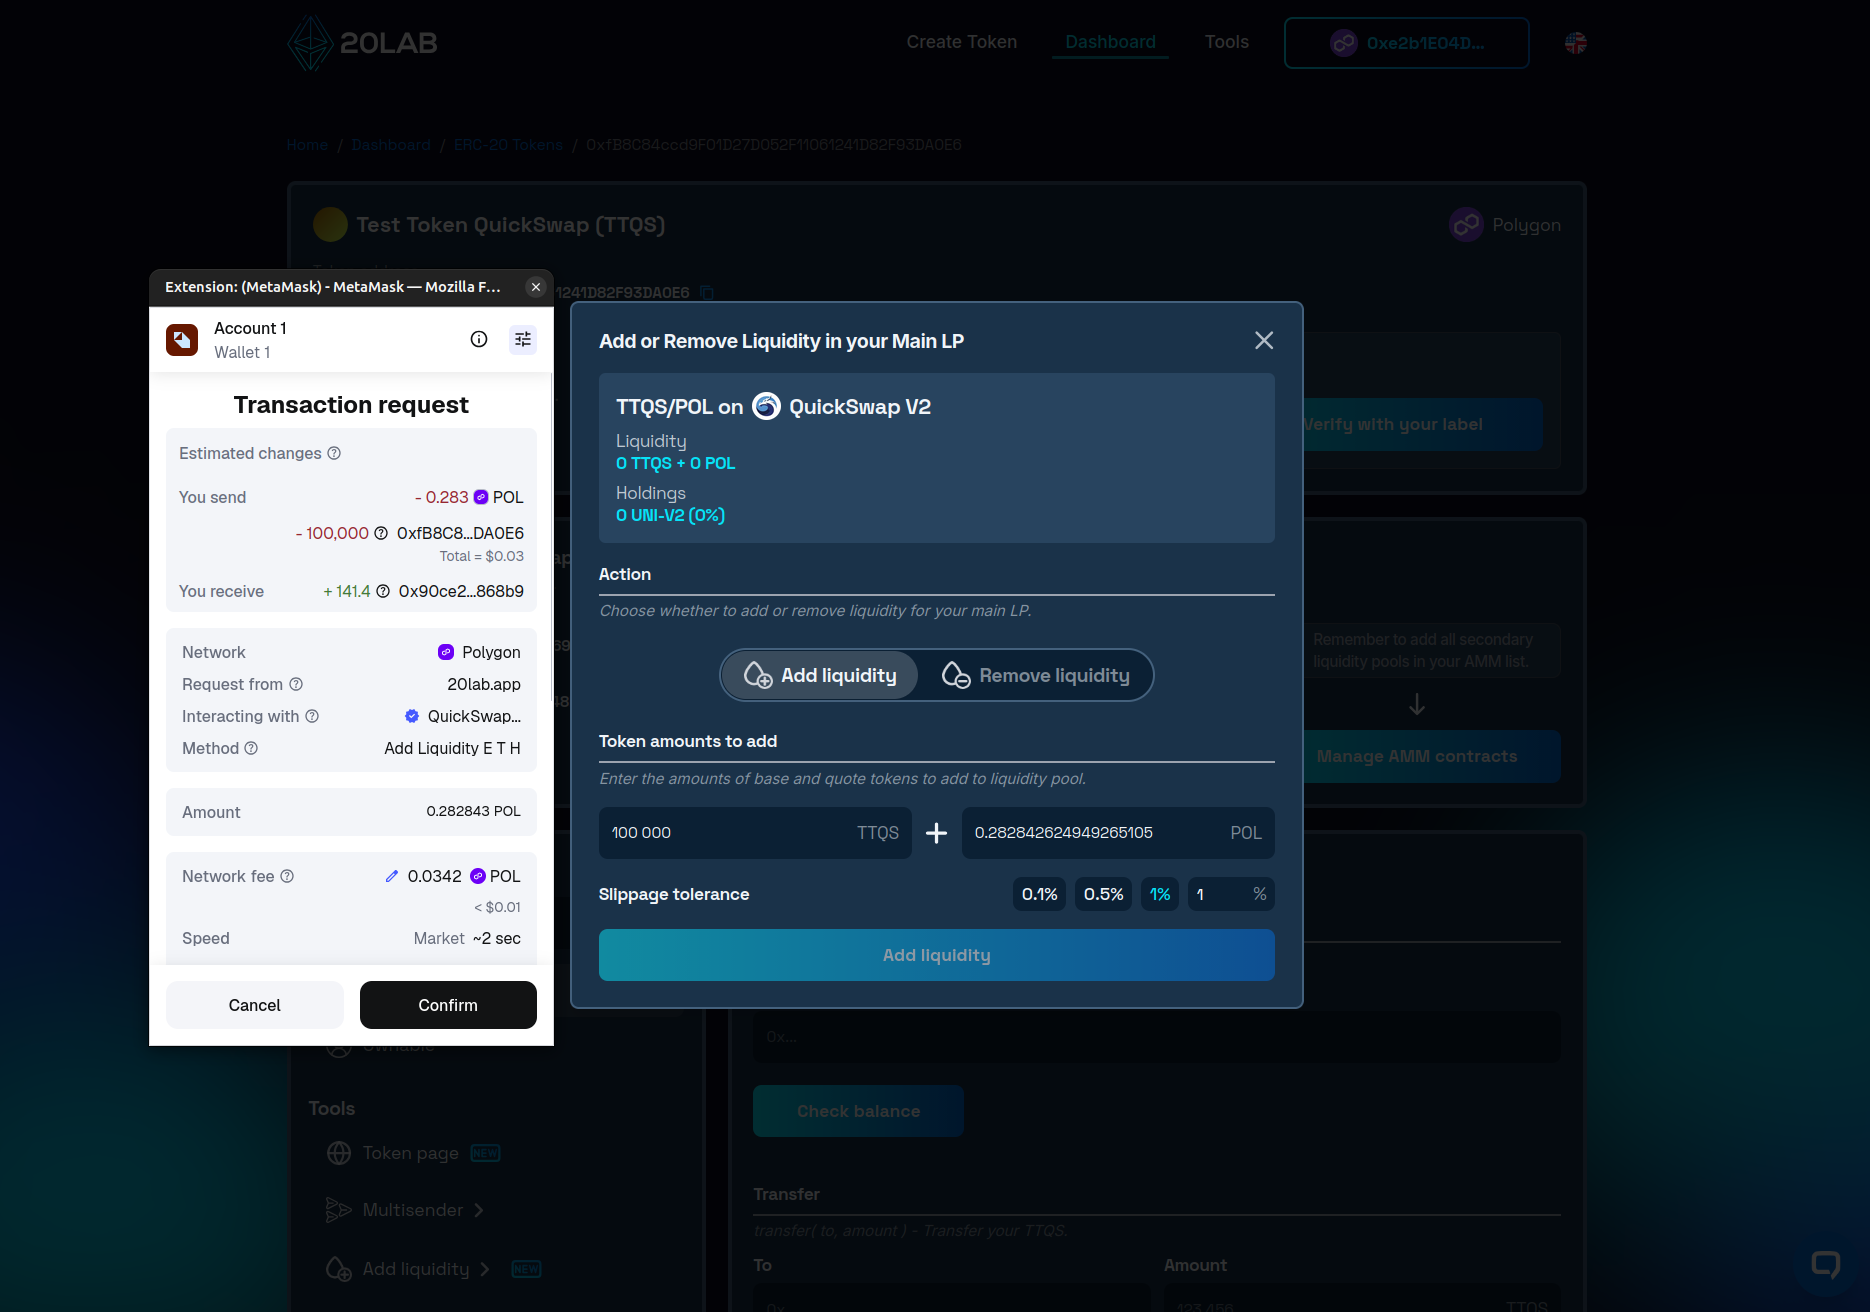
- Once both transactions confirm on-chain, the pool display will reflect your deposited assets and your token will have an established market price.
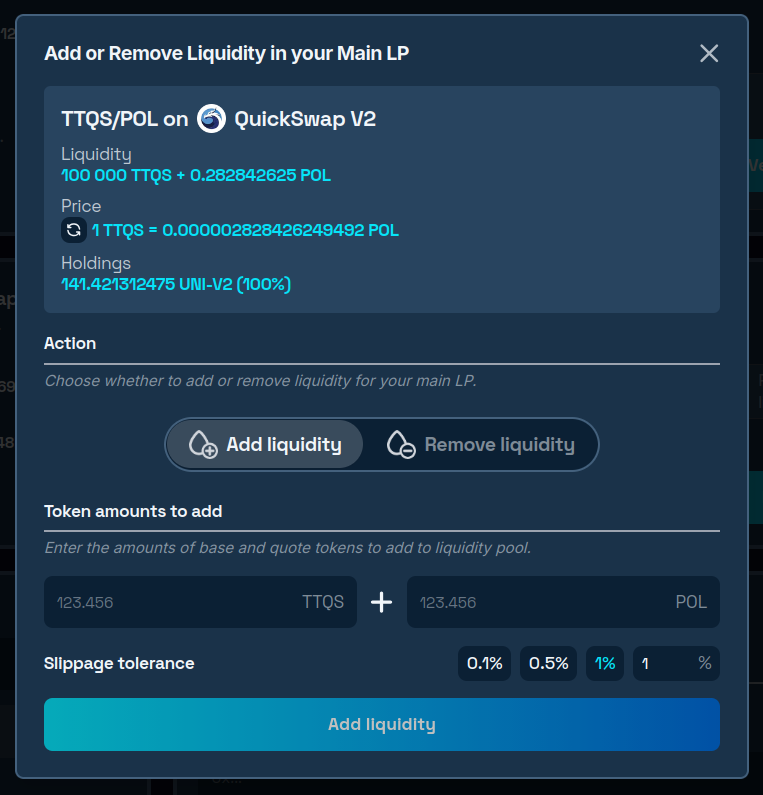
From this point, your token is open for trading on QuickSwap. If you'd prefer to control the exact moment trading goes live rather than having it begin instantly, the EnableTrading function gives you that control - it adds an owner-only switch to your contract that determines when swaps are permitted.
Manual Liquidity Addition with 20lab's Add Liquidity Tool
If QuickSwap wasn't your default exchange at creation time, or your token was deployed independently, 20lab's add liquidity tool handles the full setup in one place. The base token is the token you're launching; the quote token is what you're pairing it against - typically POL or a stablecoin.
Walk through these steps to get your pool running:
- Head to the ERC-20 add liquidity tool.
- Paste your token's contract address into the base token field, then set your chosen collateral (e.g. POL) as the quote token.
- Select QuickSwap from the list of supported DEXes, or provide a custom router address if needed.
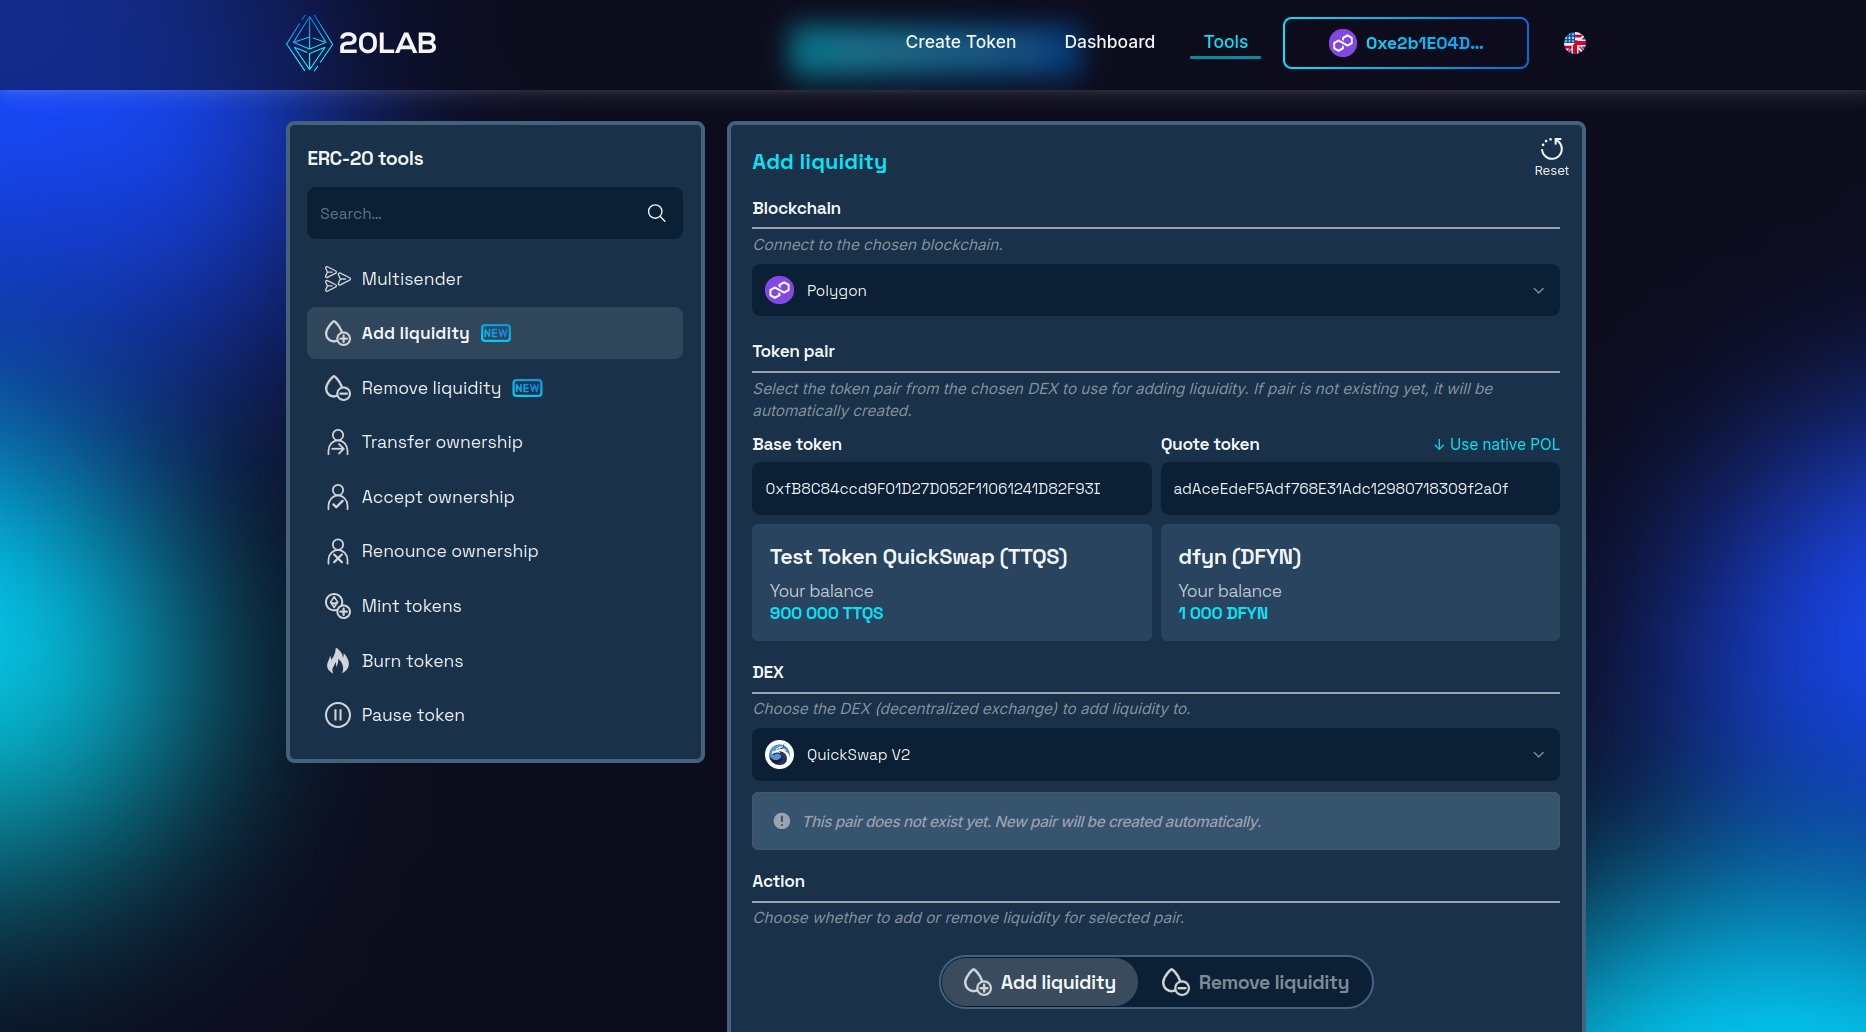
Note: If no pool exists yet for this token pair, one will be deployed automatically as part of your initial deposit.
- Specify how much of each token you want to contribute to the pool.
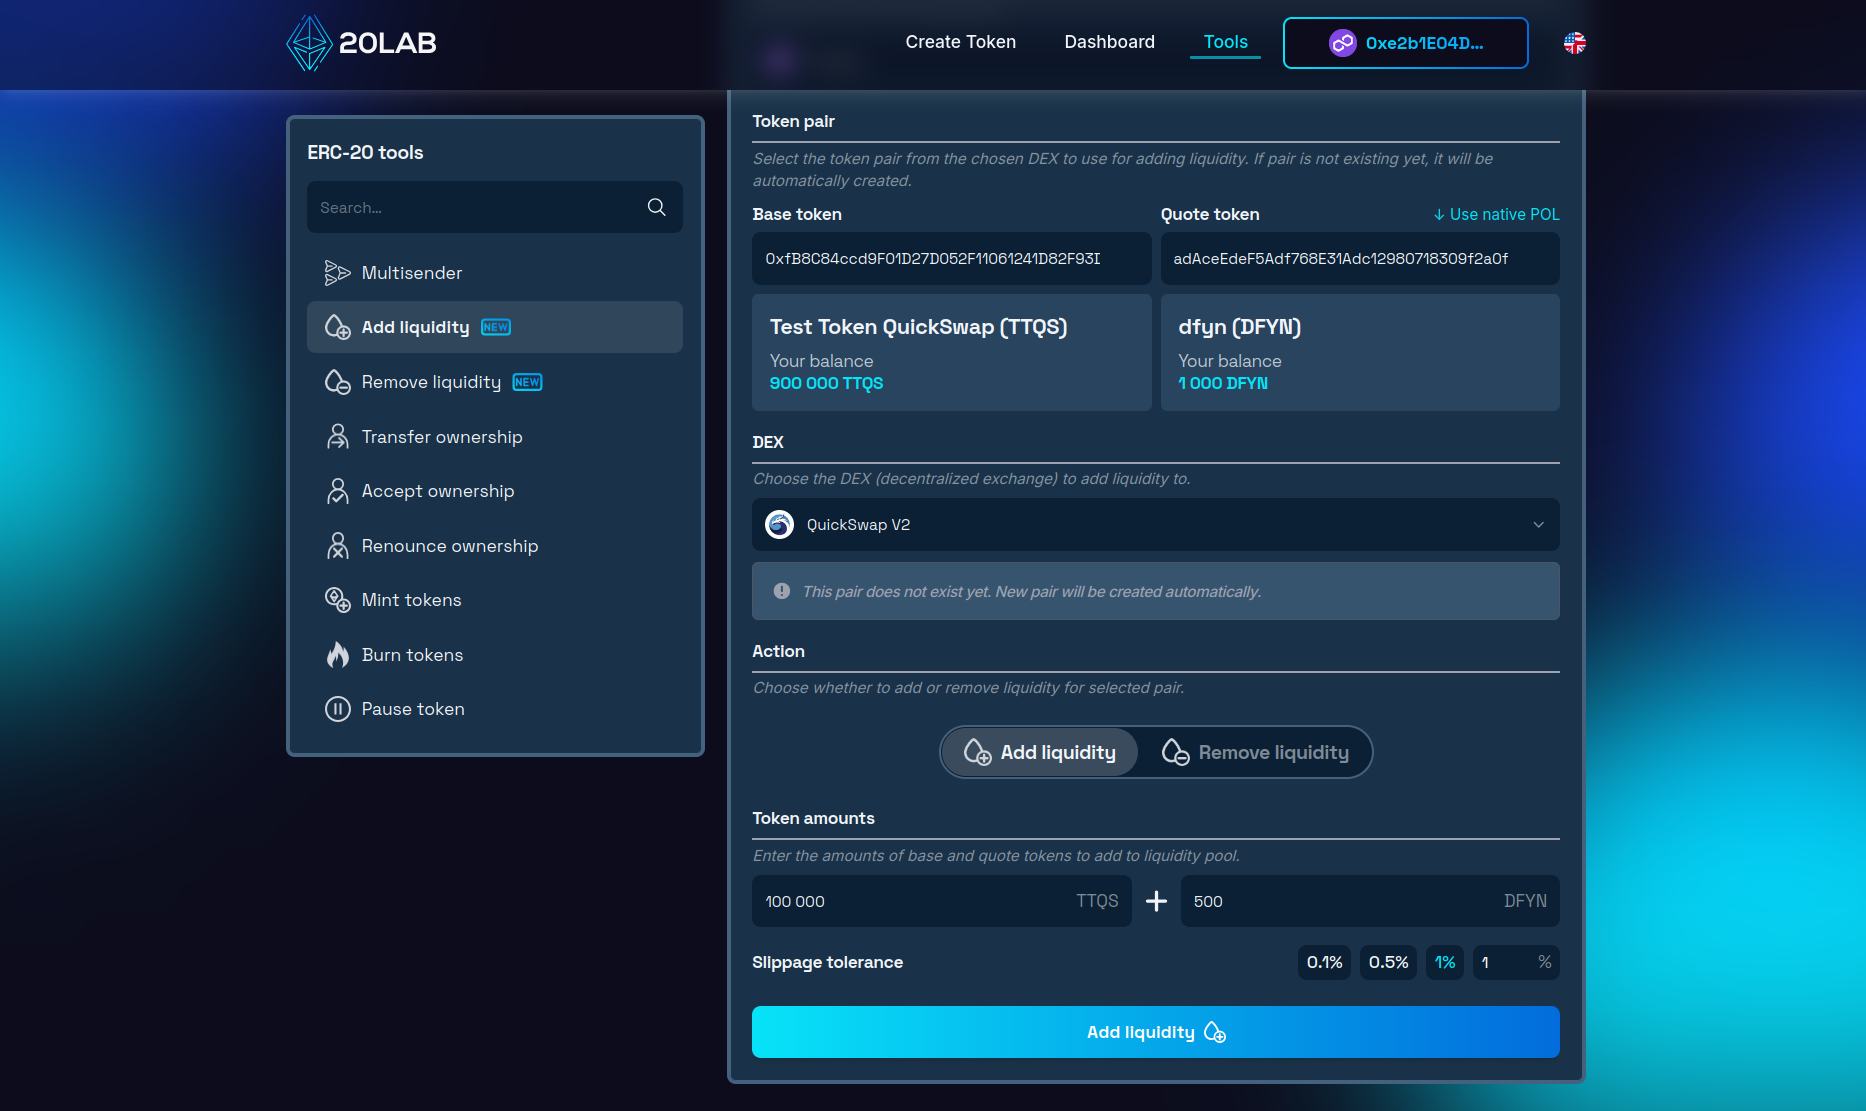
- Go through any required approvals and sign the final transactions in your wallet.
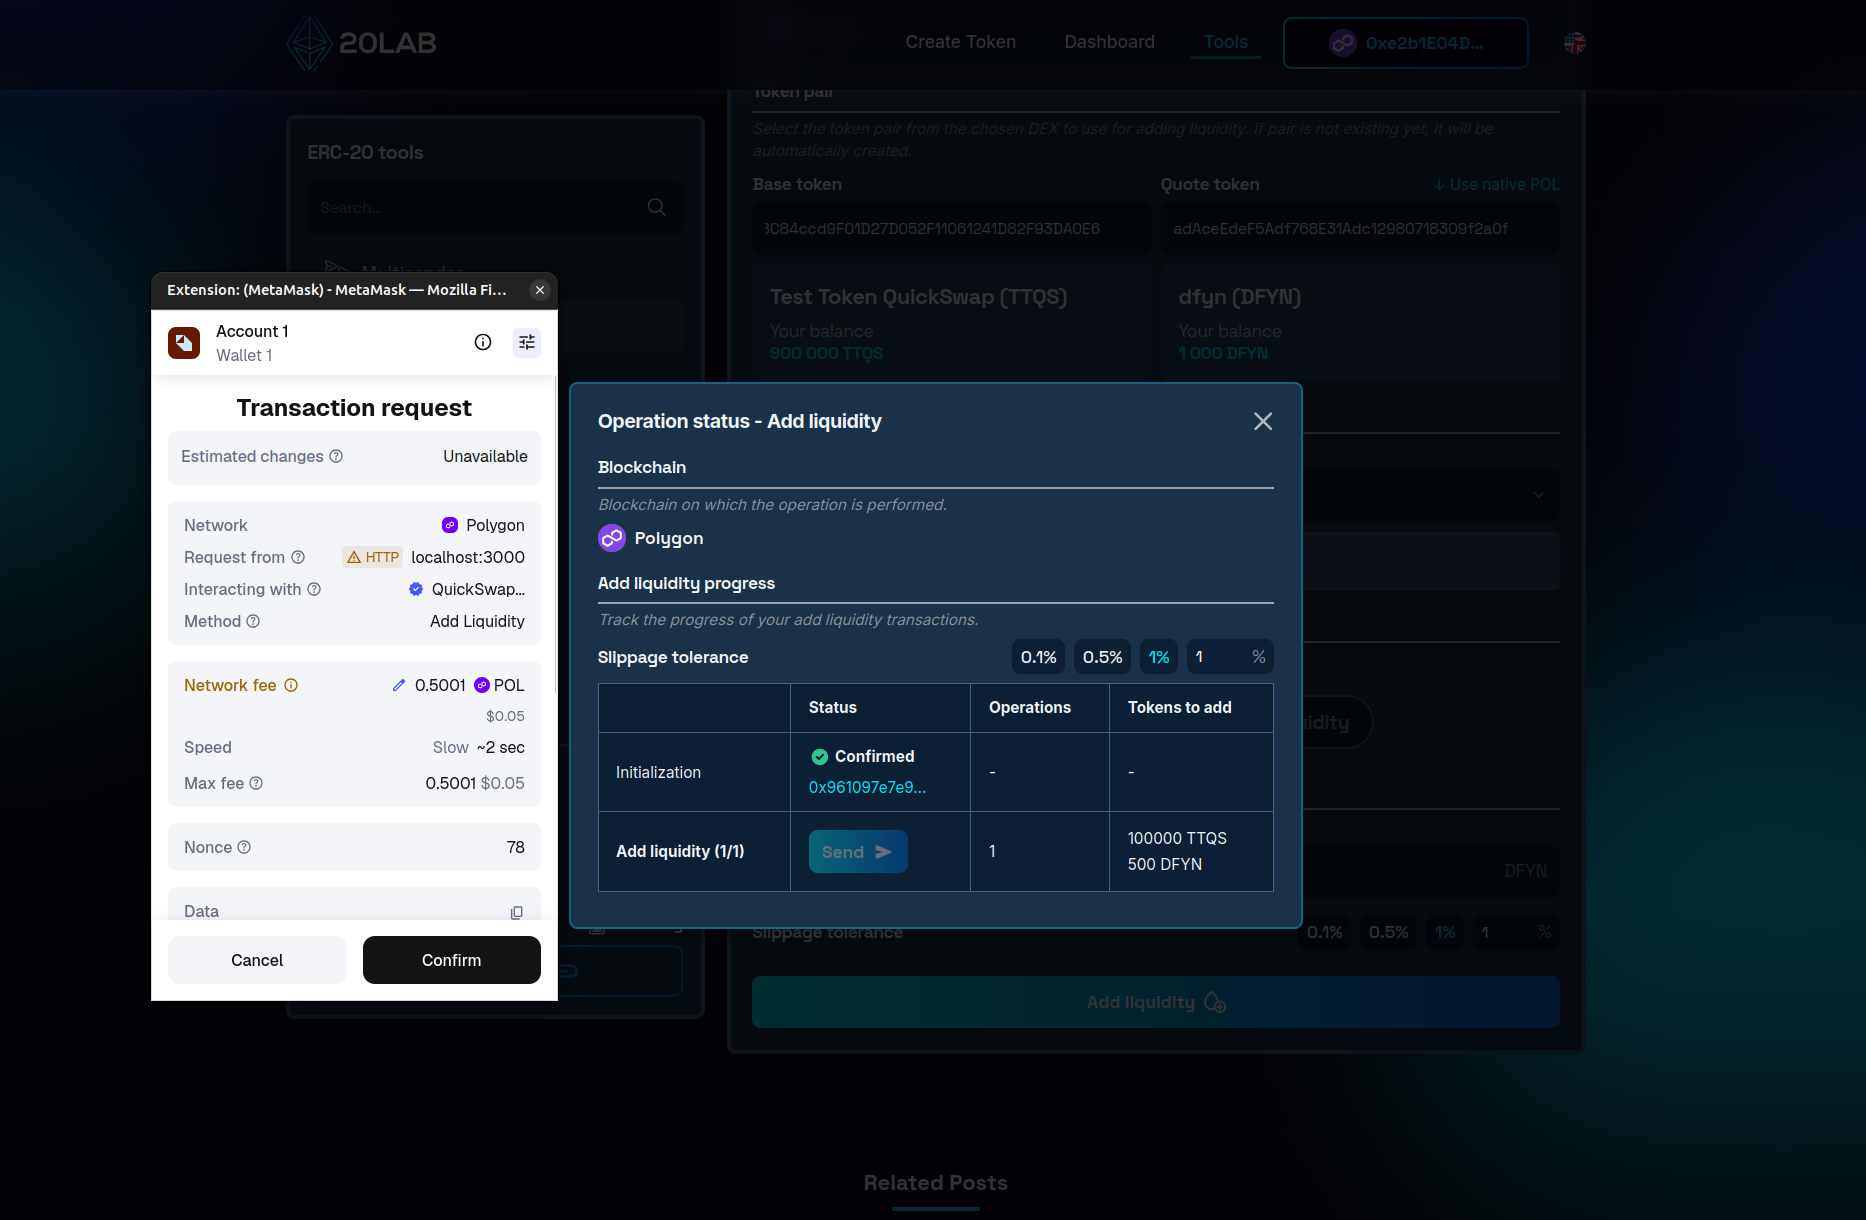
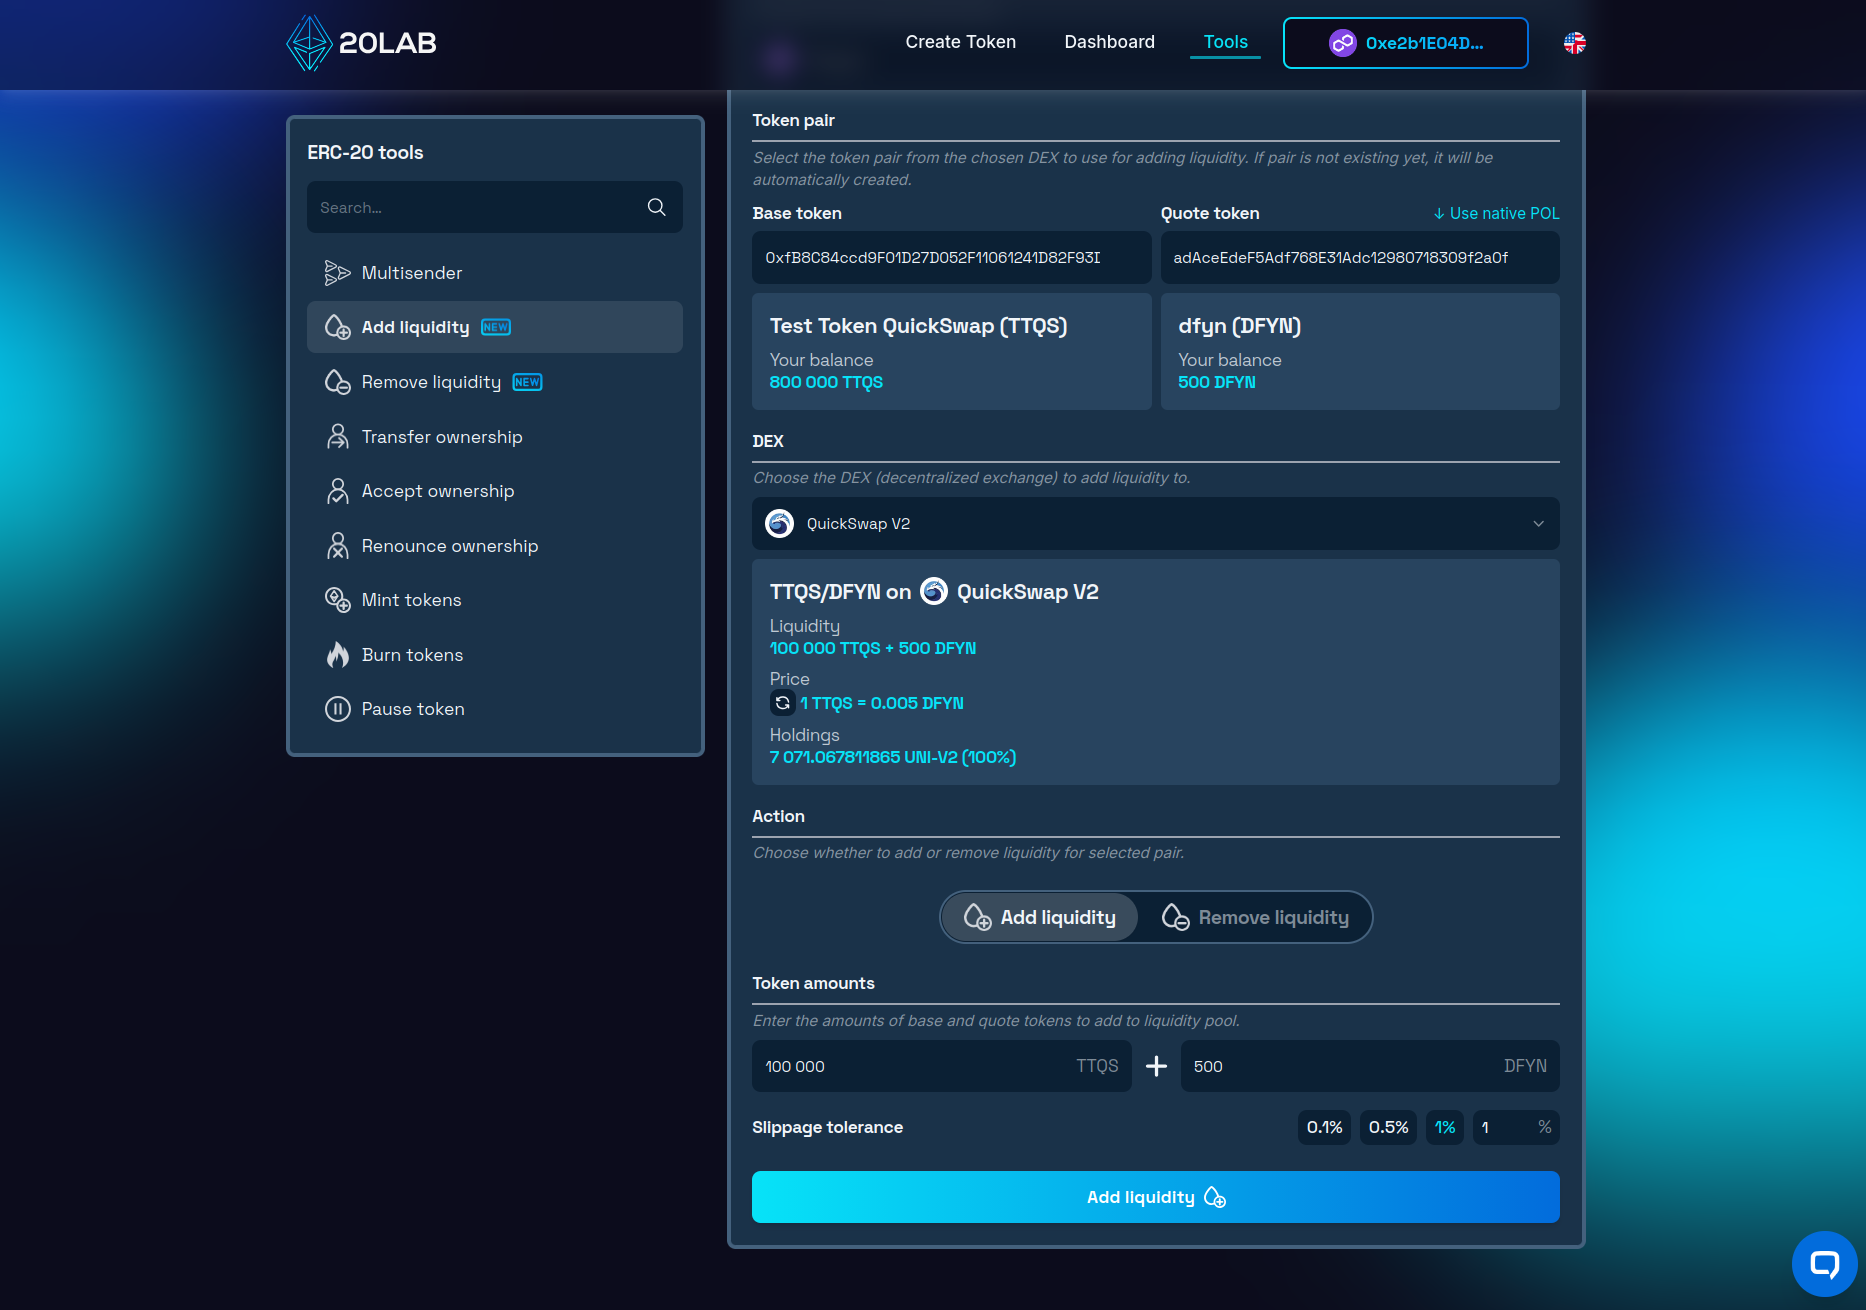
- Once the operation finishes, close the window. Your pool is now live with an accurate price, and the LP tokens are held in your wallet.
Removing Liquidity
It's worth noting that if you will ever need to withdraw your position, the ERC-20 remove liquidity tool has you covered.
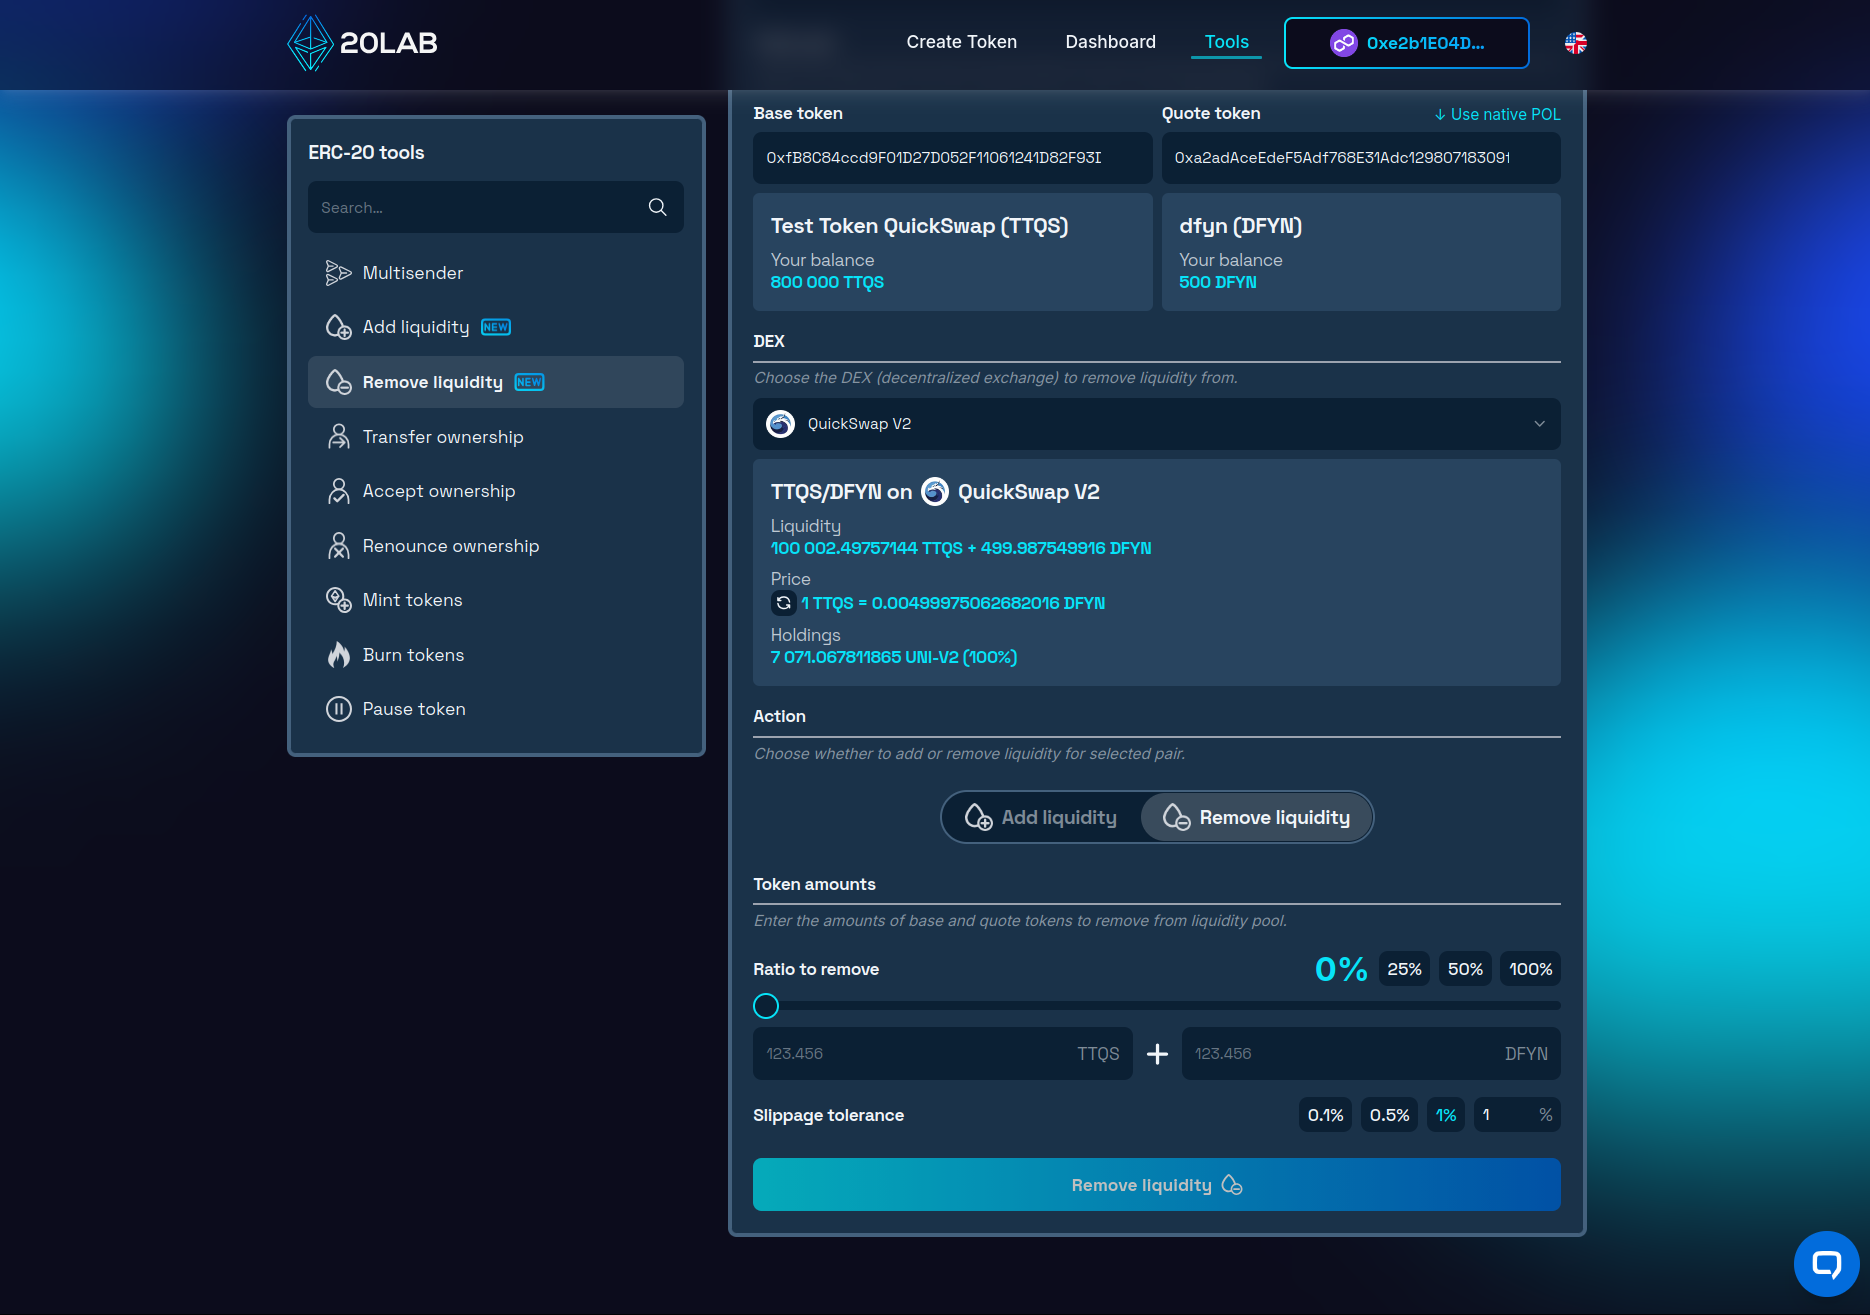
Connect your wallet, pick the relevant QuickSwap pool, and decide how much to pull out - a partial withdrawal or the full position. The tool converts your LP tokens back into the underlying assets and sends them straight to your wallet.
Security and Launch Management
With liquidity in place, the next priority is securing your LP tokens. Leaving them sitting in your wallet is a red flag for investors - it means you could pull the liquidity at any time. The two standard approaches are locking and burning.
Locking via a platform like PinkLock or QuickSwap's native locker puts your LP tokens under a time-based hold, with six months being the widely accepted minimum.
Burning goes a step further - it permanently removes those tokens from circulation, making that slice of liquidity irrecoverable. It's the strongest possible signal of long-term commitment, and 20lab's ERC-20 burn tokens tool makes the process simple: connect your wallet, enter your pair address, and send the LP tokens to the void.
On the trading protection side, your contract can be equipped with several safeguards before launch. An anti-bot cooldown limits how quickly the same address can transact, while max wallet and max transaction limits cap how much any single address can accumulate or move at once. A blacklist lets you block known bad addresses outright, and temporarily elevated sell fees in the opening hours can deter snipers looking for a quick flip at launch.
Conclusion
When you add liquidity to QuickSwap V2, the process is straightforward with the right tools behind you. Polygon's low fees and fast finality remove the friction that slows down launches on other networks, and V2's broad compatibility means even tokens with complex mechanics trade without issues.
Whether you're coming in through 20lab's default exchange setup or building out your pool manually with the ERC-20 add liquidity tool, the path from deployment to live trading is clear. And when the time comes to adjust your position, the ERC-20 remove liquidity tool gives you the same level of control on the way out.
Have questions or need a hand along the way? Join our Telegram channel - our team is ready to help.


