
Understanding Uniswap for Your Token Launch
To add liquidity to Uniswap, you first need a liquidity pool - without one, your token exists but can't be traded. Adding liquidity on Uniswap is what makes your token live - it allows traders to buy and sell, establishes a market price, and generates trading volume. As a liquidity provider (LP), you also earn fees from every transaction in your pool. Uniswap offers several versions - V2, V3, and V4 - each suited to different use cases. Many token creators choose V2 for its simplicity, compatibility with tokens that have transfer fees (taxes), and easier liquidity management.
Thanks to Layer 2 solutions, Uniswap now operates beyond Ethereum on many other networks such as Arbitrum, Optimism, Polygon, Base and many more, giving creators more flexibility in where they launch their tokens while maintaining the same familiar interface and functionality.
This guide focuses specifically on providing liquidity on Uniswap V2, walking you through creating and adding to liquidity pools. We'll cover the step-by-step process and key considerations for token creators and LPs. Whether you're launching a new token or expanding your project's trading options, this guide provides the best practices for adding liquidity on Uniswap V2.
V2 vs. V3 vs. V4 pools
Uniswap offers three main versions for creating liquidity pools, each with distinct characteristics:
- Uniswap V2: Uses a simple constant product formula
(x * y = k)to determine token prices. Liquidity is distributed evenly across the entire price spectrum, making it easy to understand and manage. Crucially, V2 supports tokens with transfer fees (taxes), a common feature in many tokens. - Uniswap V3: Introduces "concentrated liquidity", allowing LPs to specify a price range for their liquidity. This can lead to greater capital efficiency and higher fee earnings if the price stays within the chosen range. However, it adds complexity: if the price moves outside the range, LPs stop earning fees until they adjust their position. Furthermore, if no liquidity is provided within a specific price range, no trades can occur at those prices and the token cannot be bought or sold until someone provides liquidity. In addition, V3 does not support tokens with transfer fees.
- Uniswap V4: The most advanced version, V4 introduces a "hooks" architecture that allows developers to add custom logic to liquidity pools - such as dynamic fees, on-chain limit orders, or custom oracles. V4 is designed for maximum flexibility and composability, making it suited for more sophisticated DeFi applications. Like V3, V4 does not support tokens with transfer fees and requires a higher level of technical understanding to use effectively.
How to Add Liquidity to Uniswap V2 - Step by Step
Getting Started with Uniswap V2 Liquidity
Before adding liquidity to Uniswap V2, you'll need to ensure you have everything prepared. The process requires:
- Your ERC-20 token contract address and a sufficient amount of your token in your wallet
- Collateral in ETH or another token to pair with your token inside the liquidity pool
- Enough funds to cover gas fees
If you've created your token using 20lab's token generator, your path forward depends on how your token was set up:
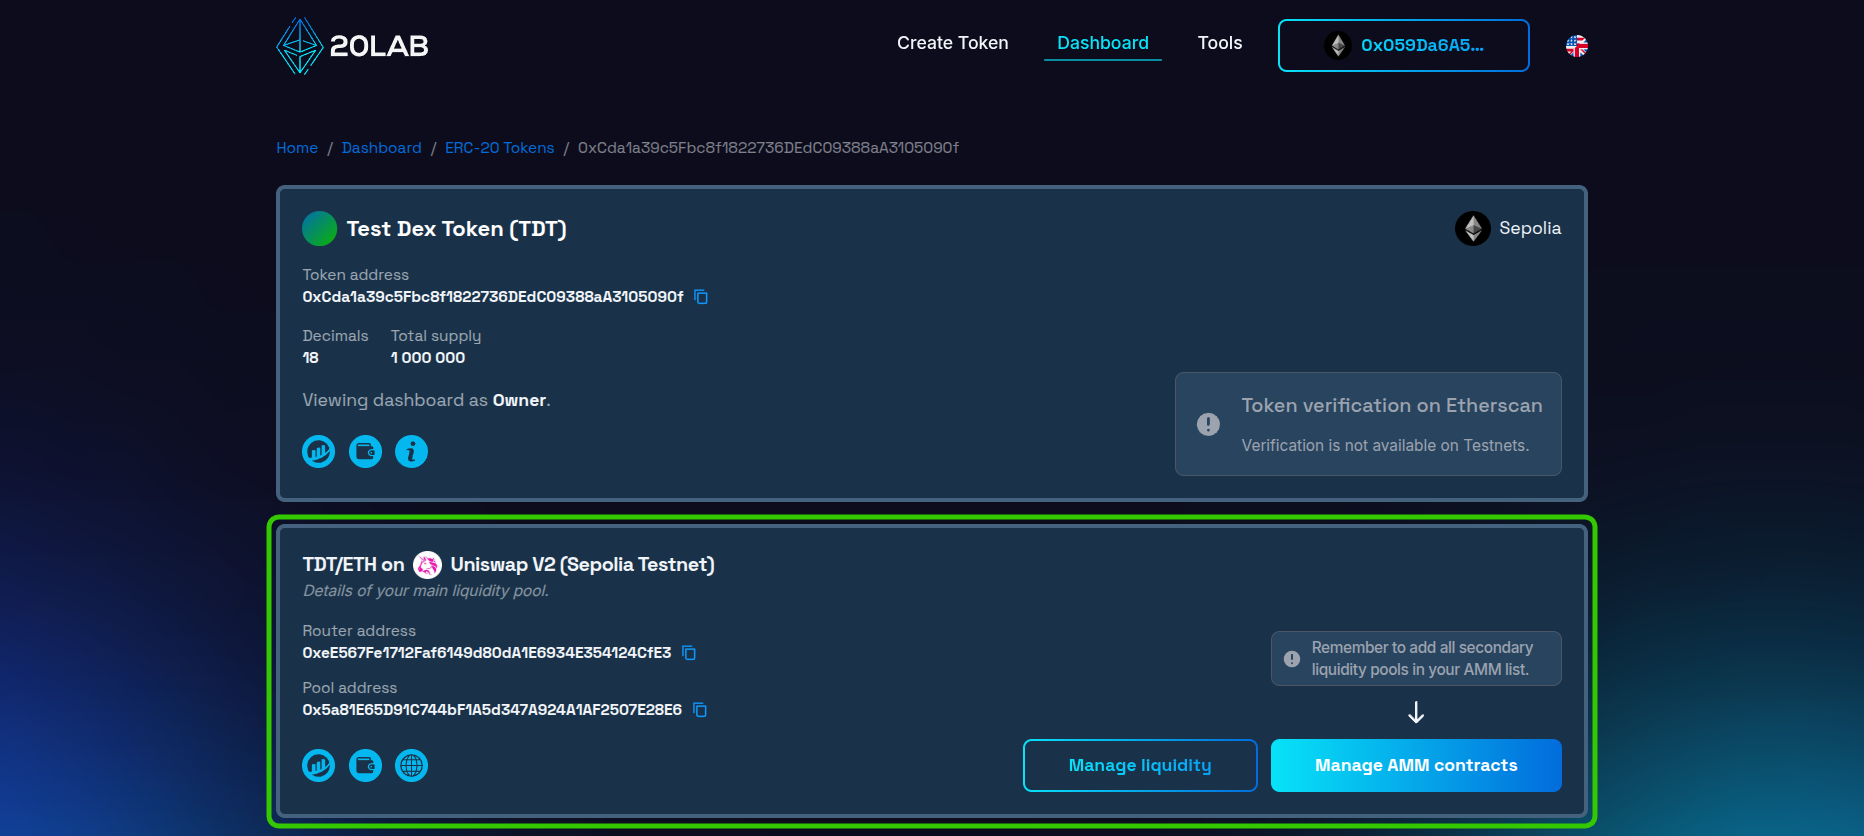
- Uniswap V2 Pre-configured: If you selected Uniswap as your default exchange when you created your token, some preparations have already been made, such as creating an empty liquidity pool and connecting it to your token so that it will be recognized correctly. You can add liquidity directly from your token dashboard.
- Manual Setup Required: If you didn't select Uniswap when creating your token, or created your token outside of 20lab, you can use ERC-20 add liquidity tool to create a new pool and manage your liquidity without switching platforms.
Adding Liquidity to Uniswap V2 with 20lab's Default Exchange Feature
If you created your token on 20lab and selected Uniswap V2 as your default exchange, you have all the foundational setup already in place. This includes an empty liquidity pool created and properly connected to your token contract.
To get started, follow these steps:
- Log into your 20lab owner dashboard.
- Find your token in the list of created tokens.
- Look for the DEX section - it should show your liquidity pool and "Uniswap V2".
- Locate the "Manage liquidity" button - after clicking, it will automatically open the tool that allows you to provide liquidity to your main pool or remove it whenever needed.
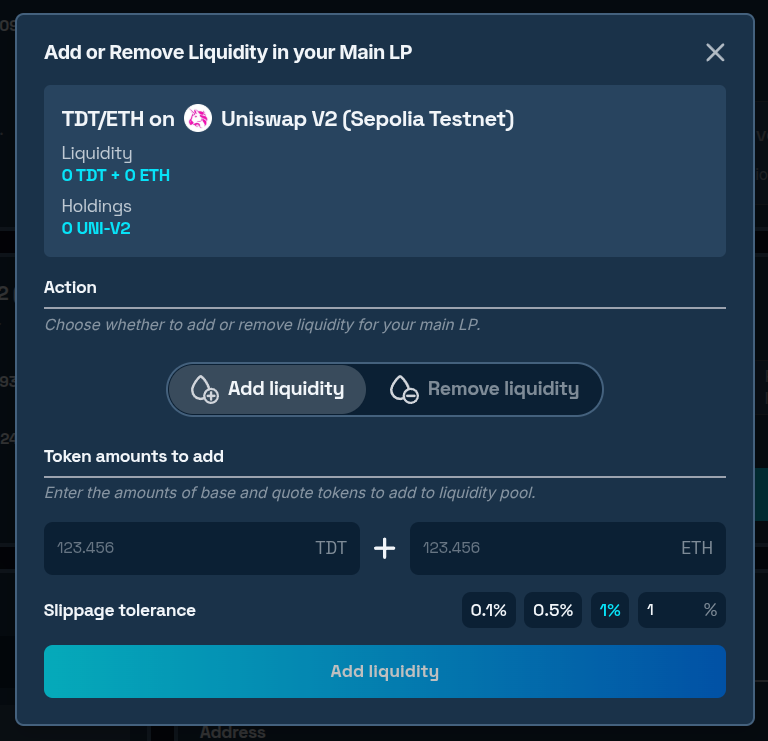
The pool is initially empty with no price assigned. To enable trading of your token, add initial liquidity:
- Input the desired amounts of both your token and native coin that you want to add.
- Sign the approval transaction to allow spending of your token using your wallet.
- Confirm the second transaction, which will add liquidity to the pool.
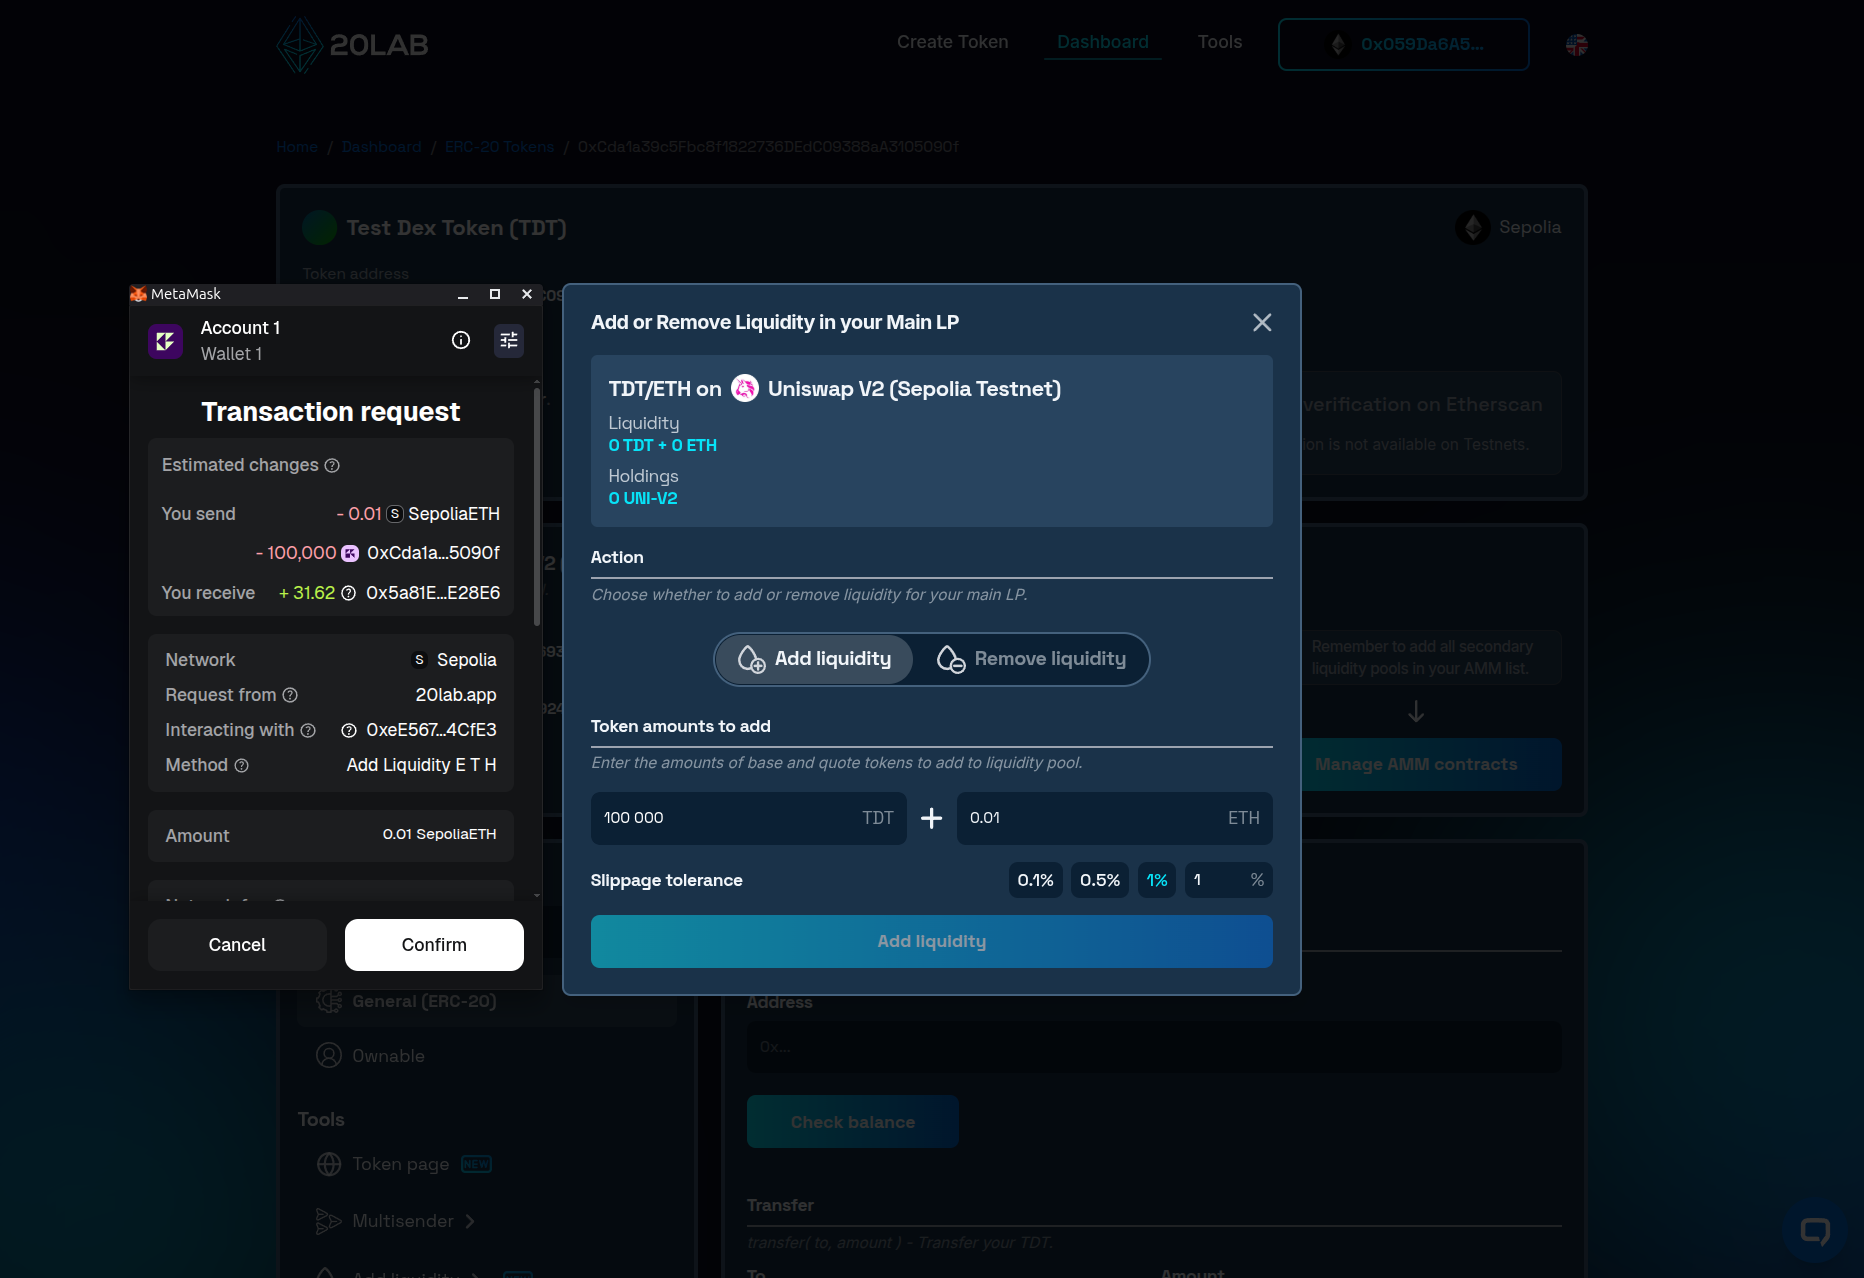
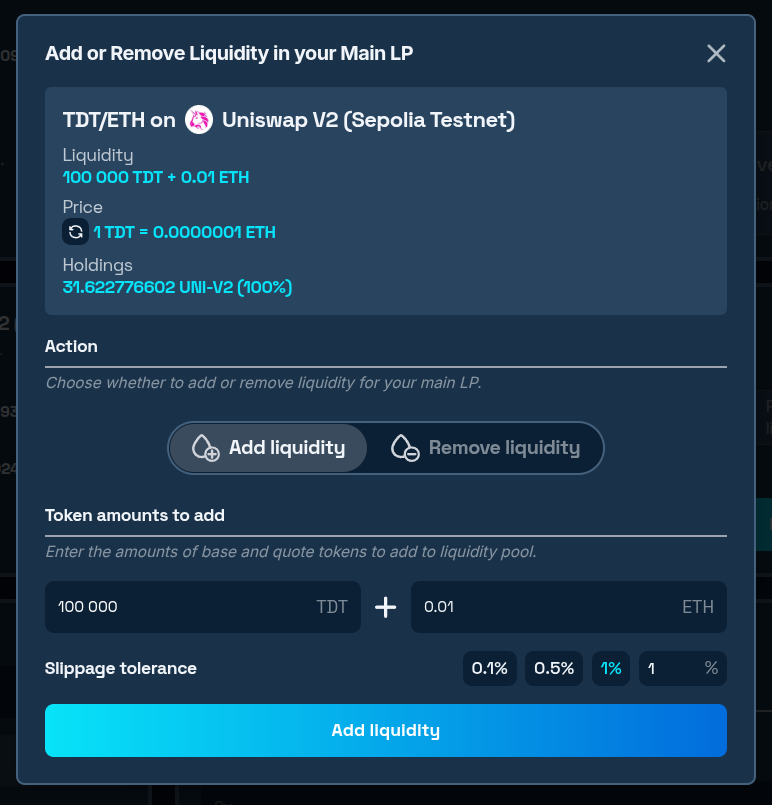
- After all transactions are confirmed, the pool information will update to reflect the added assets and a price will be assigned to your token.
In almost all cases, immediately after liquidity is added to your token, everyone will be able to trade - buy or sell your token on Uniswap. If you want to delay the start of trading and don't want to depend on the moment when liquidity is added, you can consider adding the EnableTrading function. This feature adds an owner-restricted function to control when trading should start.
How to Manually Add Liquidity to Uniswap Using 20lab's Tool
If you didn't select Uniswap as your default exchange or created your token elsewhere, you can use 20lab's add liquidity tool designed specifically for ERC-20 tokens. Here, the base token is the token you are launching, and the quote token is the asset you are pairing it with - most commonly ETH or a stablecoin.
Here's how to do it:
- Visit ERC-20 add liquidity tool.
- Enter your token's contract address as the base token and your chosen collateral (e.g. ETH) as the quote token.
- Choose the preconfigured DEX, or enter a custom one.
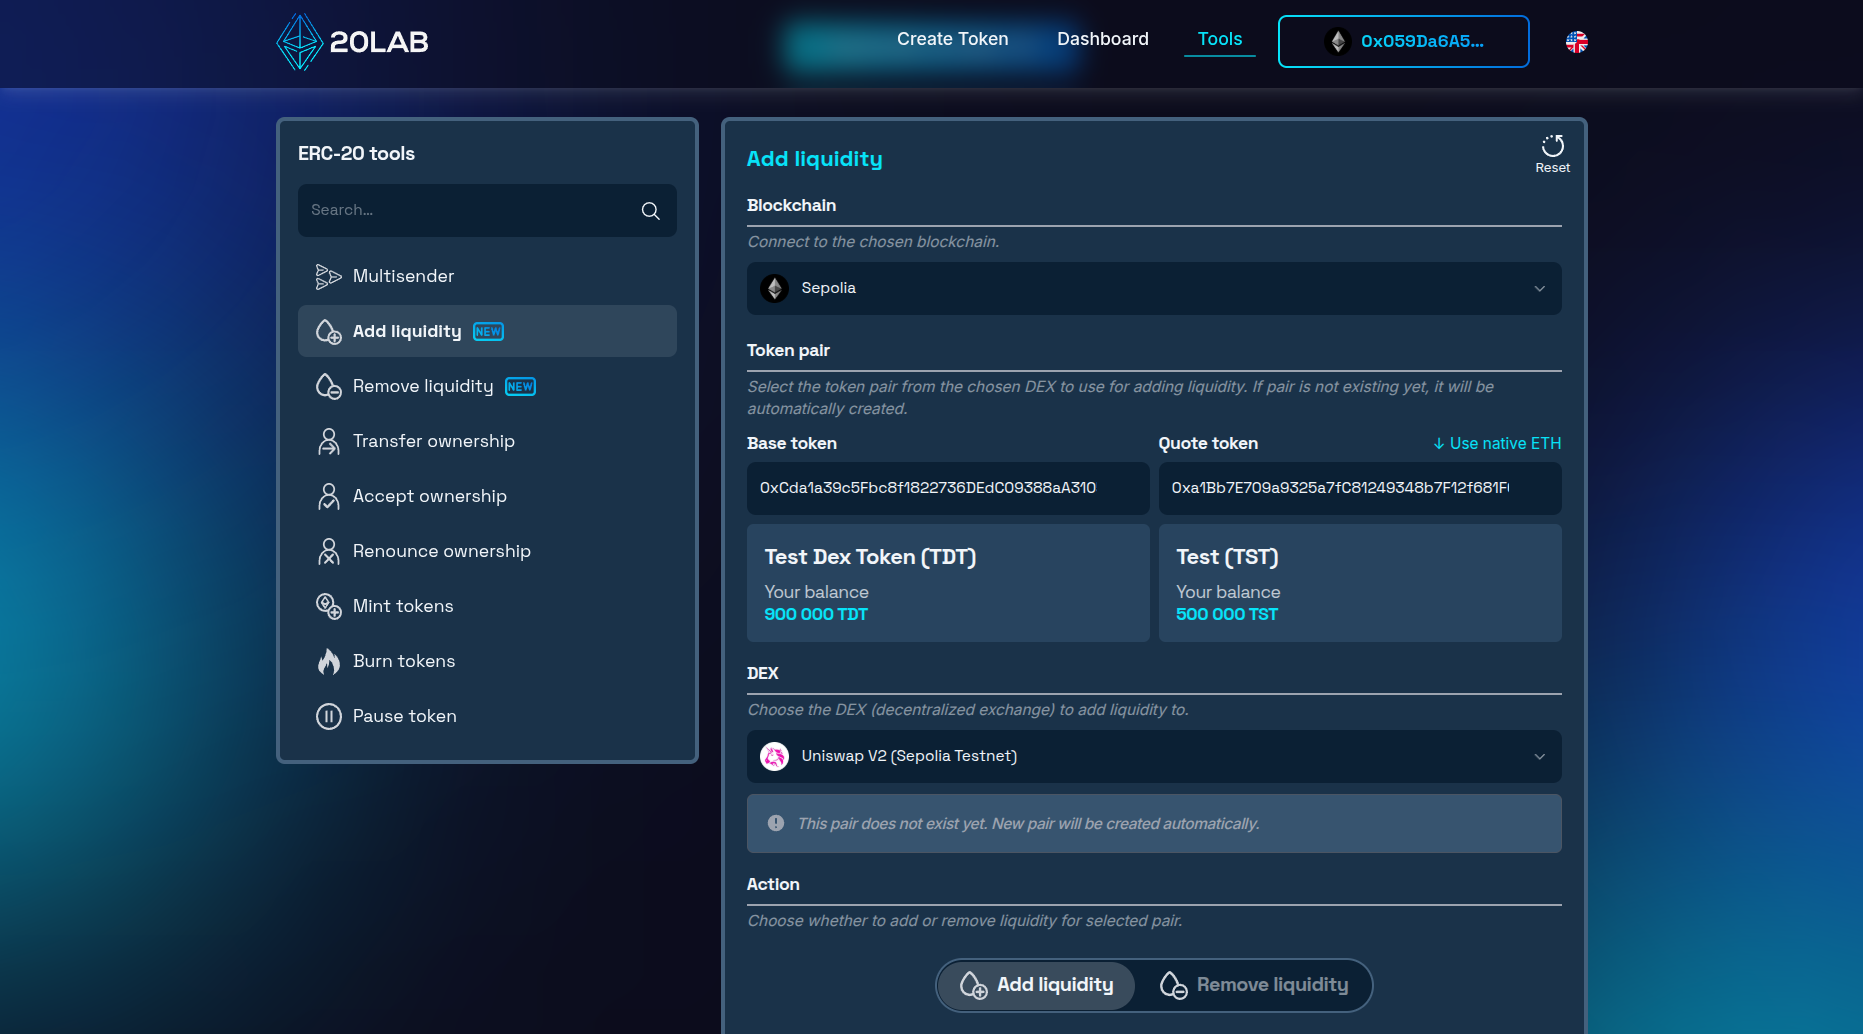
Note: If this is the first time liquidity is being added for this pair, a new pool will be created automatically alongside your initial deposit.
- Enter the desired amount of both tokens to be supplied into the new liquidity pool.
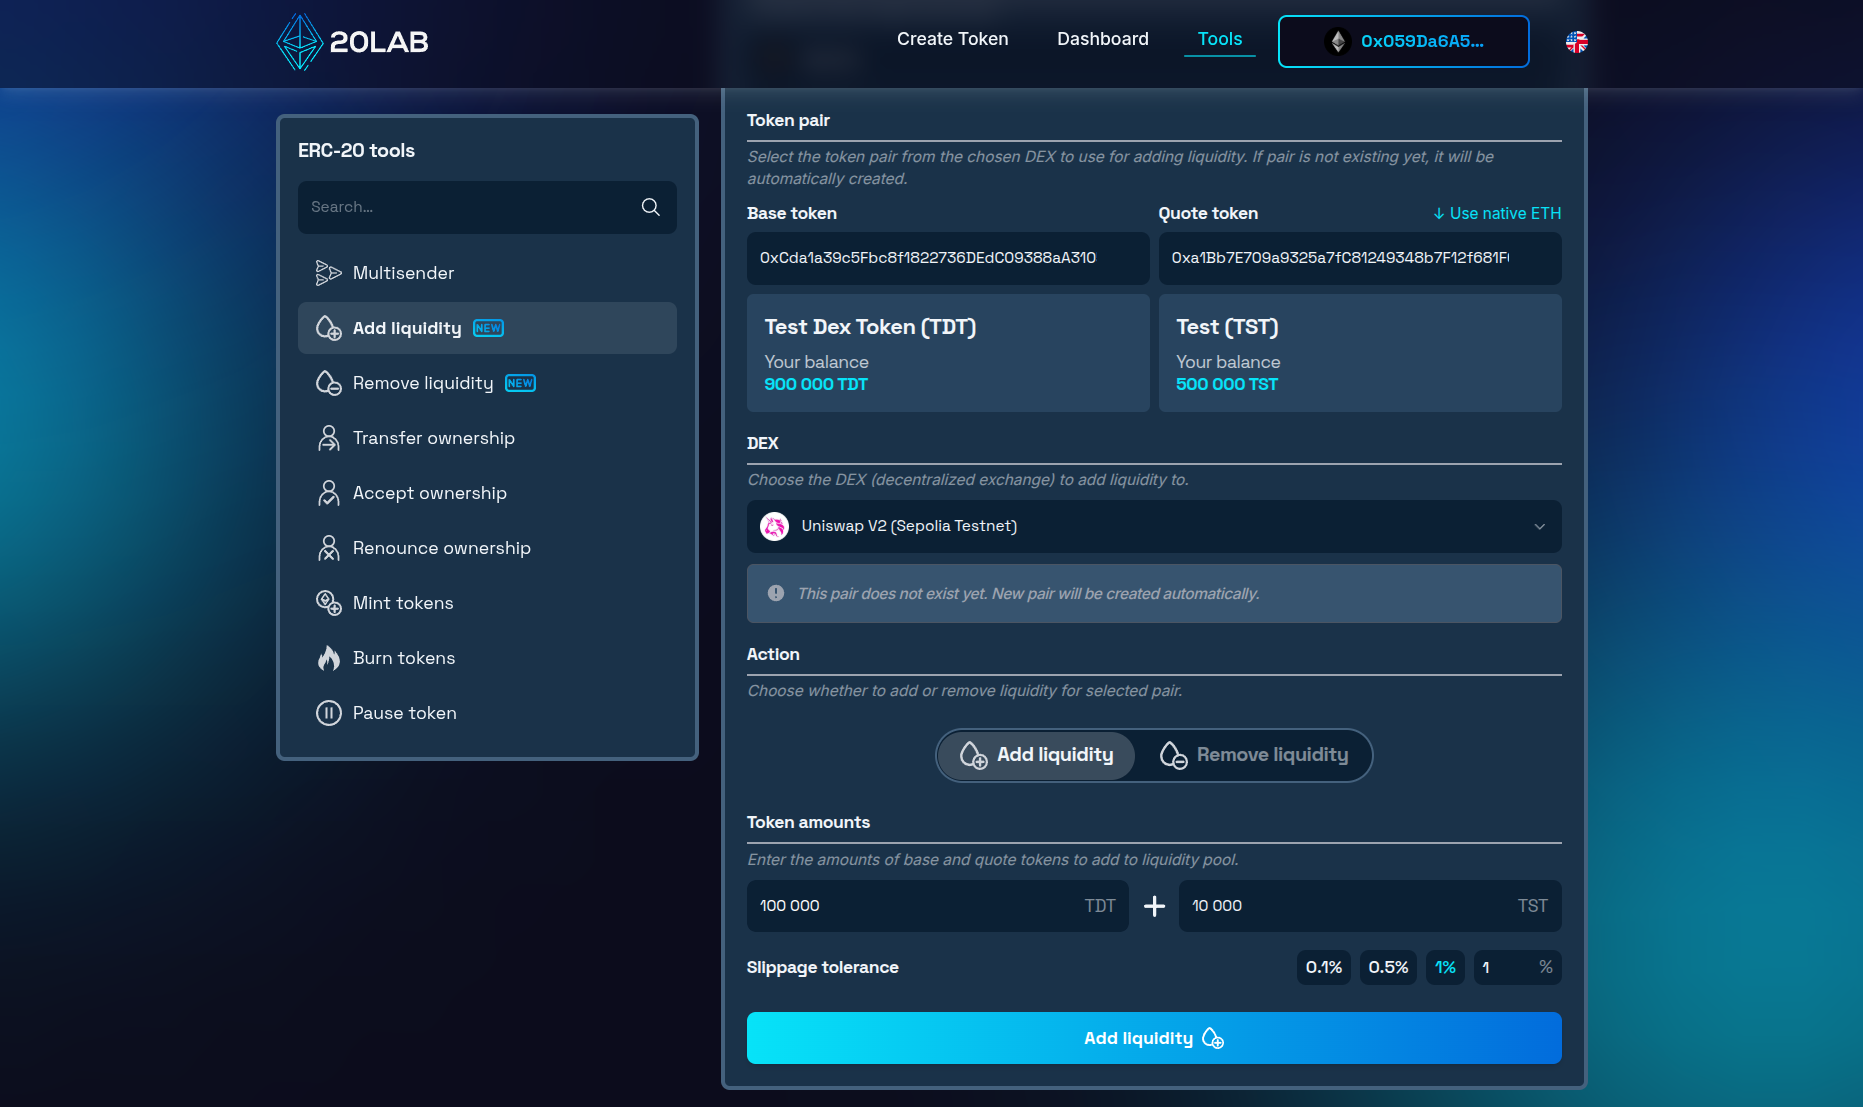
- Confirm all necessary approvals and transactions in your wallet.
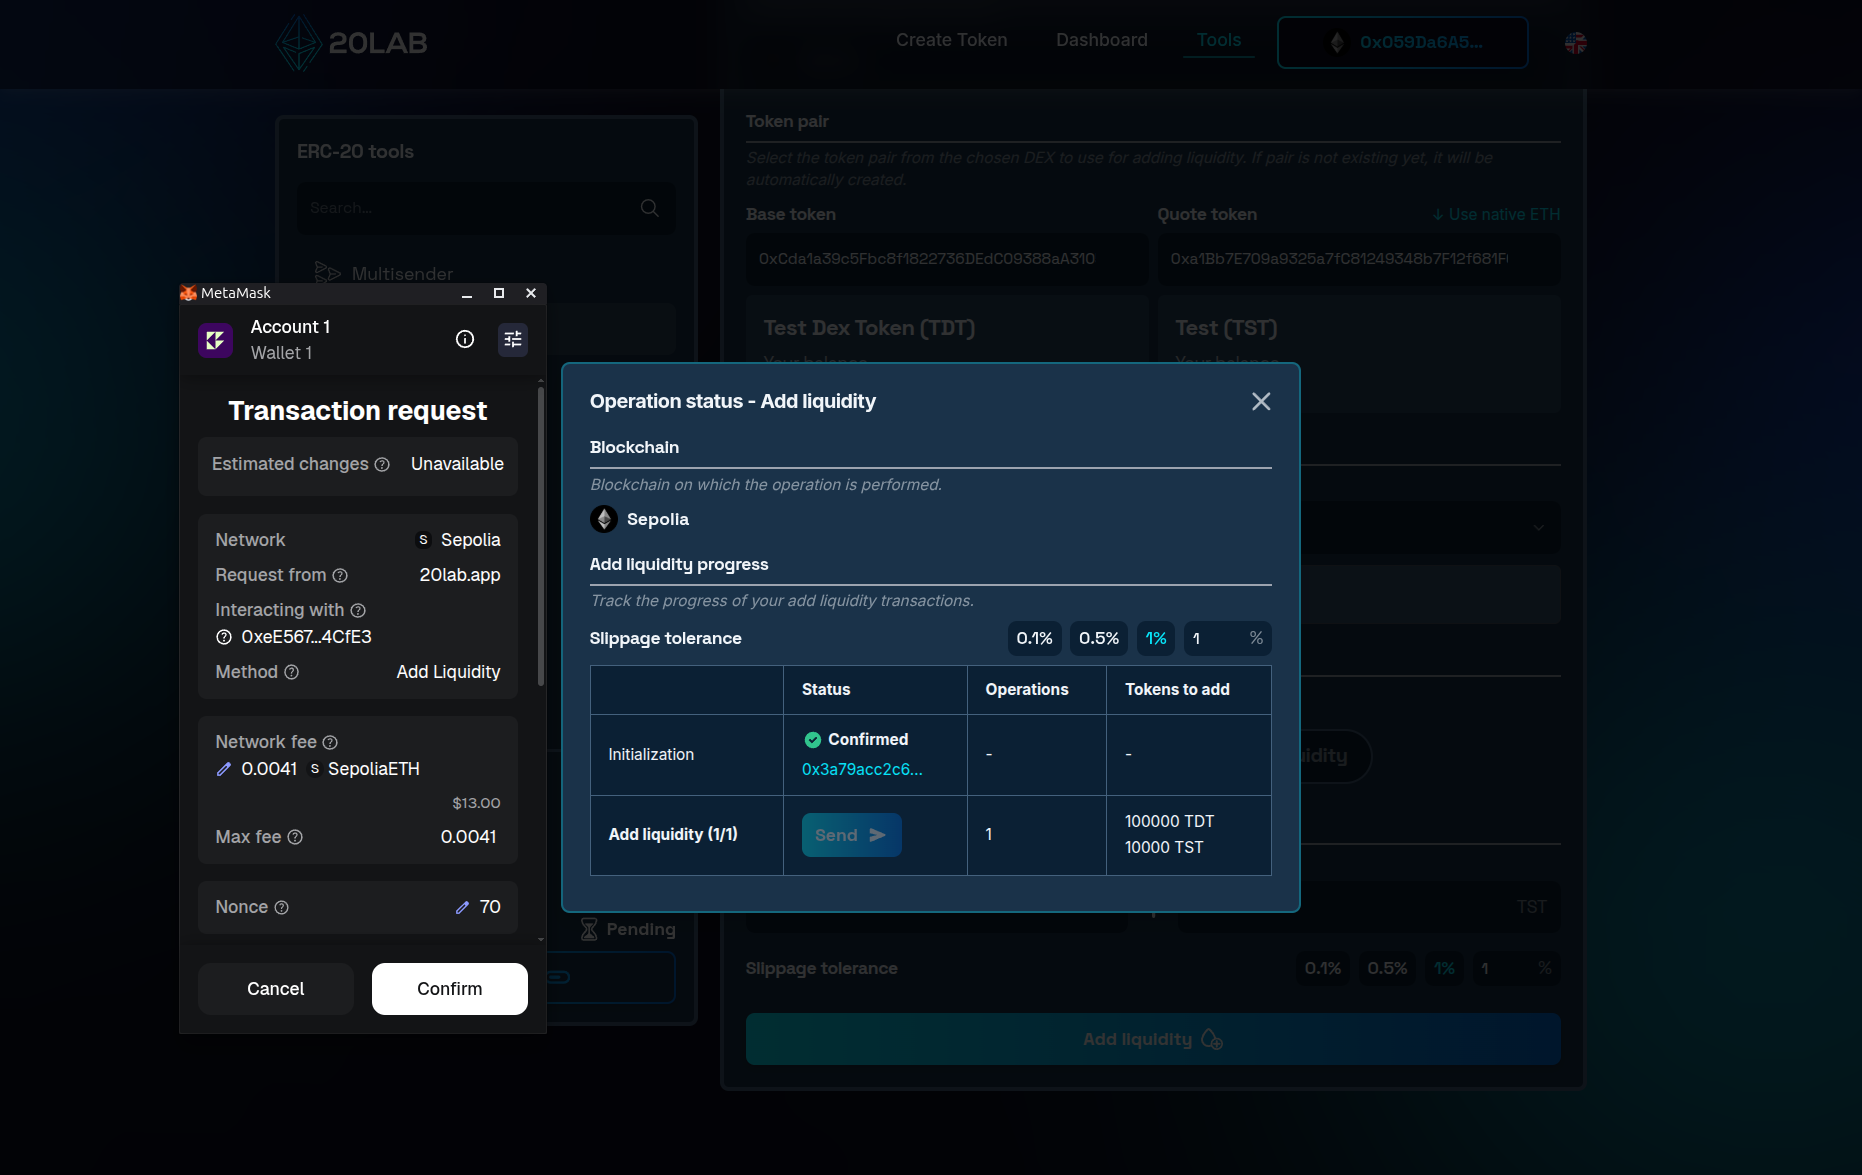
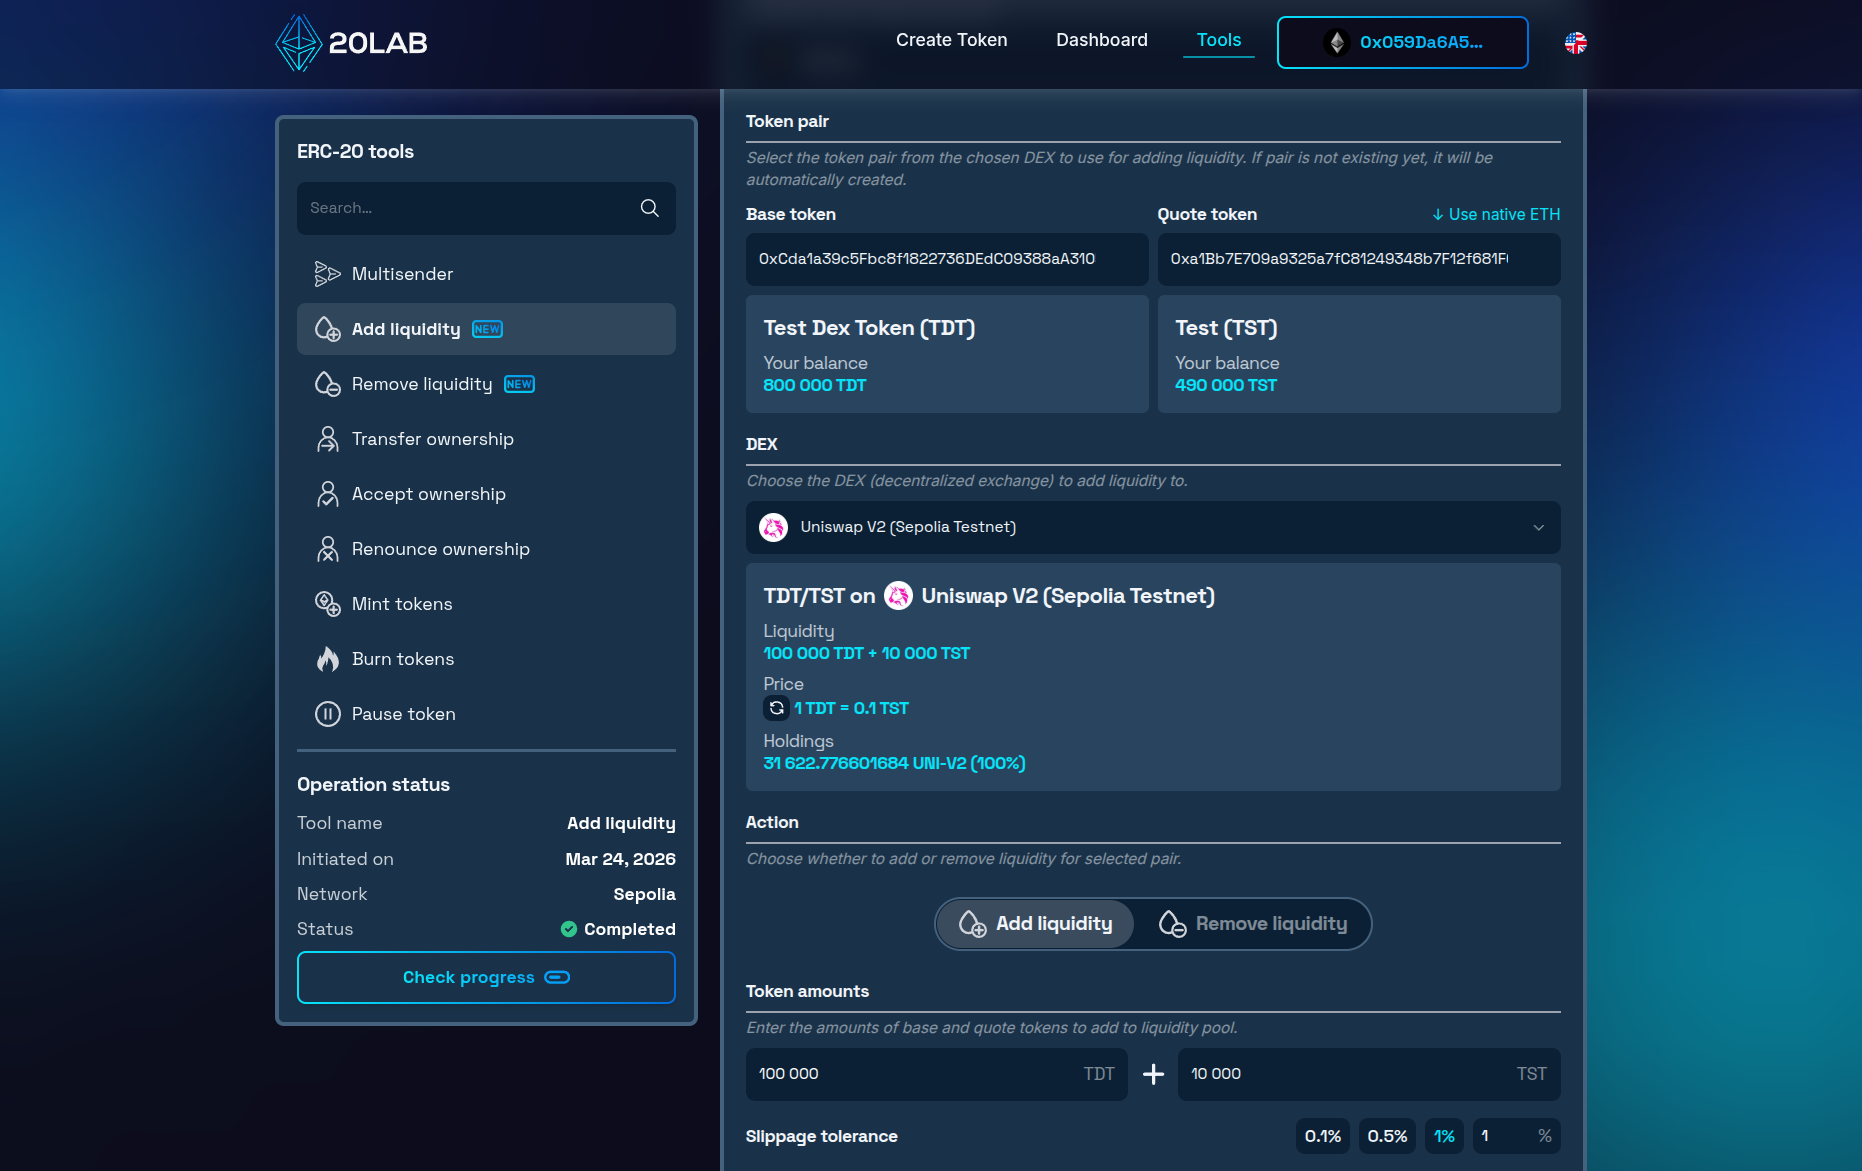
- After the operation is completed, close the window. The pool will now show the correct price and all LP tokens will be owned by your wallet.
Removing Liquidity
It's worth noting, that if you will ever need to withdraw your position, ERC-20 remove liquidity tool is here at your disposal.
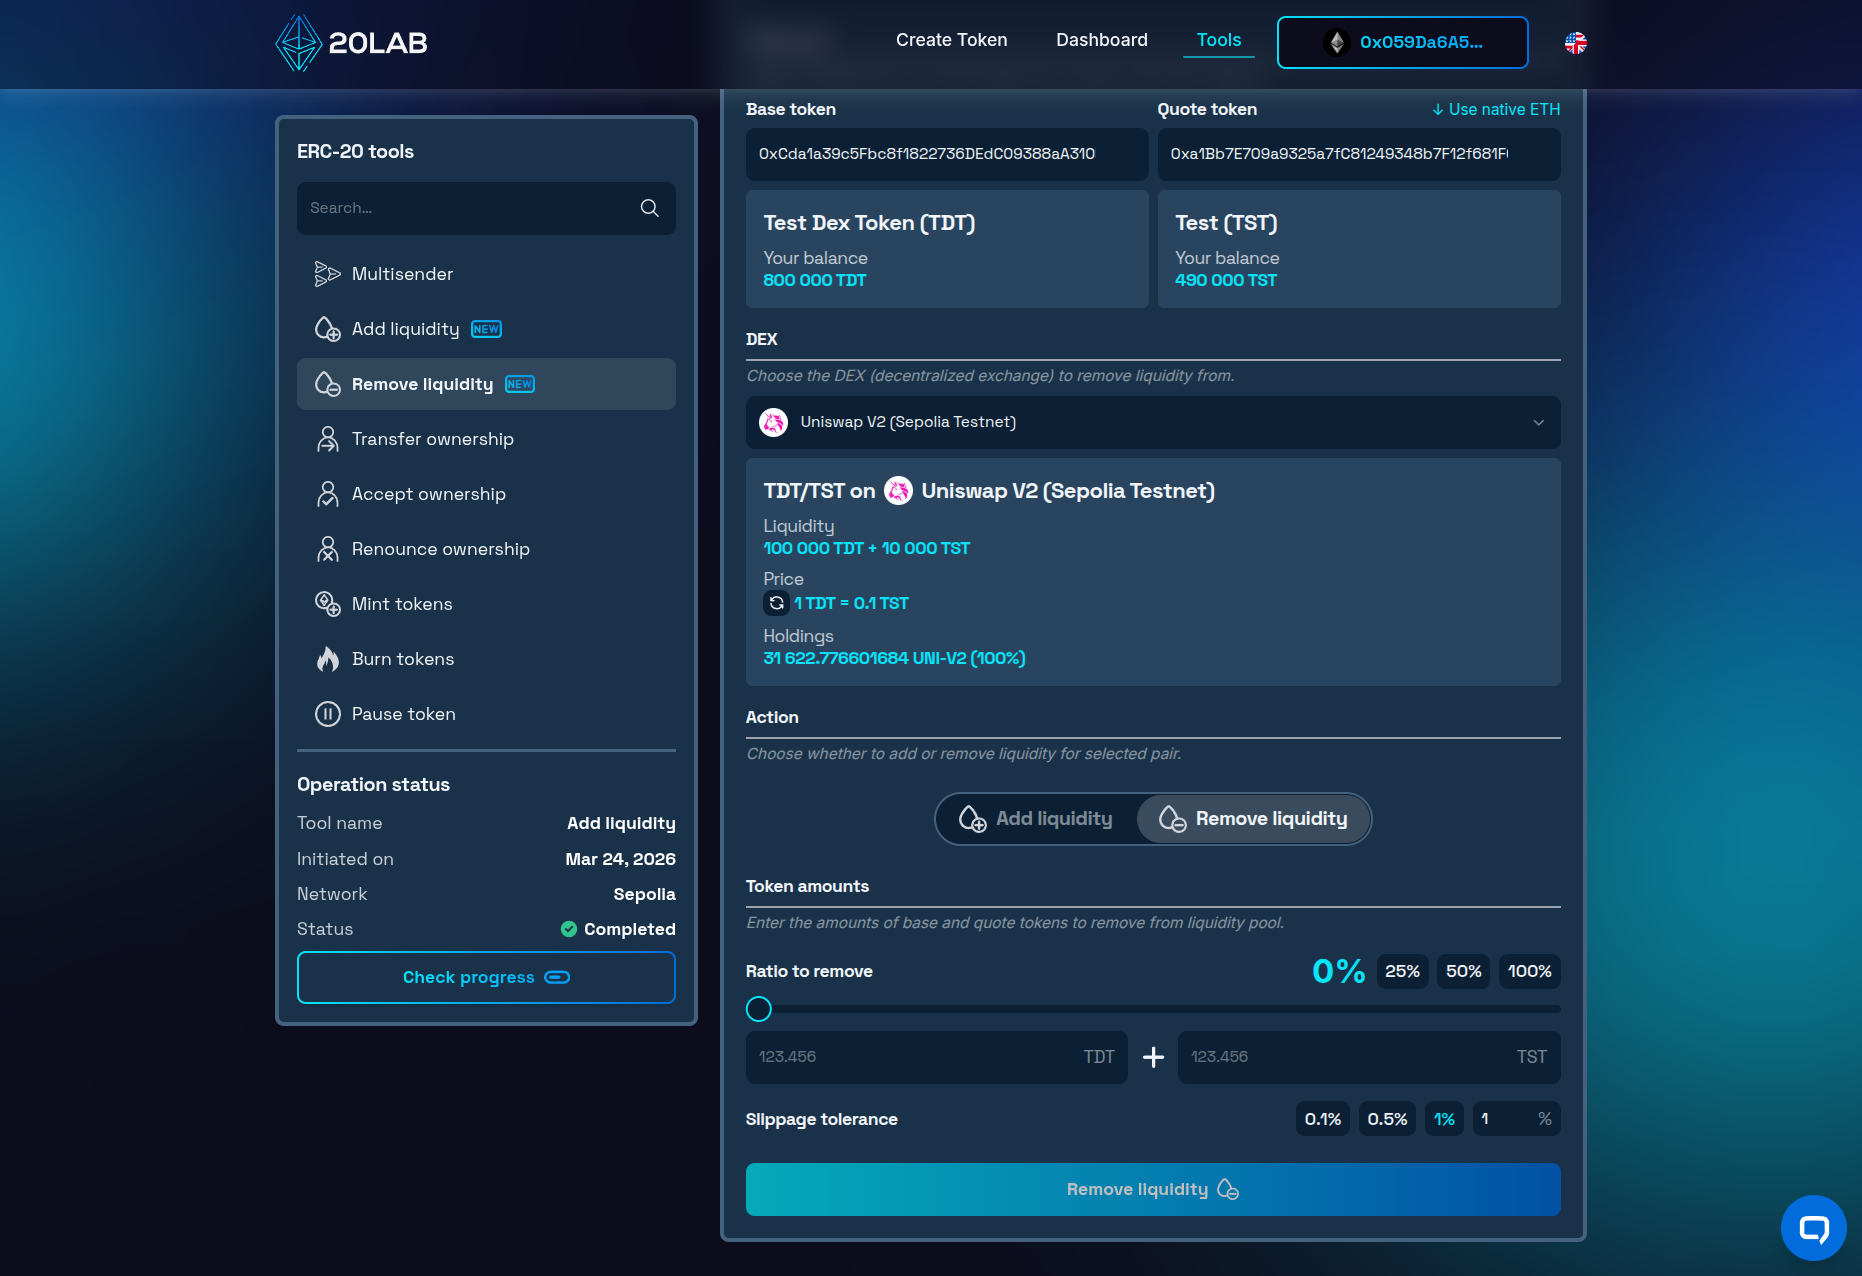
Connect your wallet, select the pool, and choose how much to withdraw - partially or in full. Your LP tokens will be exchanged back for the underlying assets and returned directly to your wallet.
Security and Launch Management
Once liquidity is added, your first move should be securing your LP tokens - leaving them in your wallet signals bad intent to potential investors. You have two options: locking them via a platform like PinkLock or Unicrypt for a set period (at least 6 months), or burning them permanently. Burning is the stronger trust signal, and 20lab's ERC-20 burn tokens tool makes it straightforward - connect your wallet, paste your pair address and burn all the LP tokens to make removing that portion of liquidity impossible.
To protect your launch from malicious actors, you can implement limits such as anti-bot cooldown, max wallet limit or max transaction limits features within your token contract. Other options might include using a blacklist to target malicious actors directly or setting higher sell fees in the first few hours after launch to decrease chances of sniping the pool.
Conclusion
When you add liquidity to Uniswap, you turn your token into a real, tradeable market - and with Uniswap V2, it's more accessible than it might seem. Its simplicity and broad compatibility, particularly for tokens with transfer fees, make it the right starting point for most token launches. With 20lab's ERC-20 add liquidity and ERC-20 remove liquidity tools, you can manage your positions from start to finish without switching platforms.
For more support with 20lab's token creation and liquidity pools, join our Telegram channel. Our team is here to help you succeed.


