
In the crypto world, creating an ERC-20 token with dividend capabilities has become a game-changer for many blockchain projects. The ability to distribute rewards directly to token holders isn't just a novel feature - it's a powerful tool for building community engagement, incentivizing long-term ownership and creating sustainable tokenomics.
Dividend-enabled ERC-20 tokens represent a significant leap forward in the digital asset space. By automatically sharing a portion of transaction fees or other revenue streams with token holders, these smart contracts foster a sense of ownership and participation among community members. This mechanism can increase loyalty, reduce selling pressure, and create a more stable token ecosystem.
Whether you're a blockchain developer, startup founder, or enthusiast looking to launch your own cryptocurrency project, understanding how to create an ERC-20 token with dividends is critical. This feature can make your token stand out in a crowded market, provide valuable benefits to your holders, and potentially attract more investors.
Why Dividends Matter
Including dividends in your ERC-20 token can be a game-changing decision. As more projects explore innovative ways to create ERC-20 tokens, dividend functionality has emerged as a powerful feature that can significantly impact a token's success and adoption. Let's explore why dividend taxation is important:
Rewarding Token Holders
At its core, a dividend token creates a direct reward system for its holders. Unlike traditional ERC-20 tokens, which can only gain value through market appreciation, dividend tokens provide a tangible, ongoing benefit to those who hold them. This reward mechanism allows for the distribution of a portion of transaction fees, effectively making token holders stakeholders in the success of the project.
Encourage Long-term Ownership
One of the most significant benefits of implementing a token reward system is its ability to incentivize long-term ownership. By offering regular dividends, projects can reduce selling pressure and create a more stable token economy. This feature is particularly attractive to investors looking for passive income opportunities in the cryptocurrency space, potentially leading to a more committed and engaged community.
Differentiate Your Project
In a market saturated with countless ERC-20 tokens, offering dividends can be a key differentiator. When potential investors are researching how to create ERC-20 tokens or comparing different projects, the presence of a well-designed dividend structure can be a compelling factor in their decision-making process.
Reward Distribution Flexibility
ERC-20 tokens with dividends offer flexibility in how rewards are distributed. Whether you choose to distribute rewards in the native token, a stablecoin, or even the blockchain's native cryptocurrency, you can tailor the dividend structure to best suit your project's goals and your community's preferences.
Creating Your ERC-20 Token with Dividends
Now that we understand the importance of dividends in ERC-20 tokens, let's dive into the practical aspects of creating your own dividend-enabled token. While the process of creating an ERC-20 token with dividends can be complex, tools like 20lab's ERC-20 token generator simplify this task significantly. 20lab provides a user-friendly interface that allows you to configure your dividend token without deep programming knowledge, making it accessible for both beginners and experienced developers alike.
In this section, we'll walk through the key steps and considerations when using 20lab to create your ERC-20 token with a dividend mechanism. We'll explore how to set up the dividend tax, configure distribution parameters, and ensure your token reward system aligns with your project's goals. Moreover, creating such a token will take as little time as reading this post!
Step 1: Initiating Your ERC-20 Token Creation
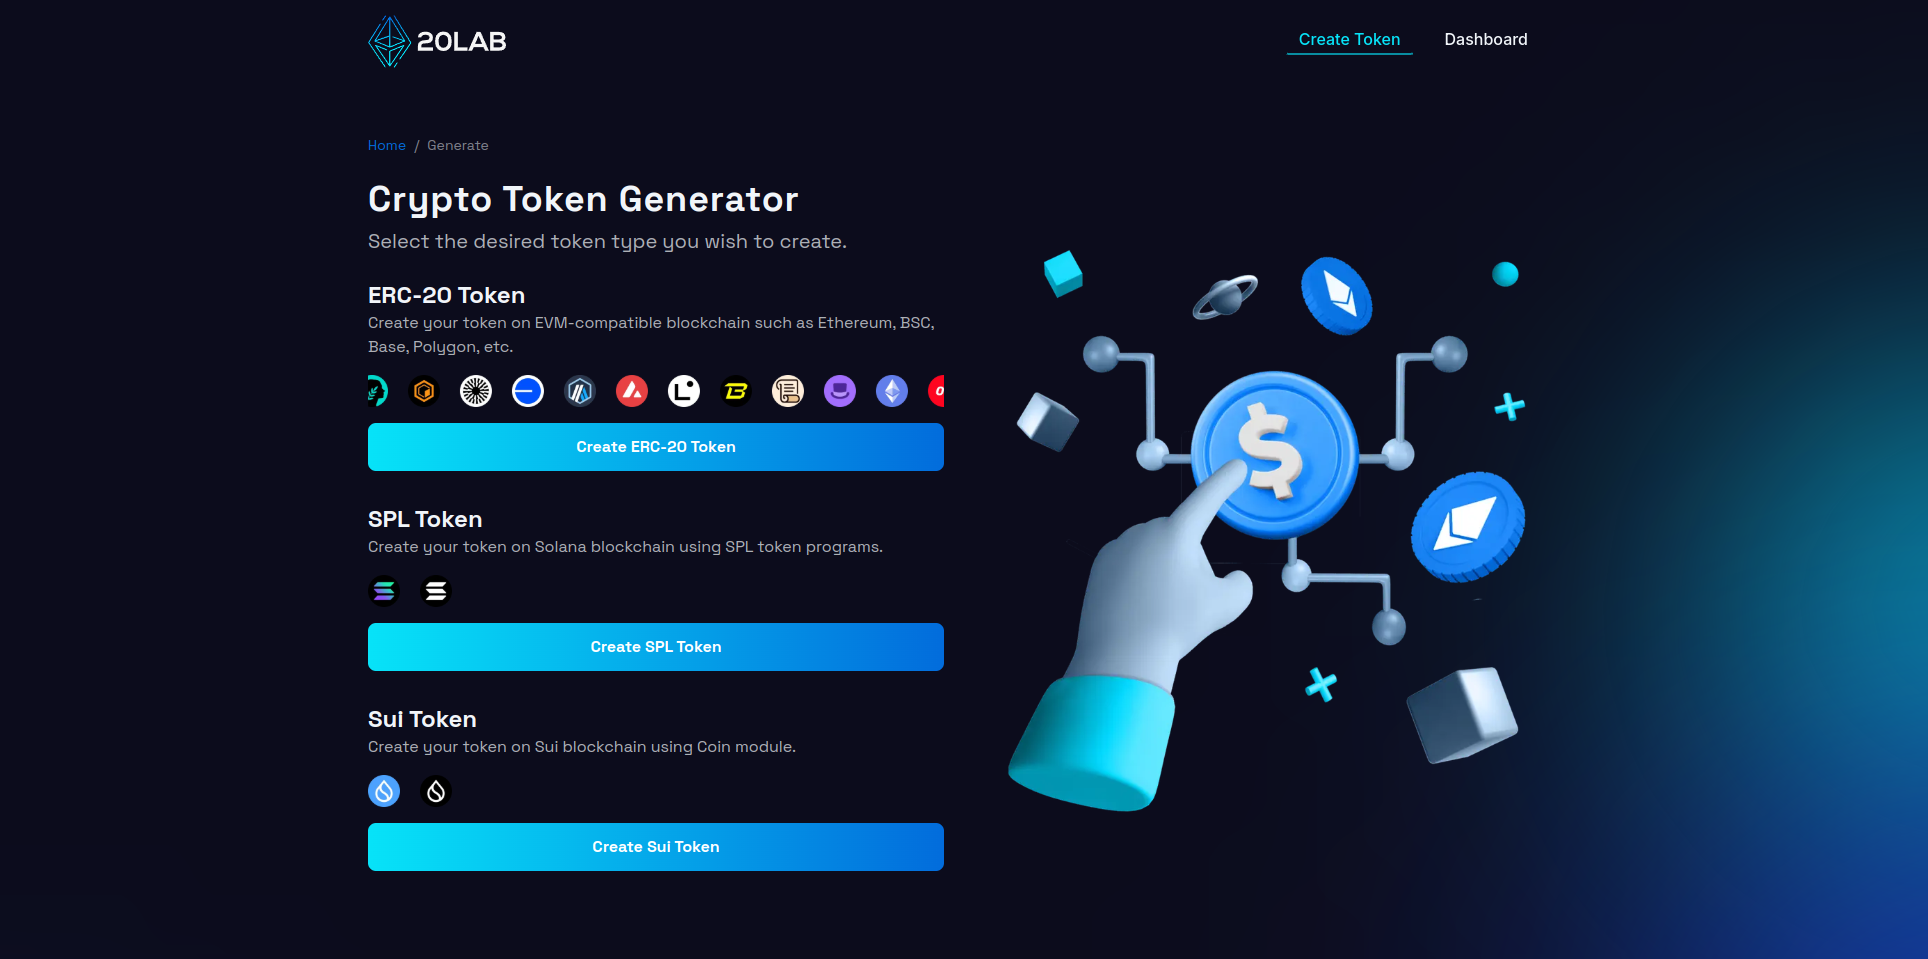
First, visit 20lab.app and navigate to the generator page. Click on "Create ERC-20 Token" to start the process.
Once there, the next critical step is to connect your Web3 wallet to the 20lab platform. This connection unlocks the token creation tools. 20lab supports a variety of popular wallets, including MetaMask, Coinbase Wallet, and Trust Wallet. Once connected, your wallet address will appear in the top right corner to confirm successful integration.
Before proceeding, make sure you're on the appropriate blockchain network:
- For production tokens, select the desired Mainnet,
- For testing purposes, choose a suitable Testnet.
20lab offers a range of popular blockchains, allowing you to select one that aligns with your project requirements. Consider factors such as:
- Transaction costs,
- Network speed,
- Ecosystem compatibility,
- Target audience preferences.
Your choice of blockchain will significantly impact your token's functionality and adoption, so carefully evaluate your options based on your project's specific needs and long-term objectives.
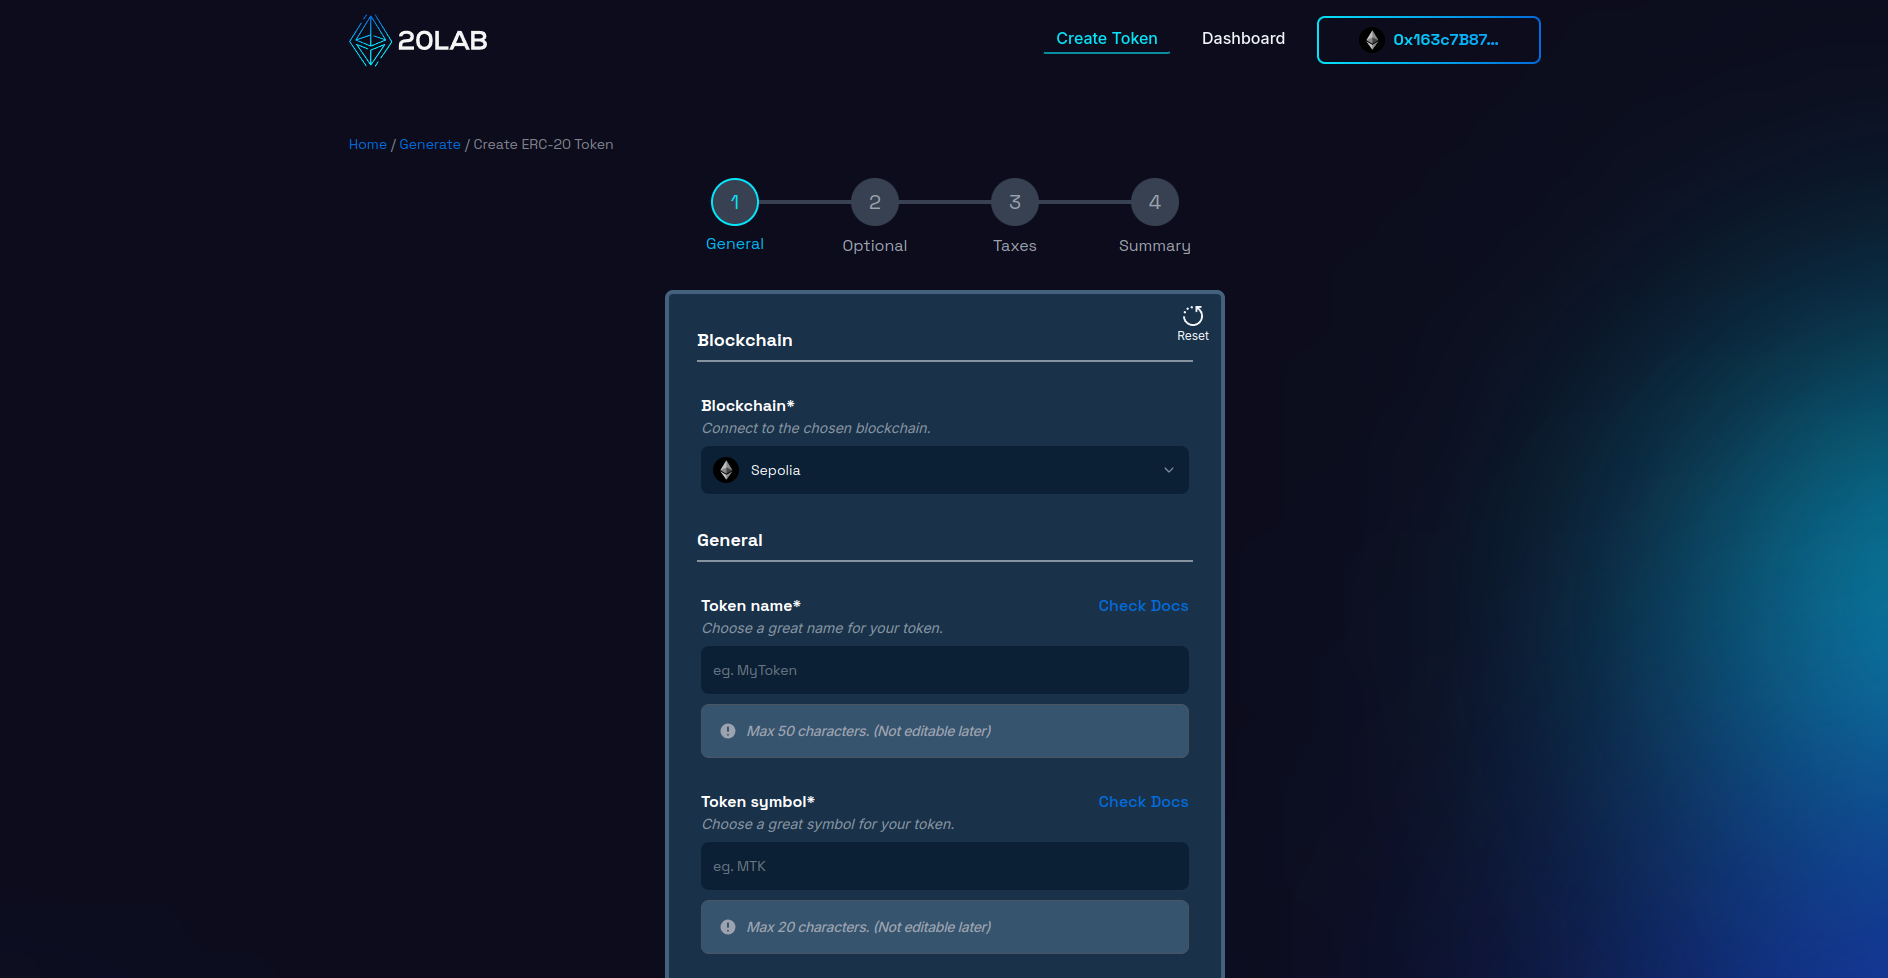
Step 2: Establishing Your ERC-20 Token's Core Parameters
This phase is critical because it defines the essential attributes of your ERC-20 token. Start by creating a distinctive and meaningful name for your token, accompanied by a short, memorable ticker symbol. It's a good idea to do some research to ensure that your chosen identifiers are unique in the crypto space.
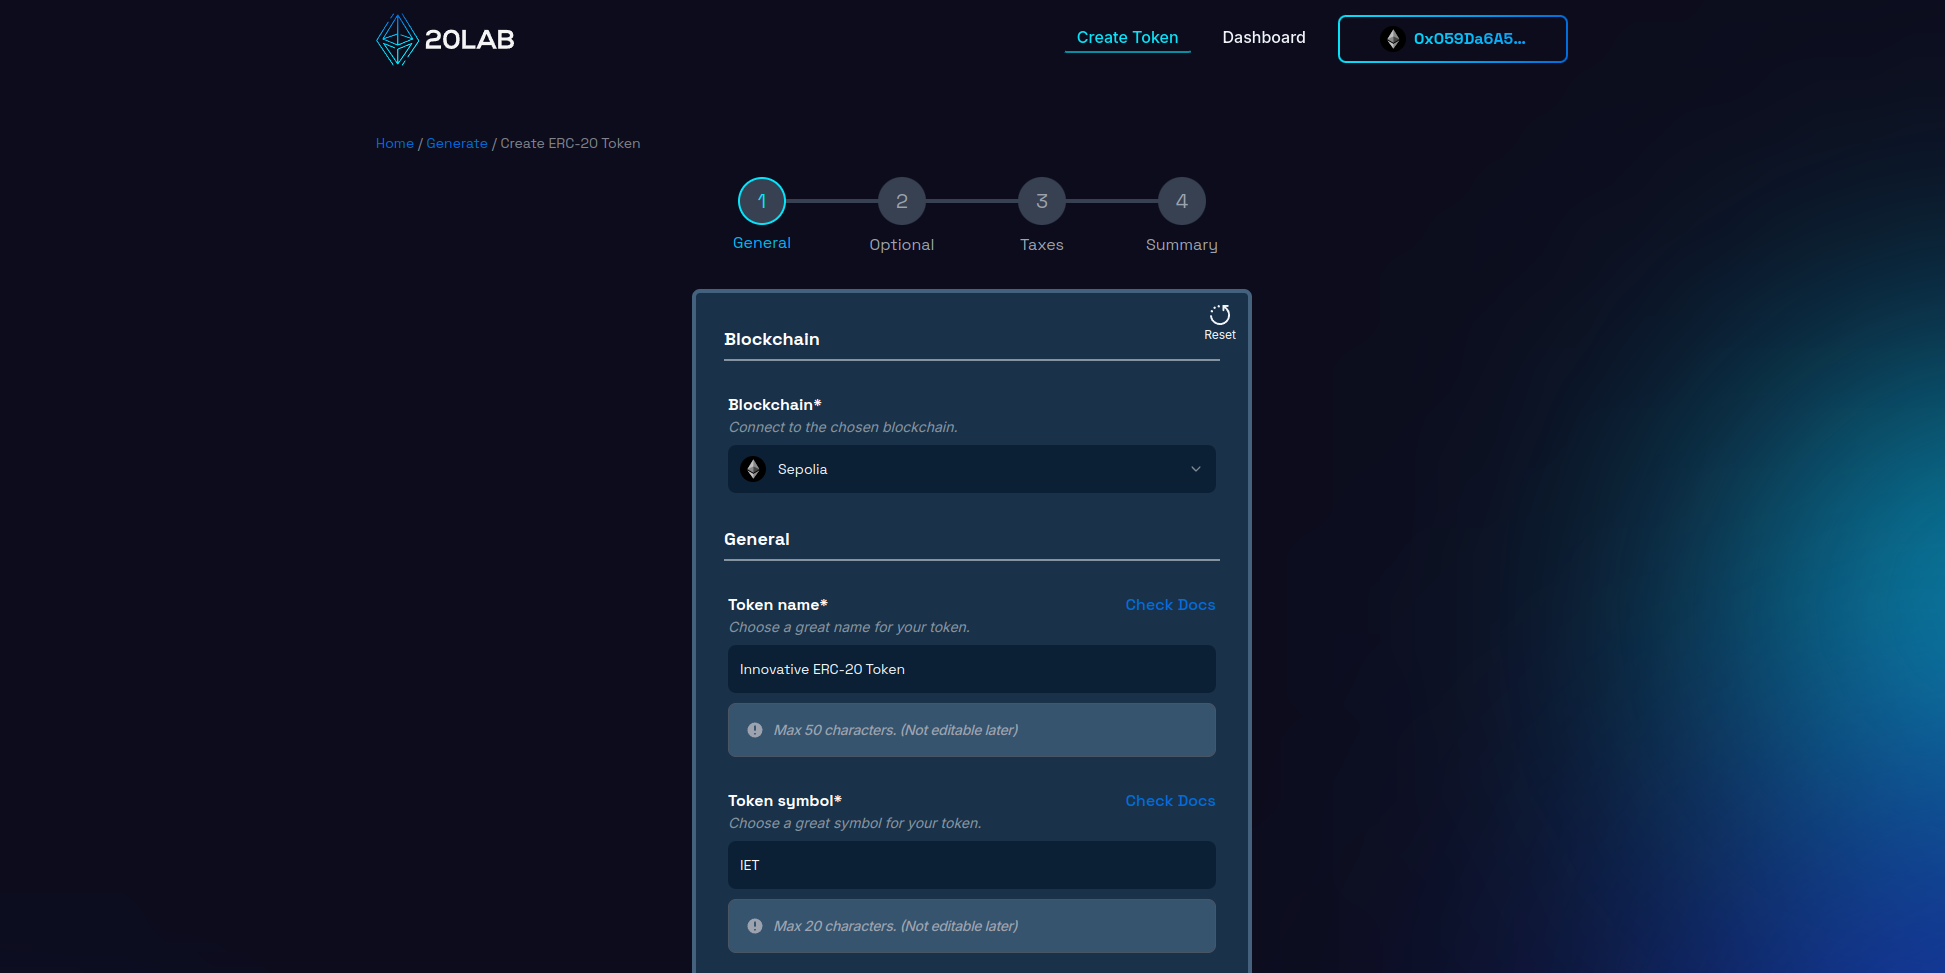
Next, specify the total supply of tokens. For example, setting a supply of 100,000,000 tokens can provide sufficient liquidity while maintaining a sense of scarcity.
Determine the divisibility of the token by setting the number of decimal places. The industry standard for ERC-20 tokens is 18 decimal places, mirroring the divisibility of Ethereum and other major cryptocurrencies. This level of precision facilitates microtransactions and fine-tuned token economics.
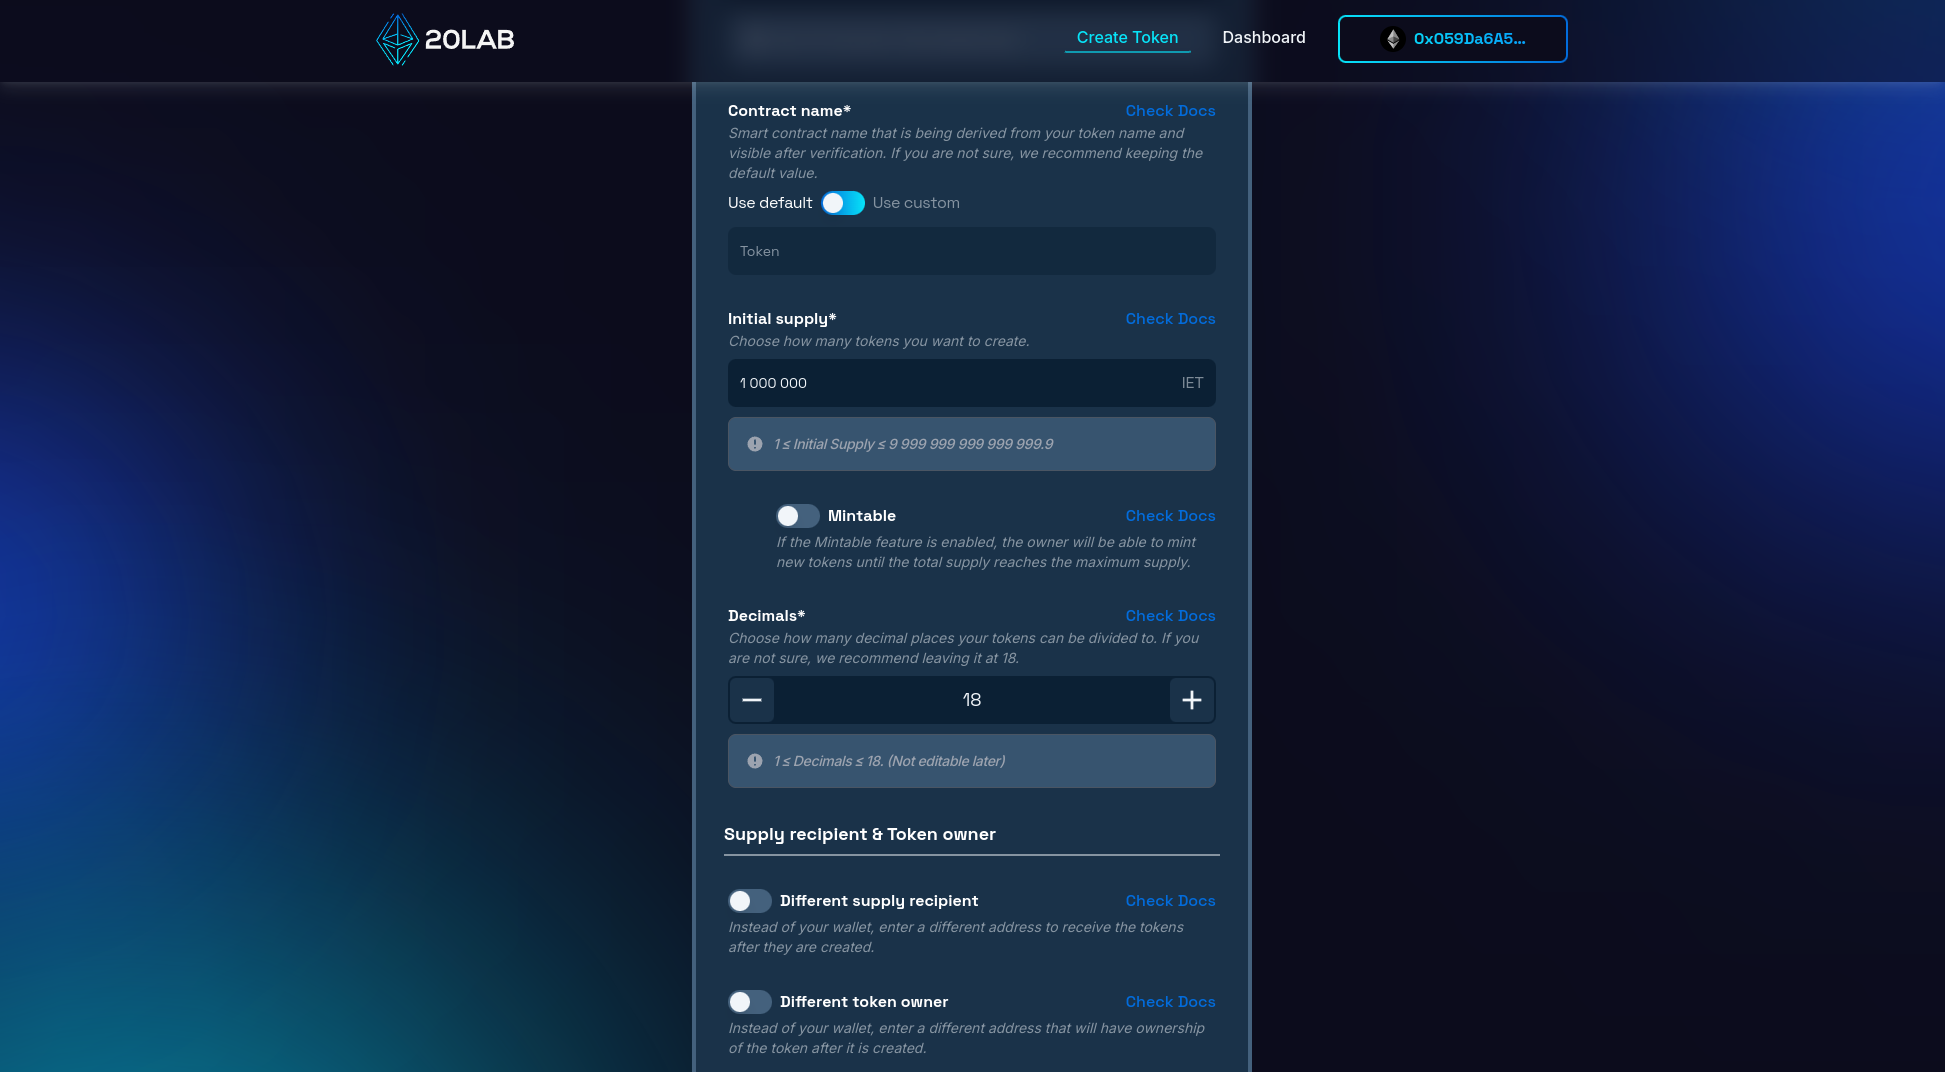
You have the option to specify a unique contract name that will be the identifier for your smart contract on Block Explorer after verification. This can be the same as your token name or a more technical name such as "InnovativeTokenV1".
Critical decisions include selecting the wallet to receive the initial token supply and determining the token owner. The supply recipient will hold the entire token allocation at launch, which can be your personal wallet or a dedicated project wallet. The token owner will have administrative rights to owner-restricted functionality. While this is often the same as the deployer, it can be a separate address if desired. For added security, consider implementing a multi-signature wallet.
These basic settings shape the identity and operational framework of your token. Make informed choices, taking into account your project's long-term goals and scalability potential. Decisions made at this stage will affect your token's perception, utility, and integration capabilities with decentralized applications, ultimately impacting the user experience.
Step 3: Implementing Dividends
Now that you've set up the basic parameters of your ERC-20 token, it's time to implement the dividend feature. 20lab's token generator makes this process easy and allows you to customize your tax structure according to the needs of your project. Navigate to the "Taxes" page of the creation form on the 20lab platform and find the "Dividend tax" section.
If you cannot find this section, please make sure to enable the default exchange first. It will be necessary to continue with the following steps.
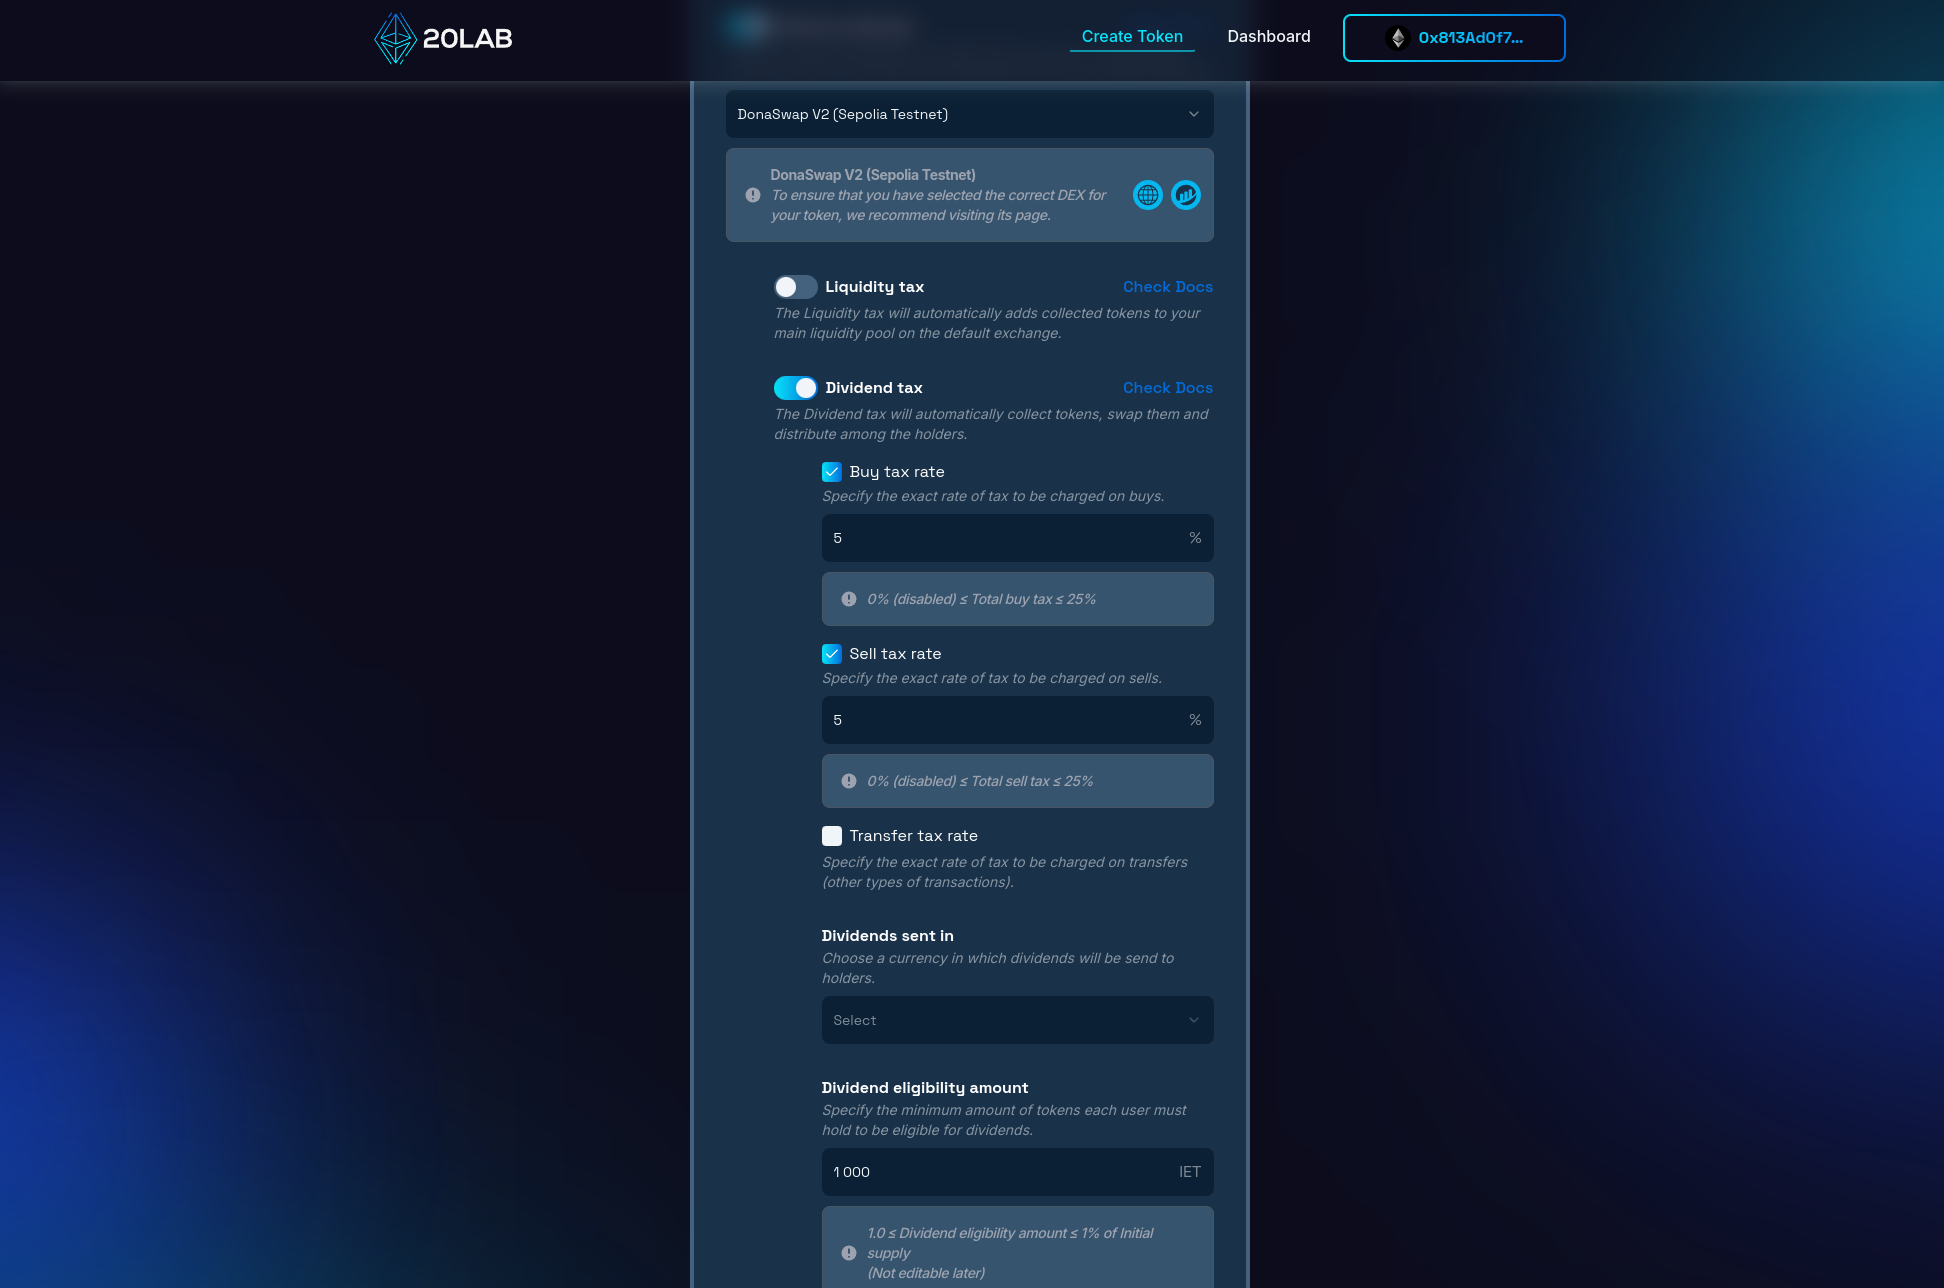
Configuring the Dividend Tax
The cornerstone of your token's dividend mechanism is the dividend tax. This feature allows you to automatically allocate a portion of each transaction for distribution to token holders. Here's how to set it up:
- Choose your dividend currency: First, decide whether dividends will be distributed in the native blockchain coin (e.g., ETH) or a custom token. This choice is permanent, so think carefully about your project's long-term goals.
- Set transaction fees: Configure the percentage of each transaction that goes to dividends. You can set different rates for purchases, sales, and transfers (all other token movements).
- Dividend eligibility amount: Set the minimum number of tokens a holder must own to qualify for dividends. This threshold helps prevent dust accounts from clogging up the distribution process.
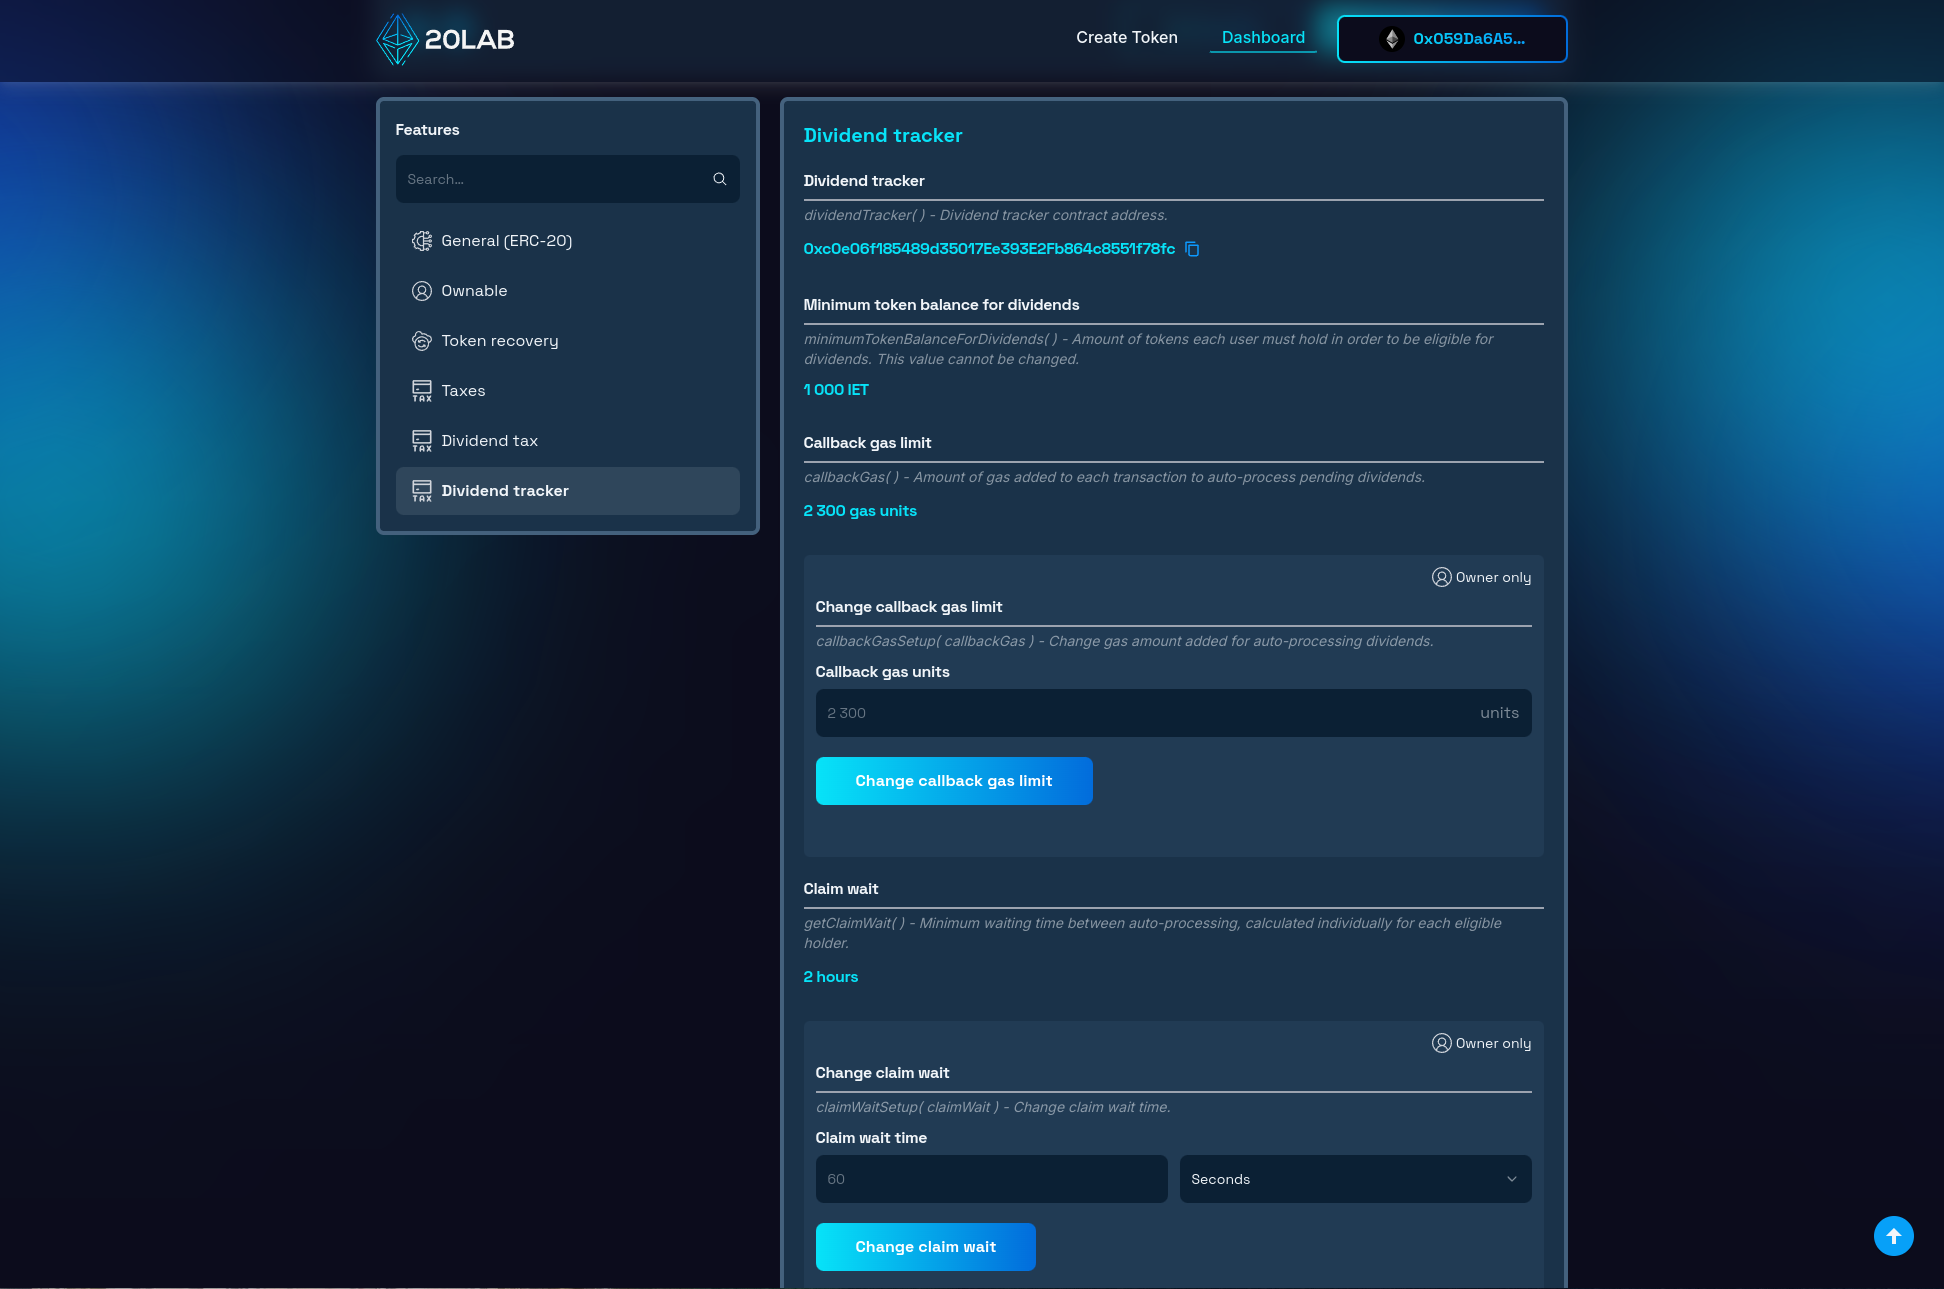
Auto Claim Settings
To optimize the dividend distribution process, you'll also need to configure the auto-claim settings:
- Auto-claim interval: Specify how often the contract will attempt to automatically distribute accumulated dividends.
- Gas for auto-claims: Specify the amount of gas to be allocated for each auto-claim attempt. This setting balances distribution frequency with gas costs.

If you're not sure, use the recommended default settings. Remember, holders can always manually claim their distributions regardless of these auto-claim settings.
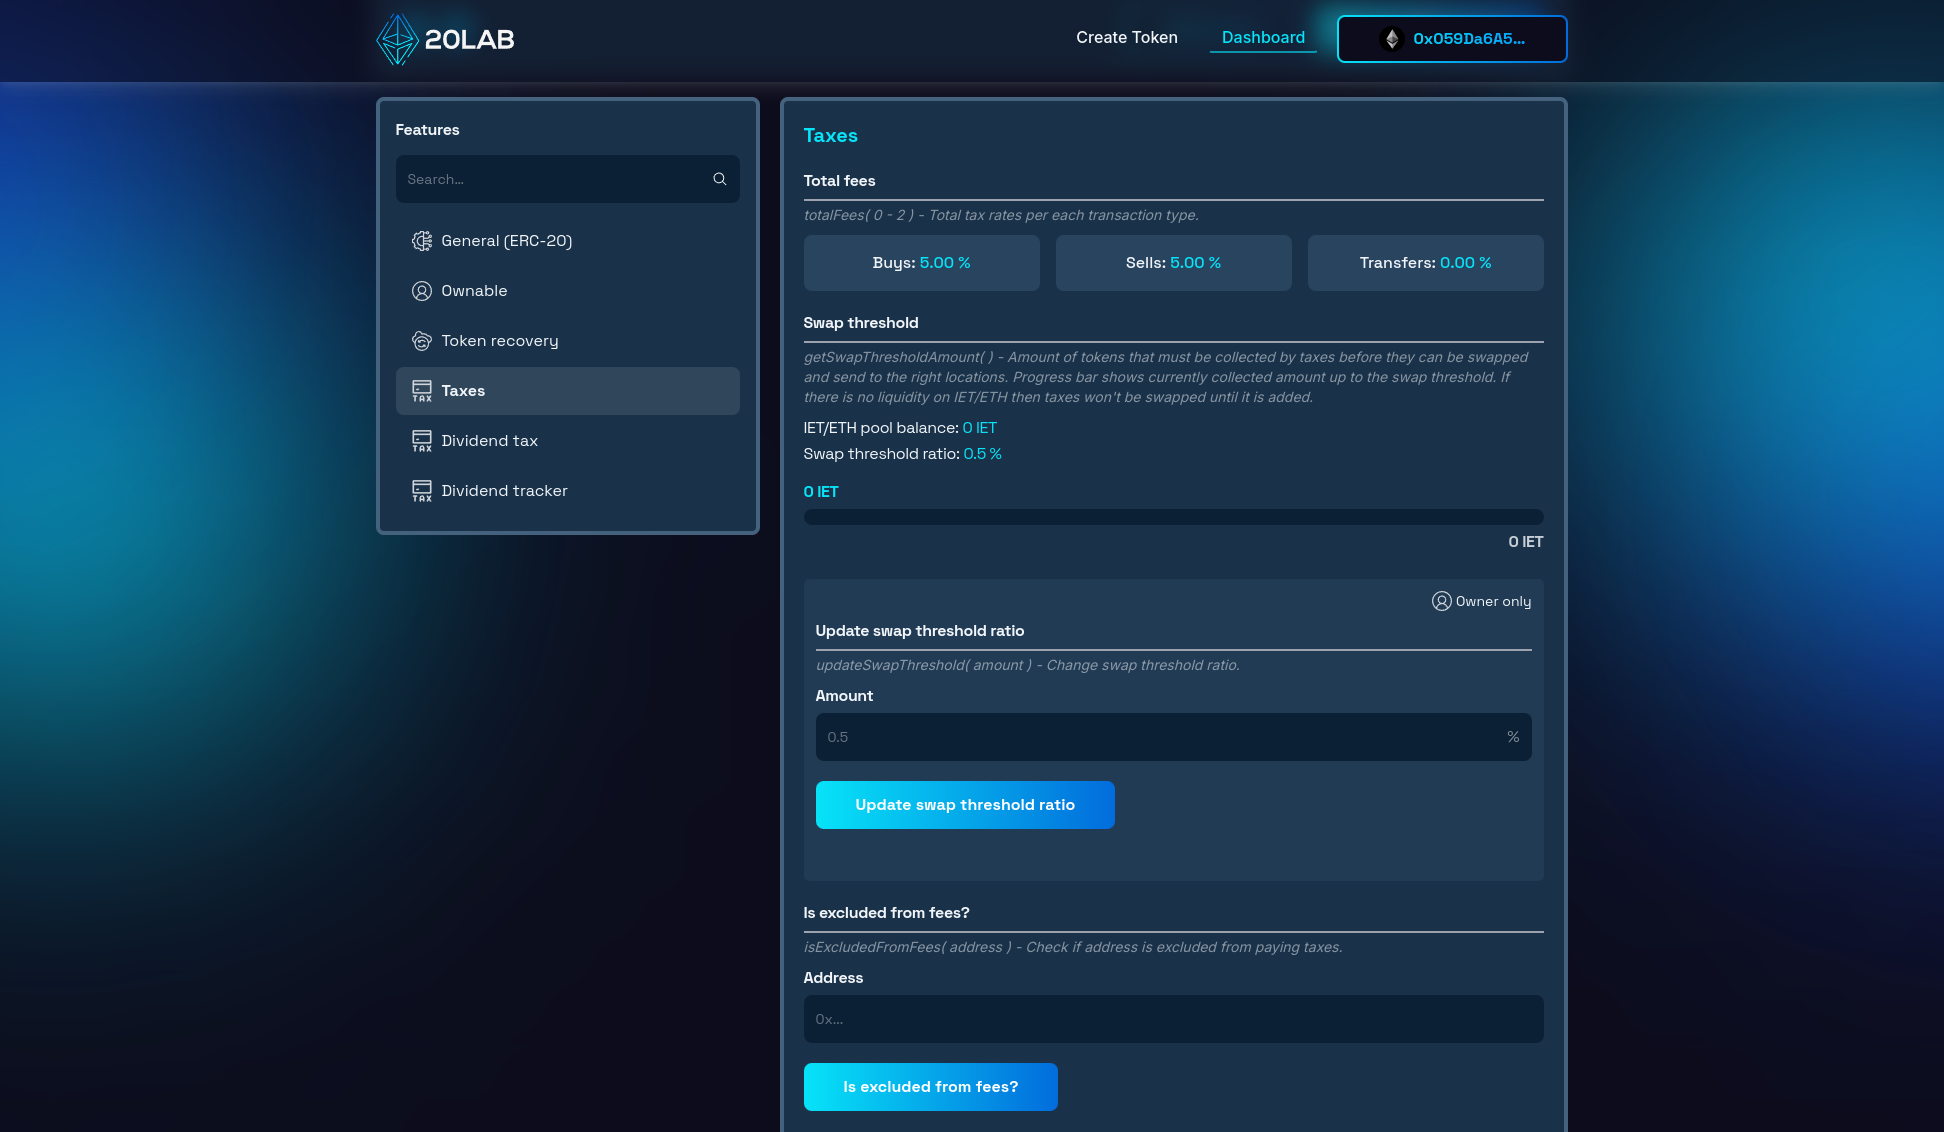
Swap Threshold Configuration
Because dividends are sent in native coins or custom tokens, you'll need to set a swap threshold. This determines how many tokens the contract must accumulate before it converts to the dividend currency, helping to optimize gas costs. Similarly to before, you can leave a default ratio of 0.5% of liquidity on your default exchange.
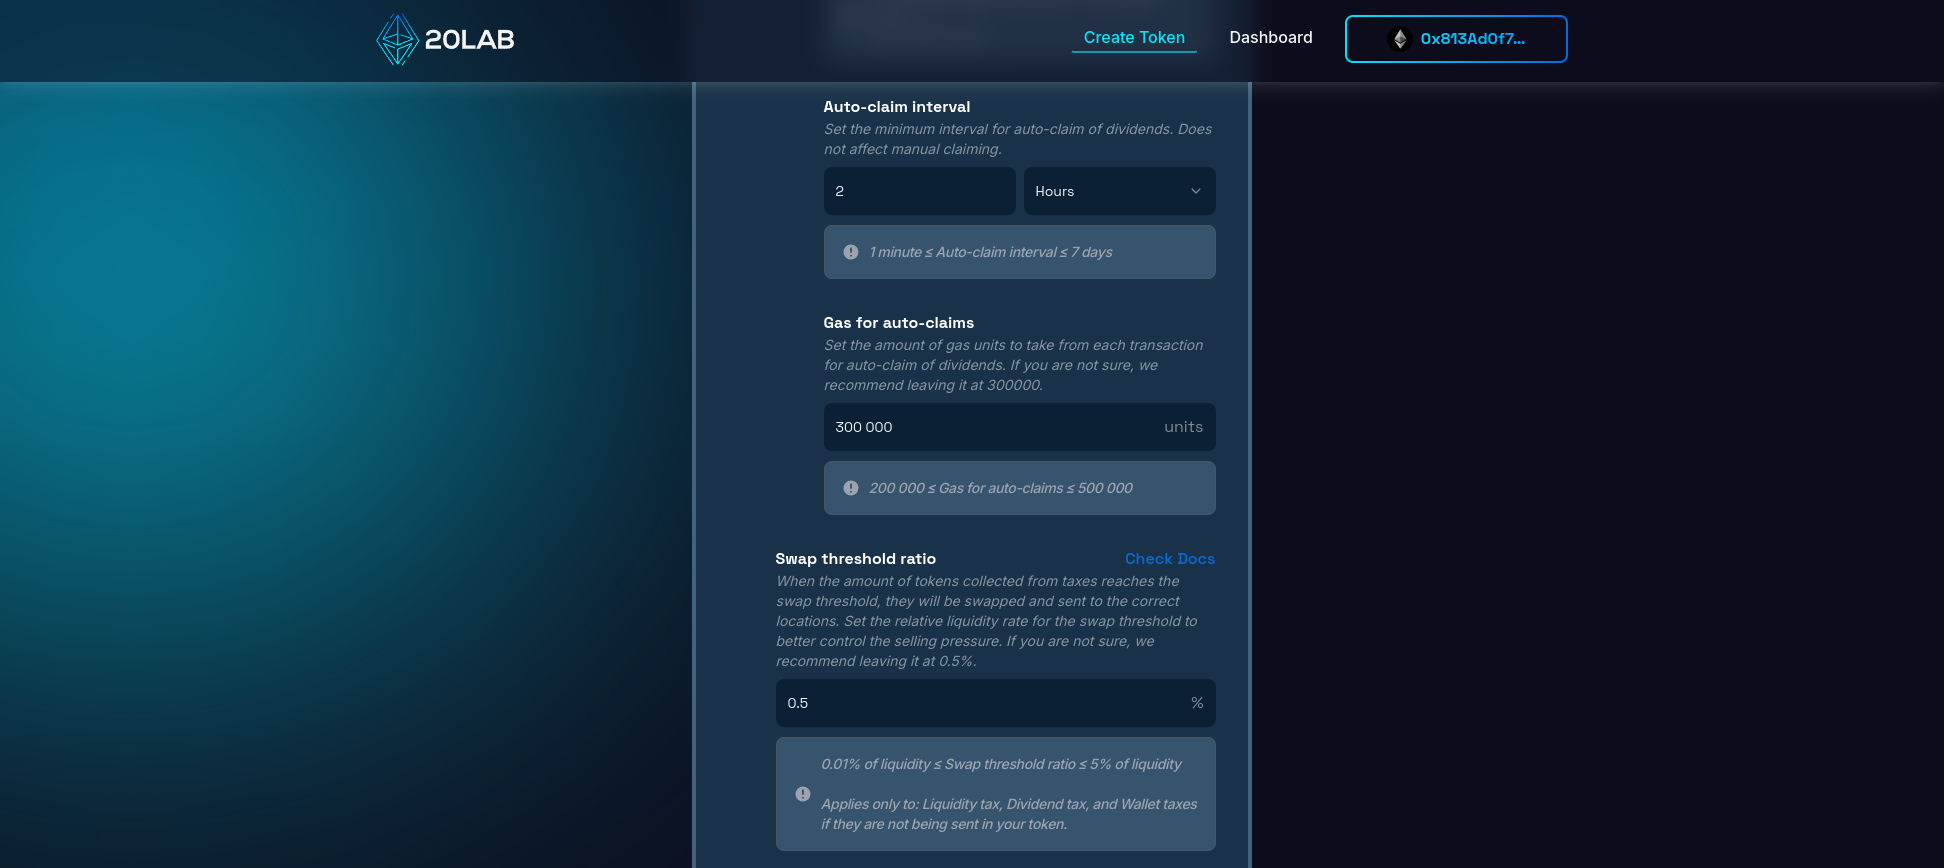
Callback Gas Limit (Advanced)
For advanced users, you can adjust the callback gas limit for dividend distributions if you have selected native coin as the receiving currency. This is especially useful if many of your holders use on-chain multi-sigs or smart contracts that require more gas to receive dividends.
In the next section, we'll explore how to deploy and test your newly created dividend-enabled ERC-20 token to ensure it's ready for your community to use and benefit from.
Step 4: Review and Deploy
Before finalizing your token creation, it's important to carefully review all configured parameters on the "Summary" page. This final review stage acts as an important check, allowing you to catch and correct any potential errors or oversights that could become costly after deployment.
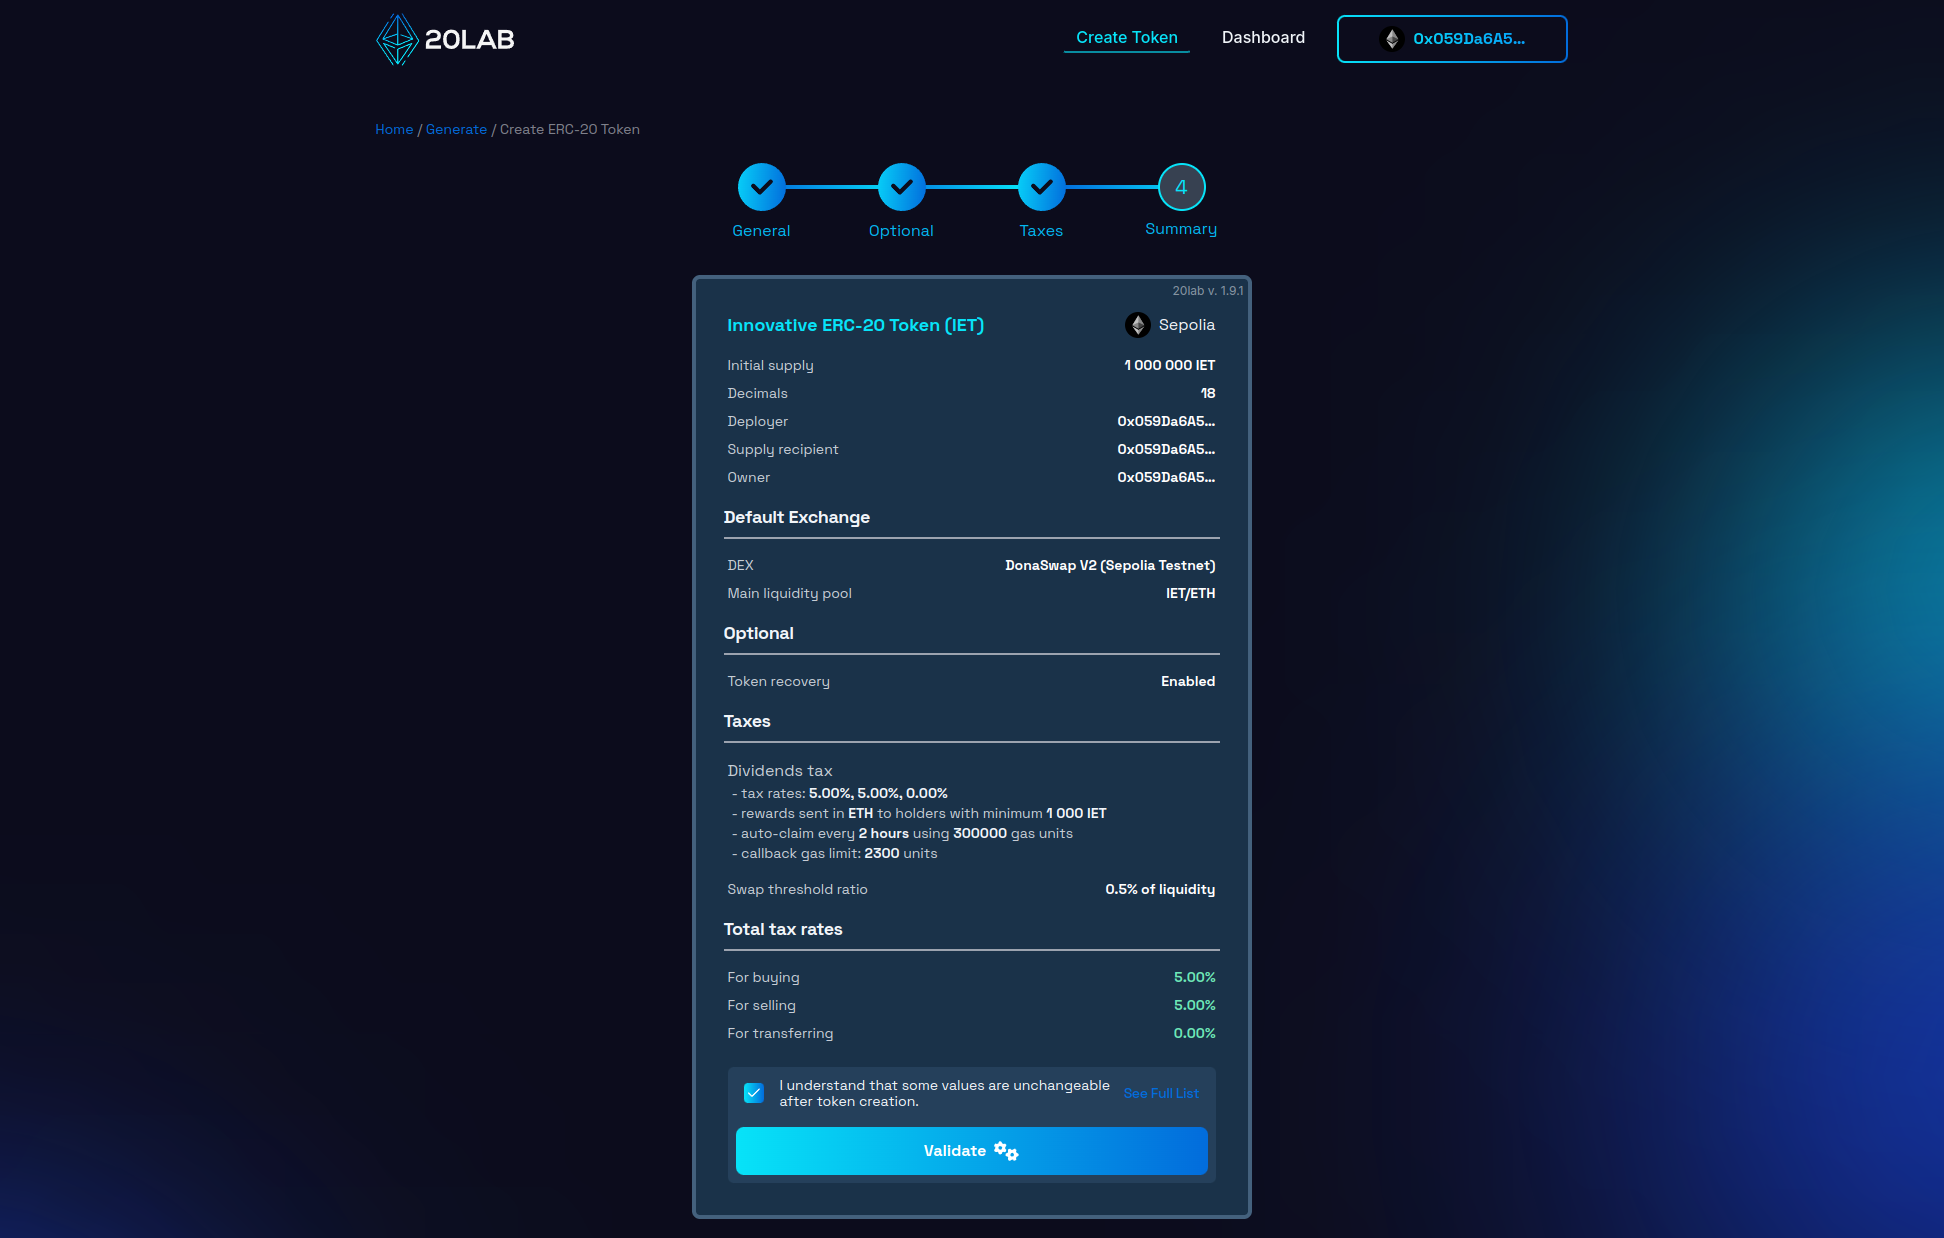
Once you have thoroughly reviewed all the details, click the button to initiate the validation process. This automated check serves as an additional layer of protection, identifying any technical inconsistencies or issues that could compromise the functionality of your token on the blockchain.
Upon successful validation, you may be presented with a deployment modal that allows you to personalize your token's address pattern. This unique feature allows you to add a distinctive touch to your token's blockchain identifier, enhancing its memorability and brand alignment.
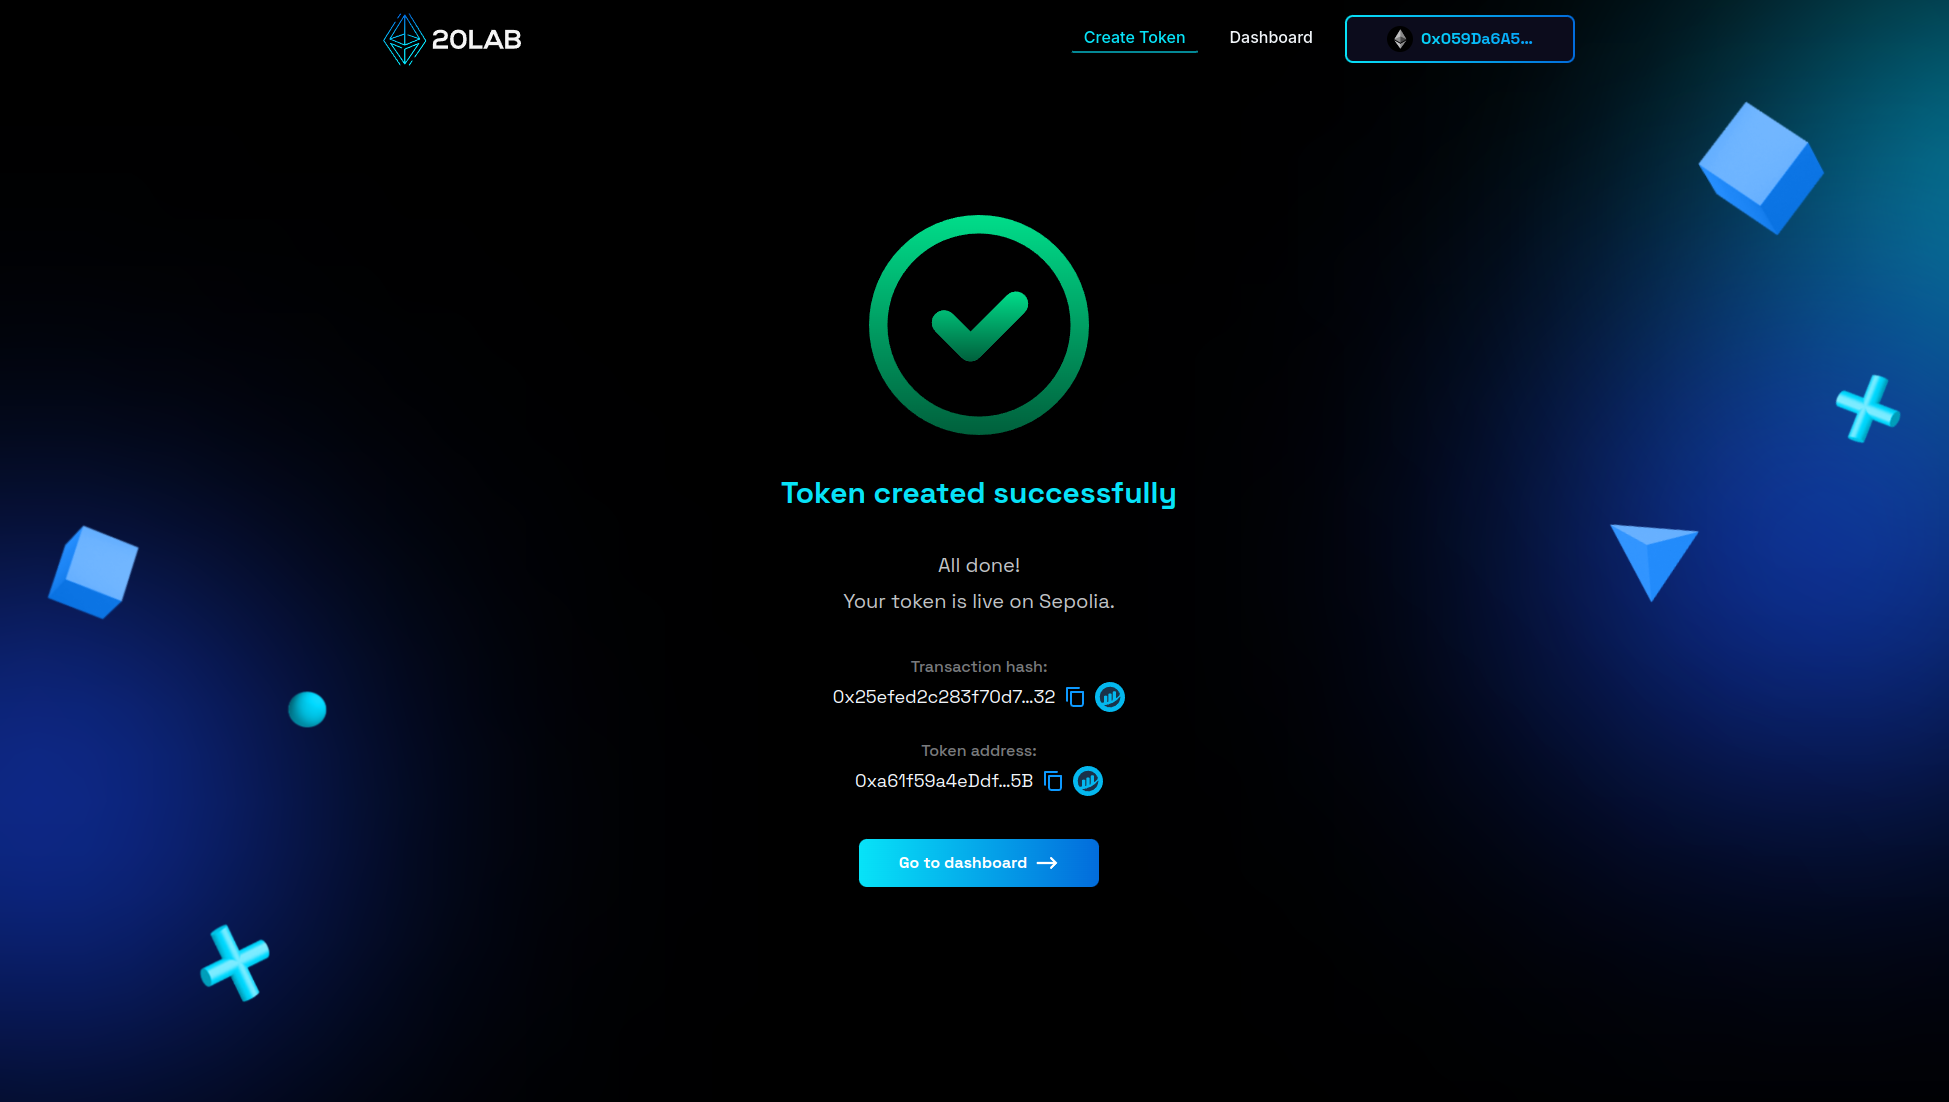
Now you're ready for the big moment. Click "Deploy" to begin the process of instantiating your token on your chosen blockchain network. This action will trigger a prompt from your connected wallet requesting transaction confirmation. Upon confirmation, your ERC-20 token will be live on the selected blockchain.
Managing Your ERC-20 Token with Dividends
After successfully launching your ERC-20 token with dividend functionality on 20lab.app, you gain access to a comprehensive management dashboard. This intuitive control panel provides essential tools to monitor and fine-tune your dividend-enabled token.
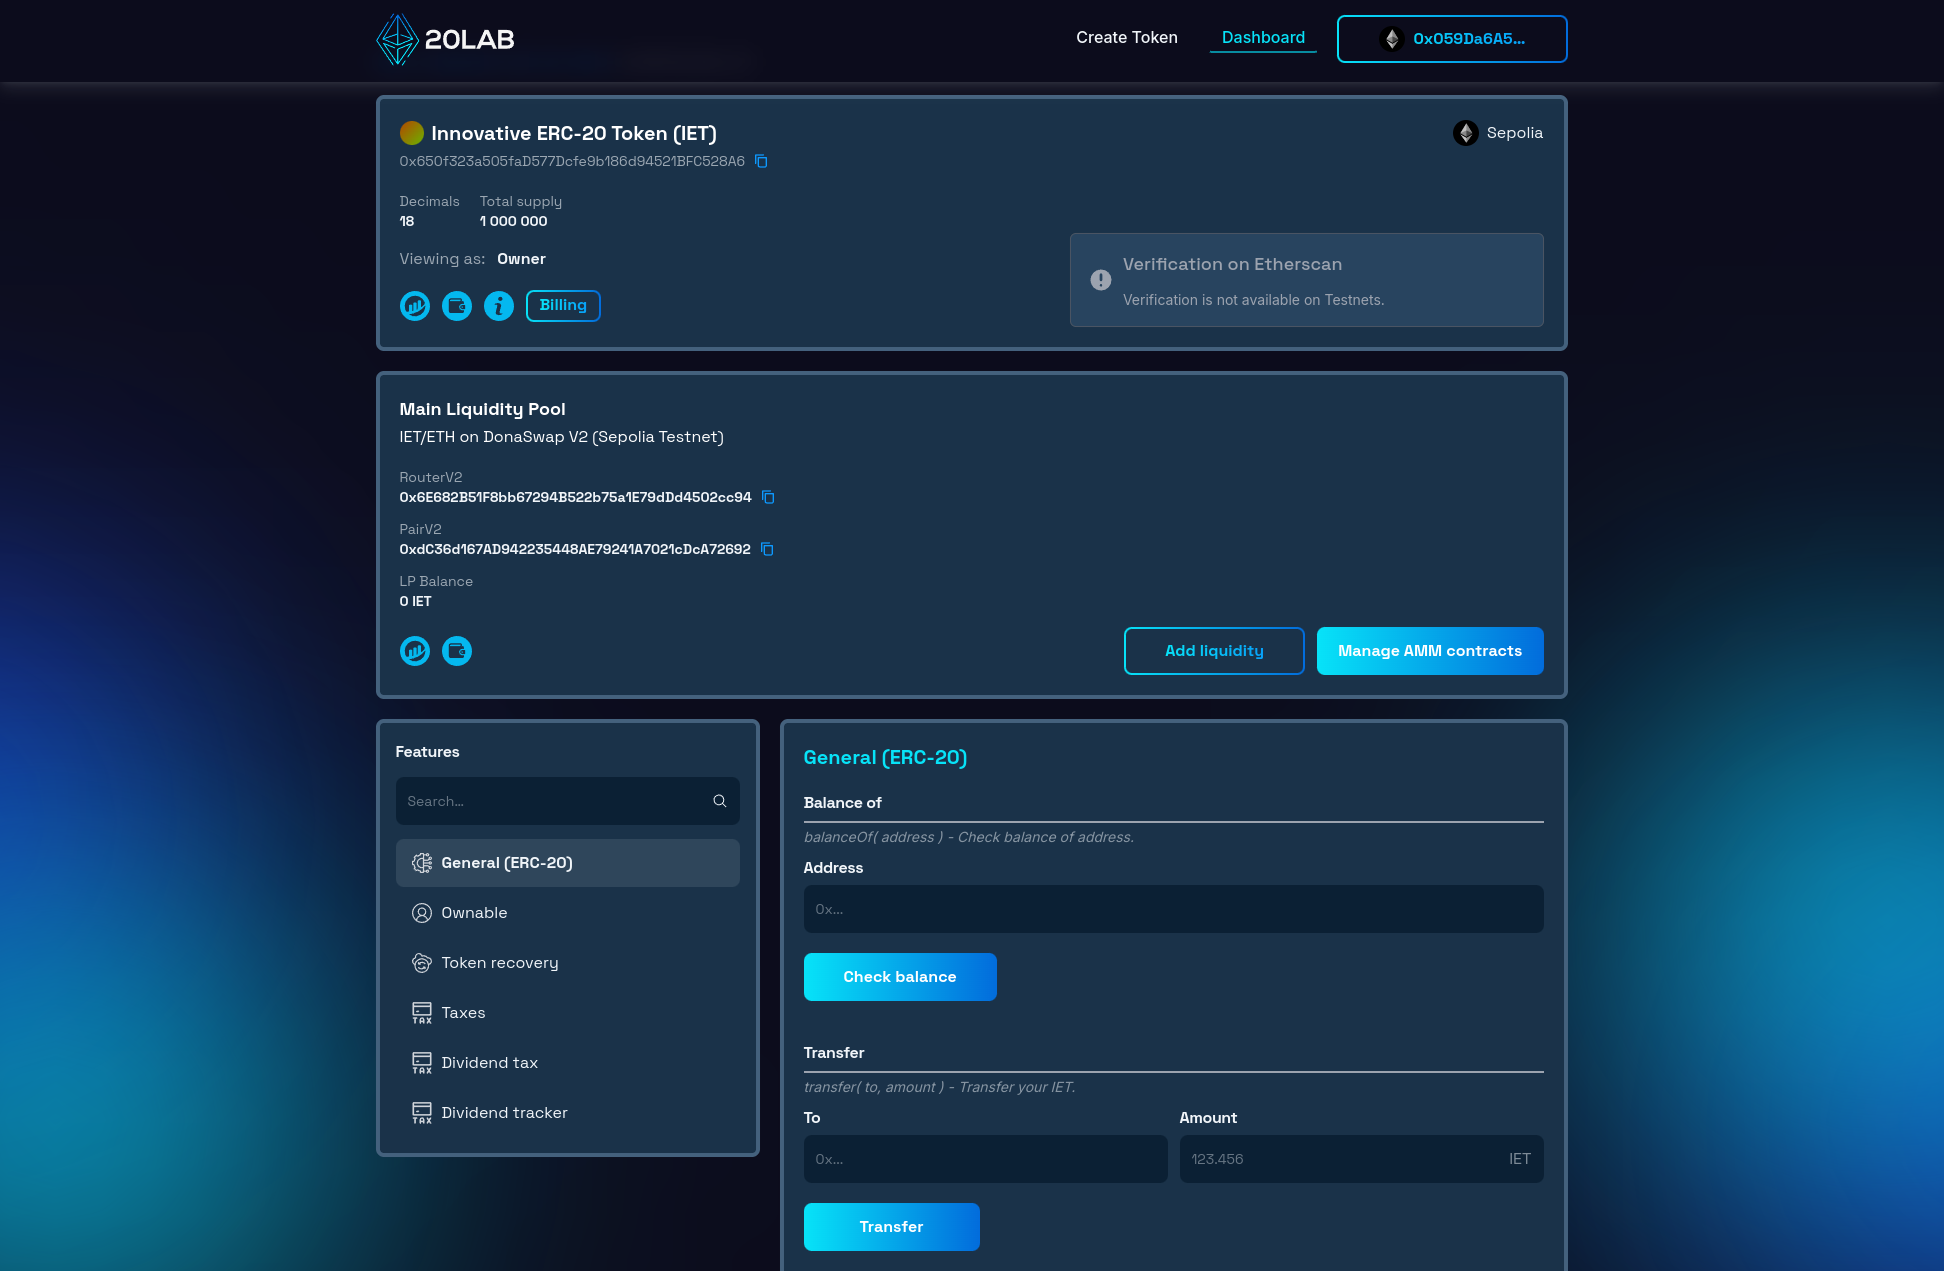
The dashboard provides a detailed view of your token's key information, including its blockchain address, total supply, name, symbol, and decimal precision. This overview ensures that you're always aware of your token's fundamental metrics.
A critical component of the dashboard is the ownership management suite. As the token creator, you retain initial ownership unless delegated during the creation process. The "Ownable" section allows you to view current permissions, transfer ownership to a new address, or renounce ownership as needed.
The next important section of the dashboard is the dividend management suite. By enabling dividend tax 3 new sections are available: "Taxes", "Dividend tax" and "Dividend Tracker".
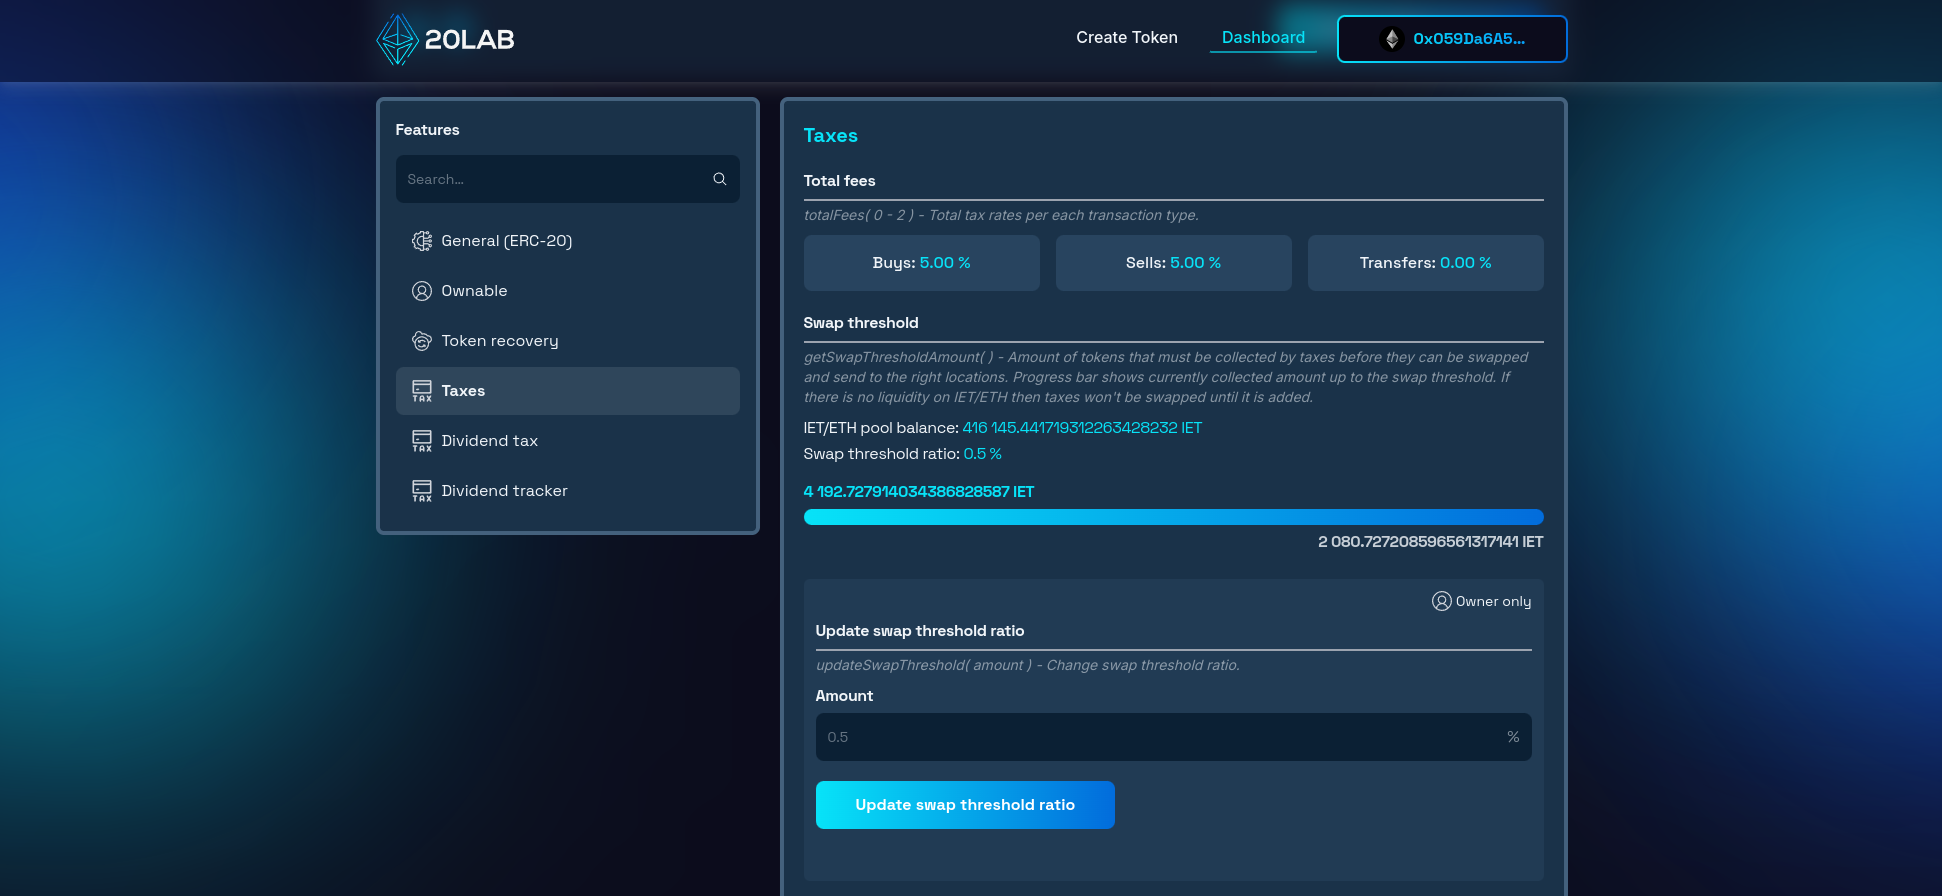
"Taxes" Section
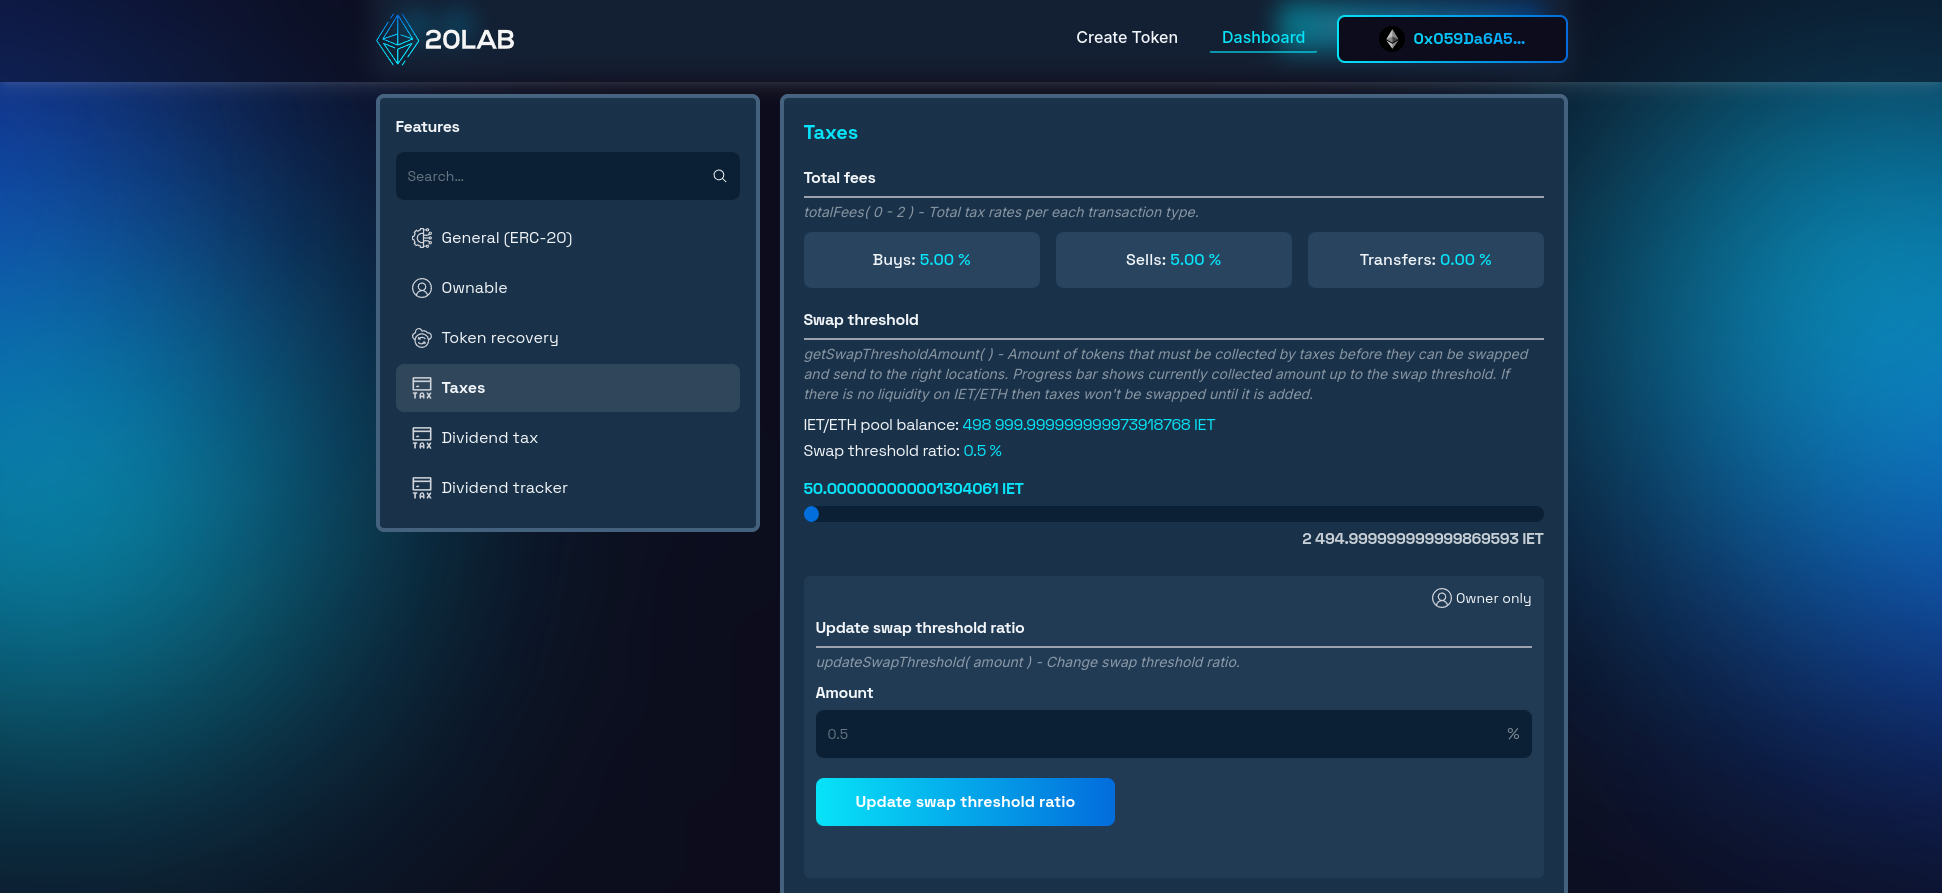
The "Taxes" section provides an overview of the general tax settings for your token. Here, you can manage the current swap threshold and whitelist addresses from paying fees.
"Dividend Tax" Section
The "Dividend Tax" section is where you can monitor and adjust the core parameters of your token's dividend functionality including: adjusting tax rates for each transaction type and managing another whitelist present in your token - exclusion from receiving dividends.
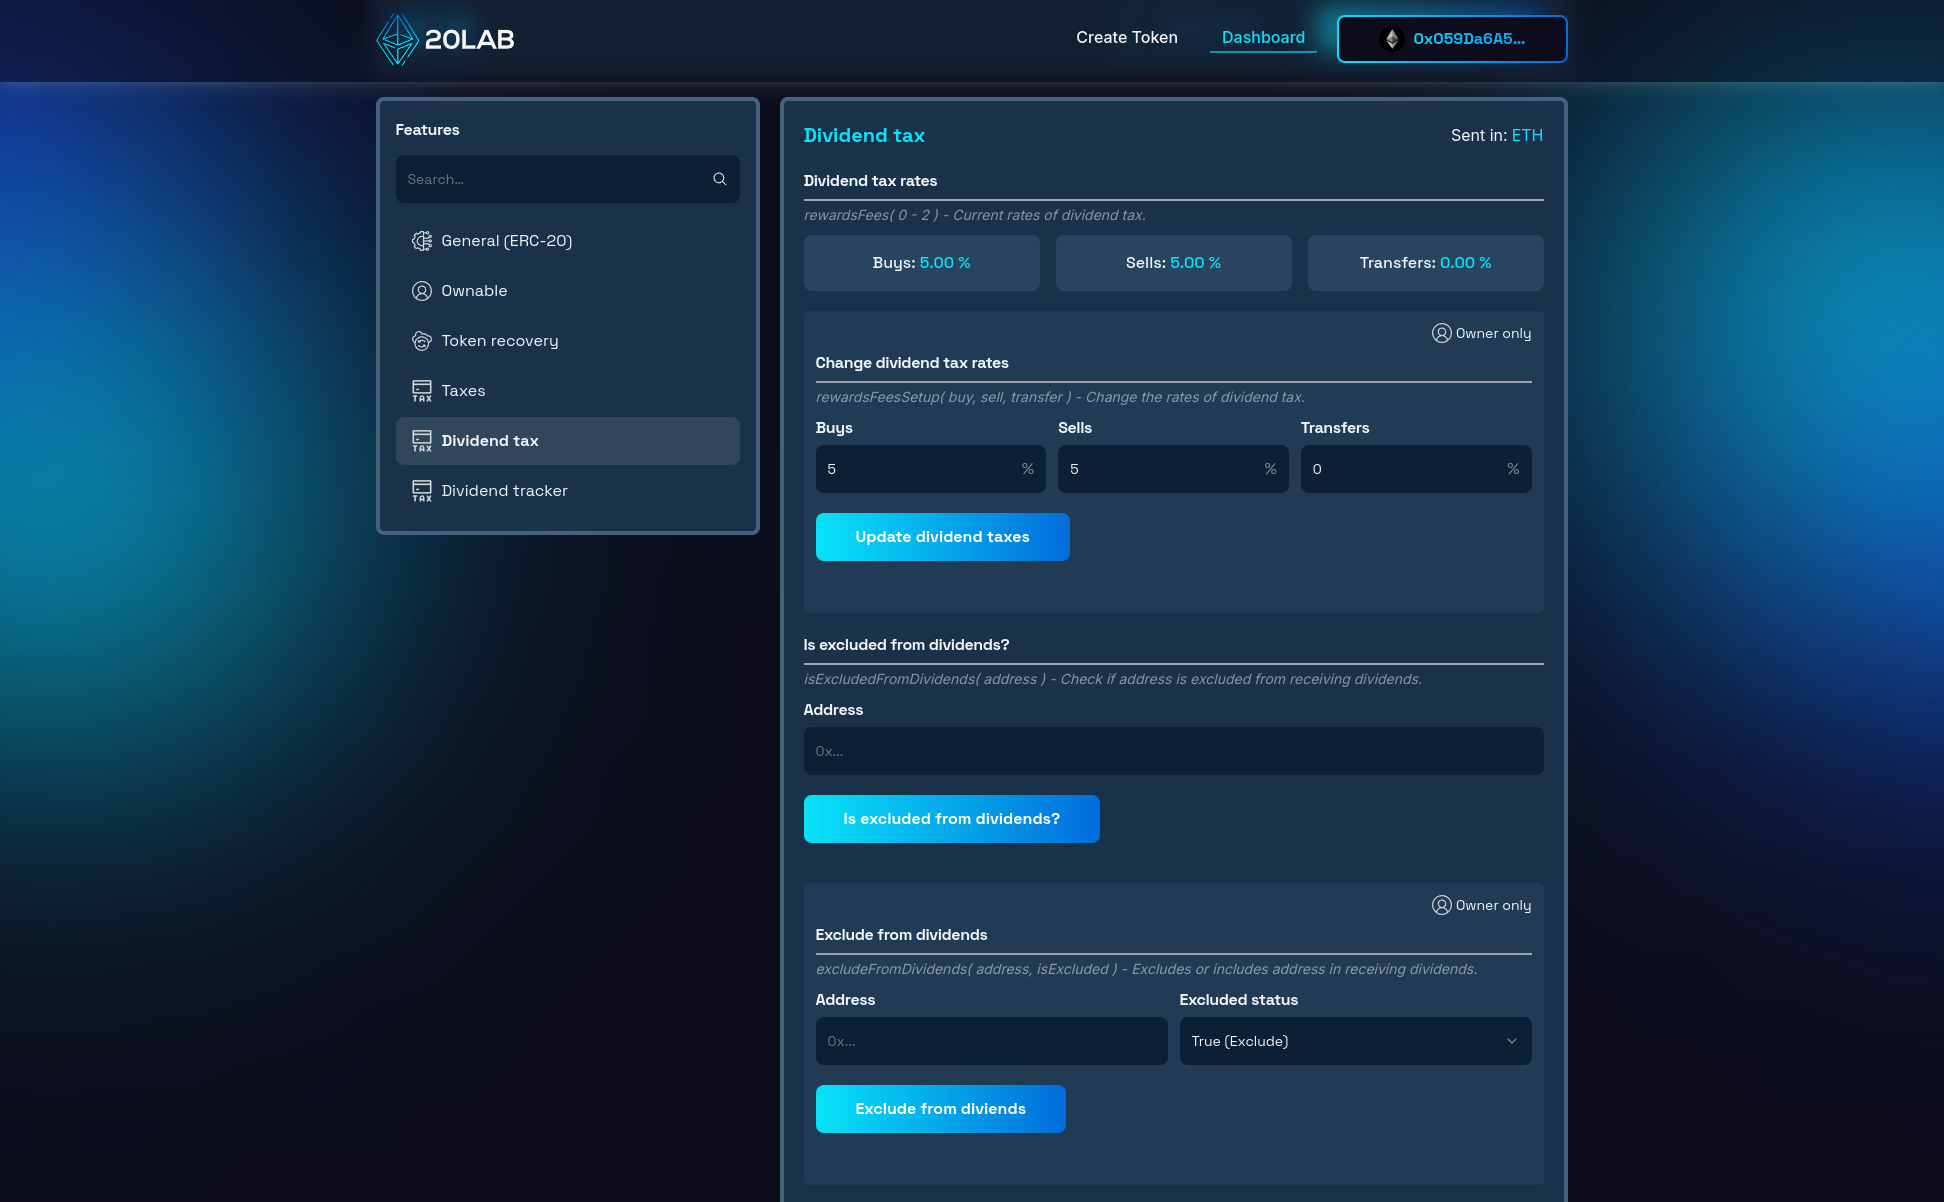
You can check the addresses whitelisted by default in our documentation or directly in your token's dashboard.
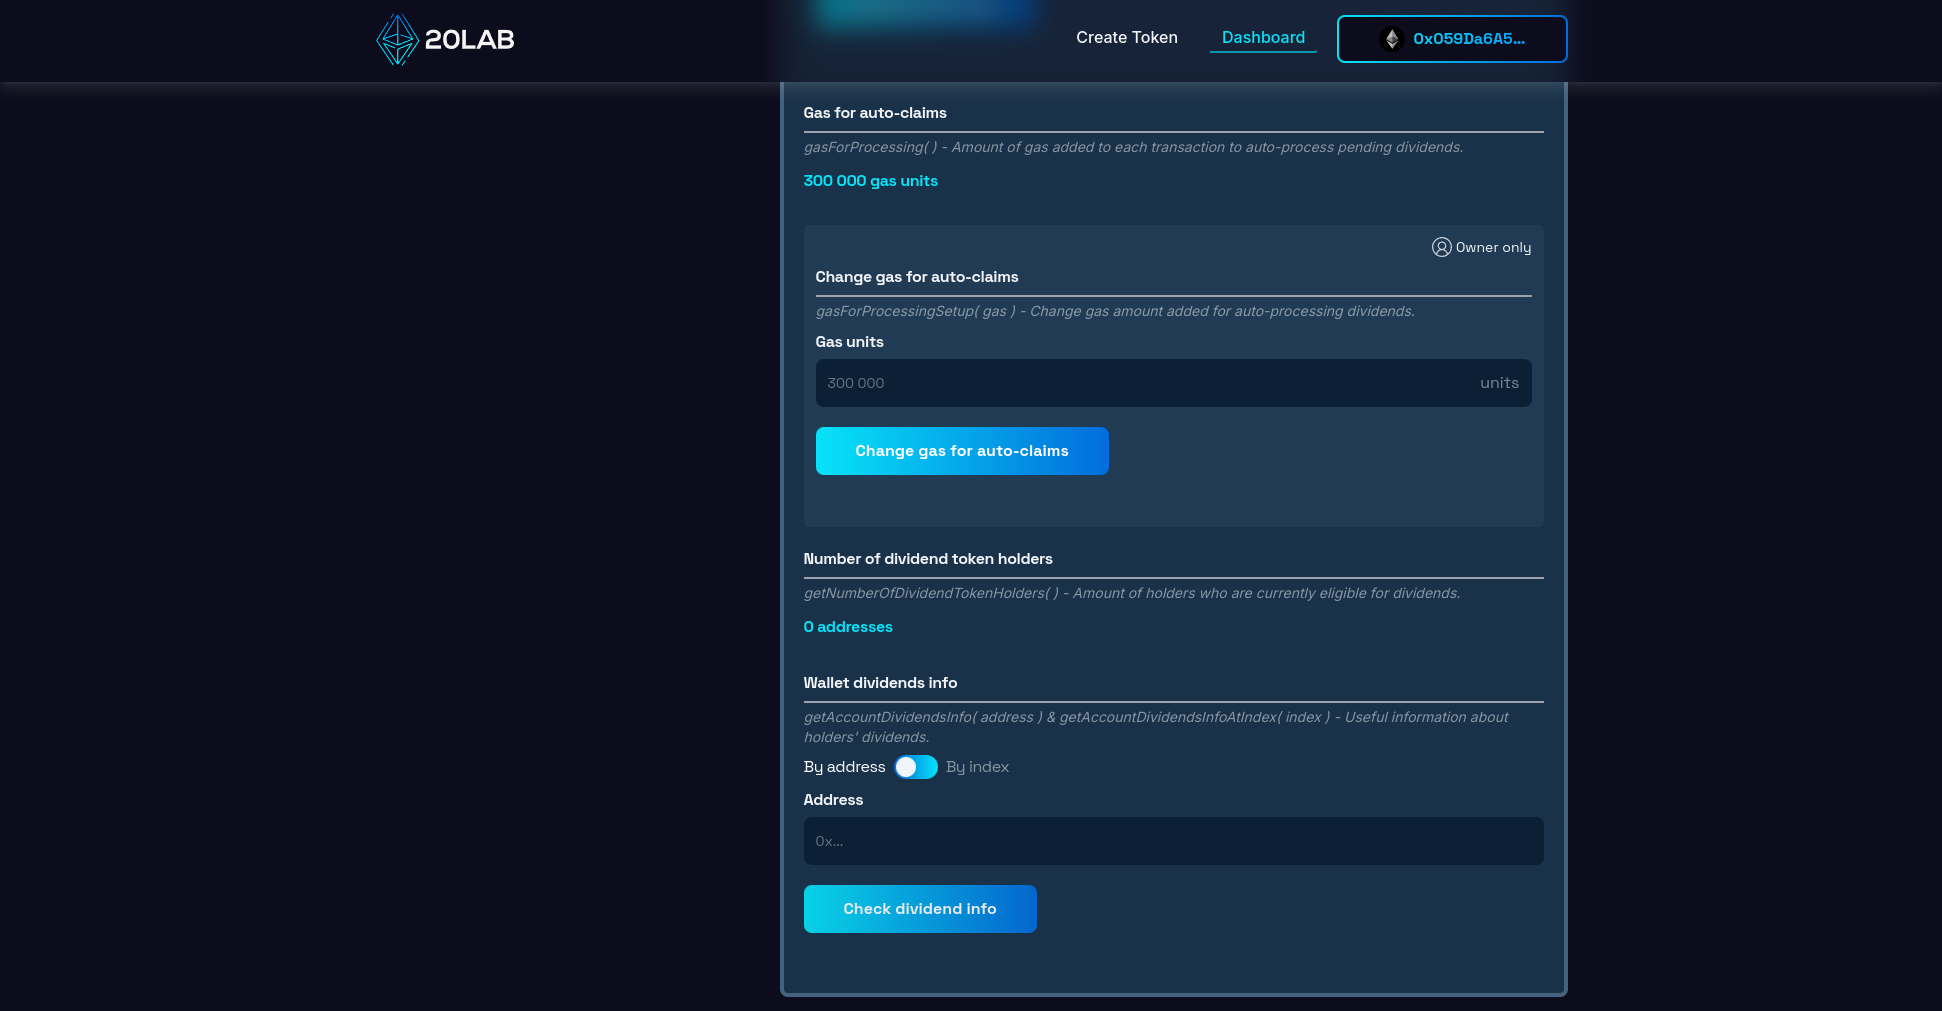
"Dividend Tracker" Section
The "Dividend Tracker" section provides valuable insights into the performance of your dividend mechanism and allows for configuration for distribution-related settings. Some examples are:
- Number of dividend holders: This feature displays the total number of token holders who are eligible to receive dividends.
- Claim waiting time between automatic distributions: This setting allows you to configure the time interval between automatic dividend distributions. By adjusting this parameter, you can balance the frequency of distributions with the cost of gas.
- Gas for automatic distribution: This feature allows you to set and monitor the gas limits for automatic dividend distributions. It's a great tool for optimizing the efficiency of your payout mechanism while keeping costs under control.
- Detailed dividend information for each holder: This comprehensive feature provides granular data on the dividend status of each token holder.
Also, you can manage AMM pair contracts in the DEX section of the dashboard. This feature allows you to add or remove recognized exchange pairs, ensuring that your dividend tax works seamlessly across different decentralized exchanges if your token has liquidity on more than one exchange pair.
By leveraging these powerful tools in the 20lab dashboard, you can effectively manage your dividend-enabled ERC-20 token. This level of control allows you to adapt your dividend strategy to changing market conditions, optimize distribution efficiency, and ensure your token continues to provide value to holders.
Remember, while you have significant flexibility in adjusting dividend parameters, it's crucial to communicate any changes clearly to your token holders. Transparency in token management can help maintain trust and community engagement, key factors in the long-term success of your ERC-20 token with dividends.
Putting Dividends into Test
Let's explore a practical example of how dividend mechanisms work in real-world token ecosystems. We'll examine various token transactions to observe these systems in action.
By simulating different scenarios, we can gain a clearer understanding of how dividends are collected, distributed, and claimed. This demonstration will illustrate the inner workings of your ERC-20 token's reward system and help you understand its functionality beyond the theoretical setup.
Adding Liquidity on a Decentralized Exchange (DEX)
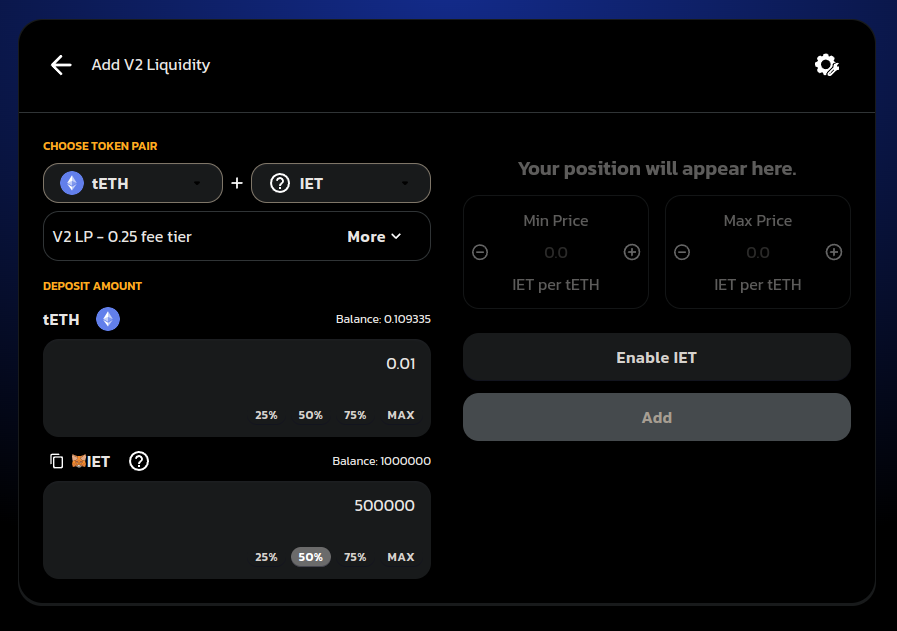
After successfully creating your ERC-20 dividend token using 20lab's token generator, the next crucial step is to add liquidity. This process typically involves establishing a trading pair on a decentralized exchange (DEX) that links your newly minted token to a widely used cryptocurrency. This pairing allows for smooth trading and lays the groundwork for your token's dividend mechanism to function effectively.
Buying using Different Address
When a user interacts with your ERC-20 token with dividends, the dividend tax is applied based on the type of transaction. Let's break down how this works:
- Buying tokens: If you've set a 3% dividend tax on purchases and a user buys 1000 tokens, they will receive 970 tokens. The remaining 30 tokens are taken as dividend tax.
- Selling tokens: With a 5% dividend tax on sales, if a user sells 1000 tokens, they'll receive the equivalent of 950 tokens in the native coin or specified dividend currency. The difference of 50 tokens is taken as dividend tax.
- Transferring tokens: For wallet-to-wallet transfers that do not involve the default exchange, the transfer tax rate applies. If set to 2%, a transfer of 1000 tokens will result in the recipient receiving 980 tokens, with 20 tokens collected as dividend tax.
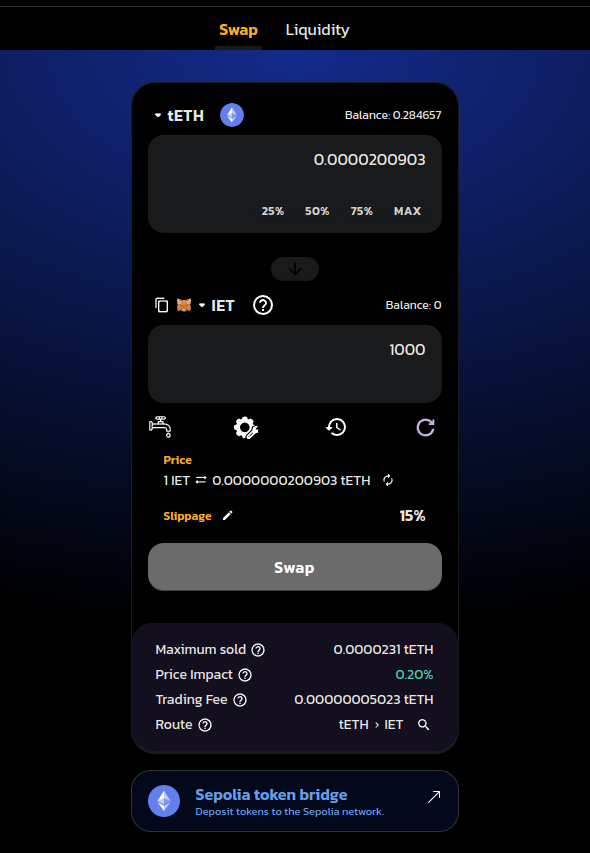
Suppose we buy 1000 tokens using a different address. After confirming the transaction in the wallet, we can check the details on the Block Explorer.
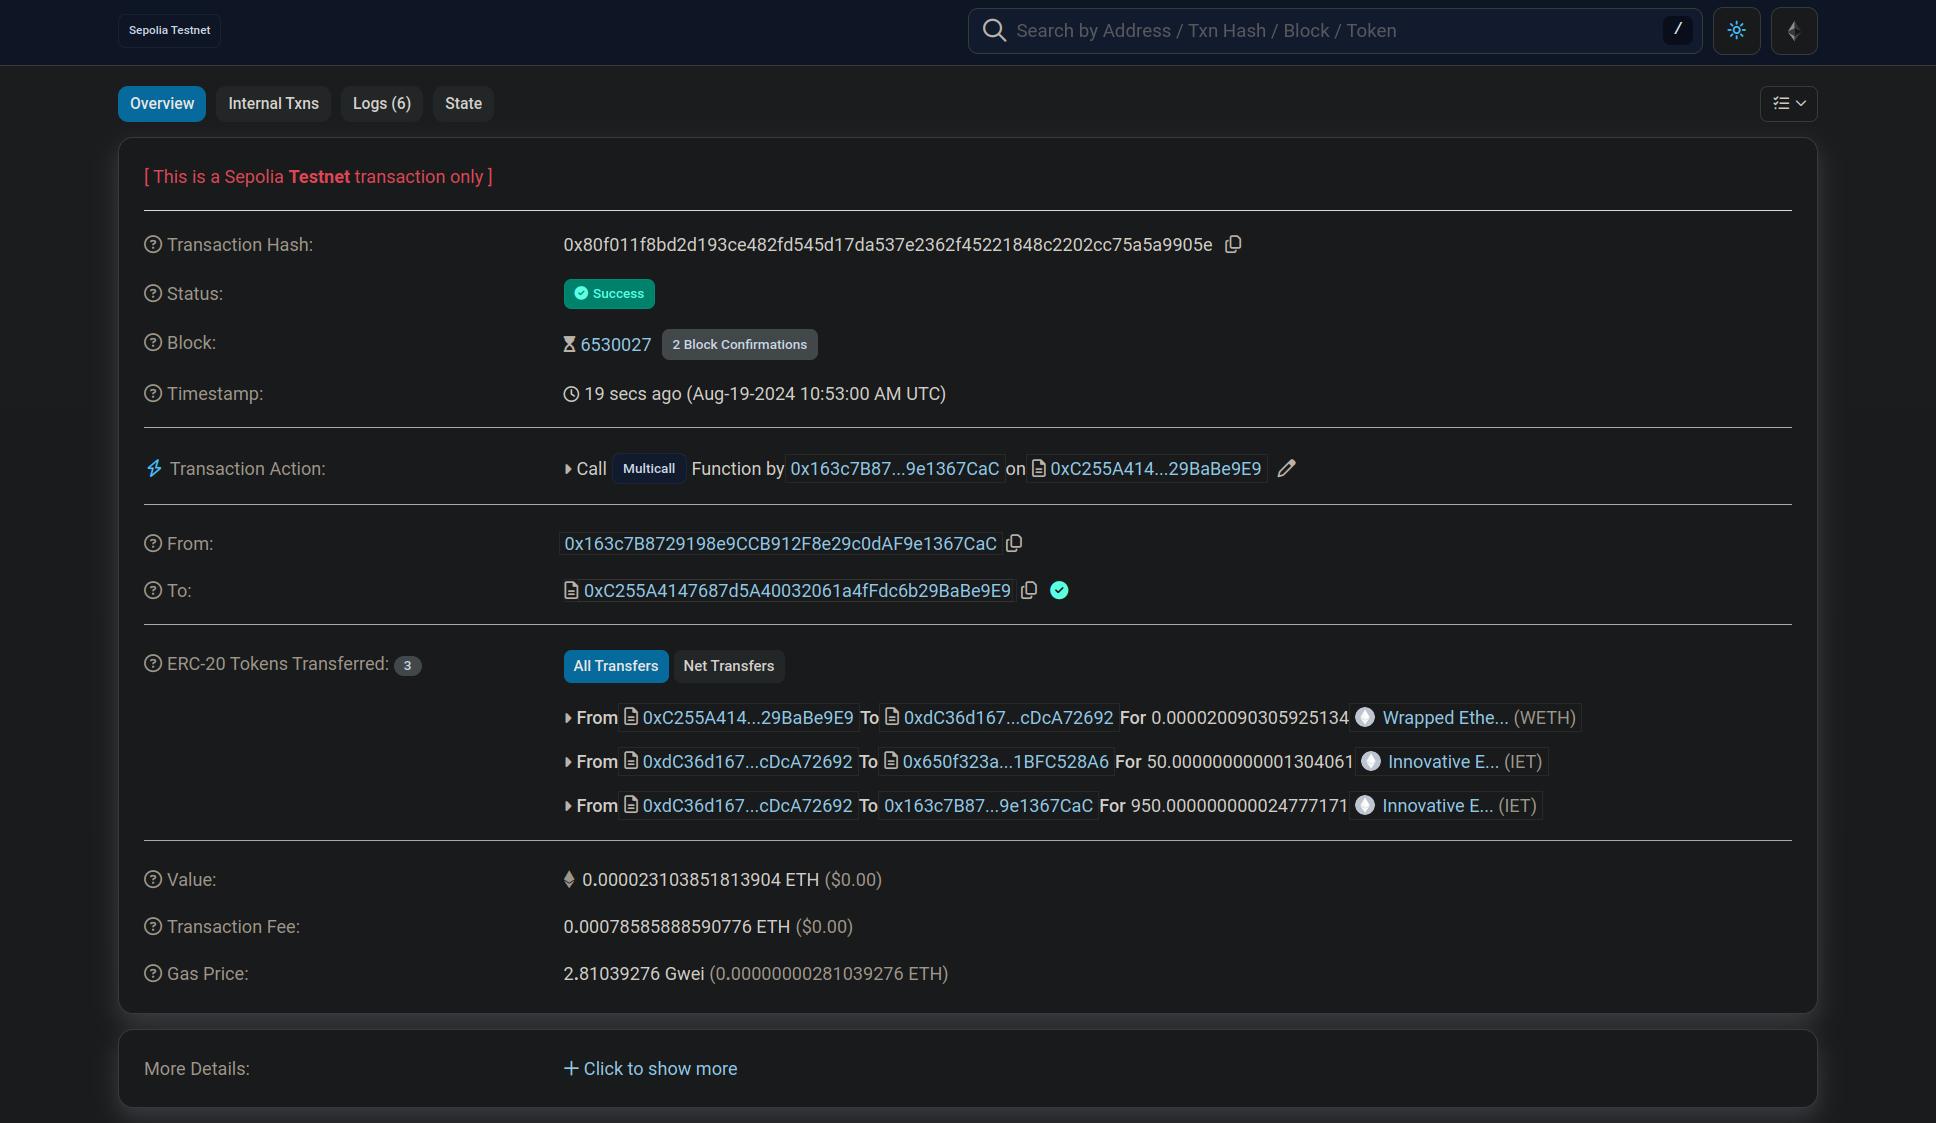
On the Block Explorer, in the "ERC-20 Tokens Transferred" section, we can see that 1000 tokens were sent to the token contract, but only 950 tokens were received. This 5% difference represents the dividend tax specified when generating the ERC-20 token.
Filling the Swap Threshold
After the test purchase, let's go to the dashboard and see the impact of this transaction on the swap threshold. Here we can see that 50 IET are sitting on the token contract balance, waiting for more to accumulate to be swapped and sent in ETH to the holders.
However, if we look at the Dividend Tracker section and scroll down, we can see that there are no holders entitled to receive dividends.
That's because the current holders are:
- Token contract (excluded from dividends by default)
- Liquidity pool (excluded from dividends from the beginning)
- Deployer wallet (also excluded from dividends)
- Wallet used to buy tokens (does not meet 1000 minimum balance to be eligible)
To change this situation, let's buy more tokens from the wallet I already bought and also use an additional wallet to receive some tokens directly from the deployer to make 2 eligible holders.
After successfully performing the above transactions, the swap threshold is now full and the collected tokens are ready to be swapped and sent in ETH to the holders.
Distribution of Dividends
We were able to overfill the swap threshold because it cannot be triggered on buys. As soon as someone sells, transfers or buys tokens on another liquidity pool, the distribution will take place. Let's sell 1 IET to trigger the distribution process.
After confirmation, let's check the Block Explorer page for transaction details.
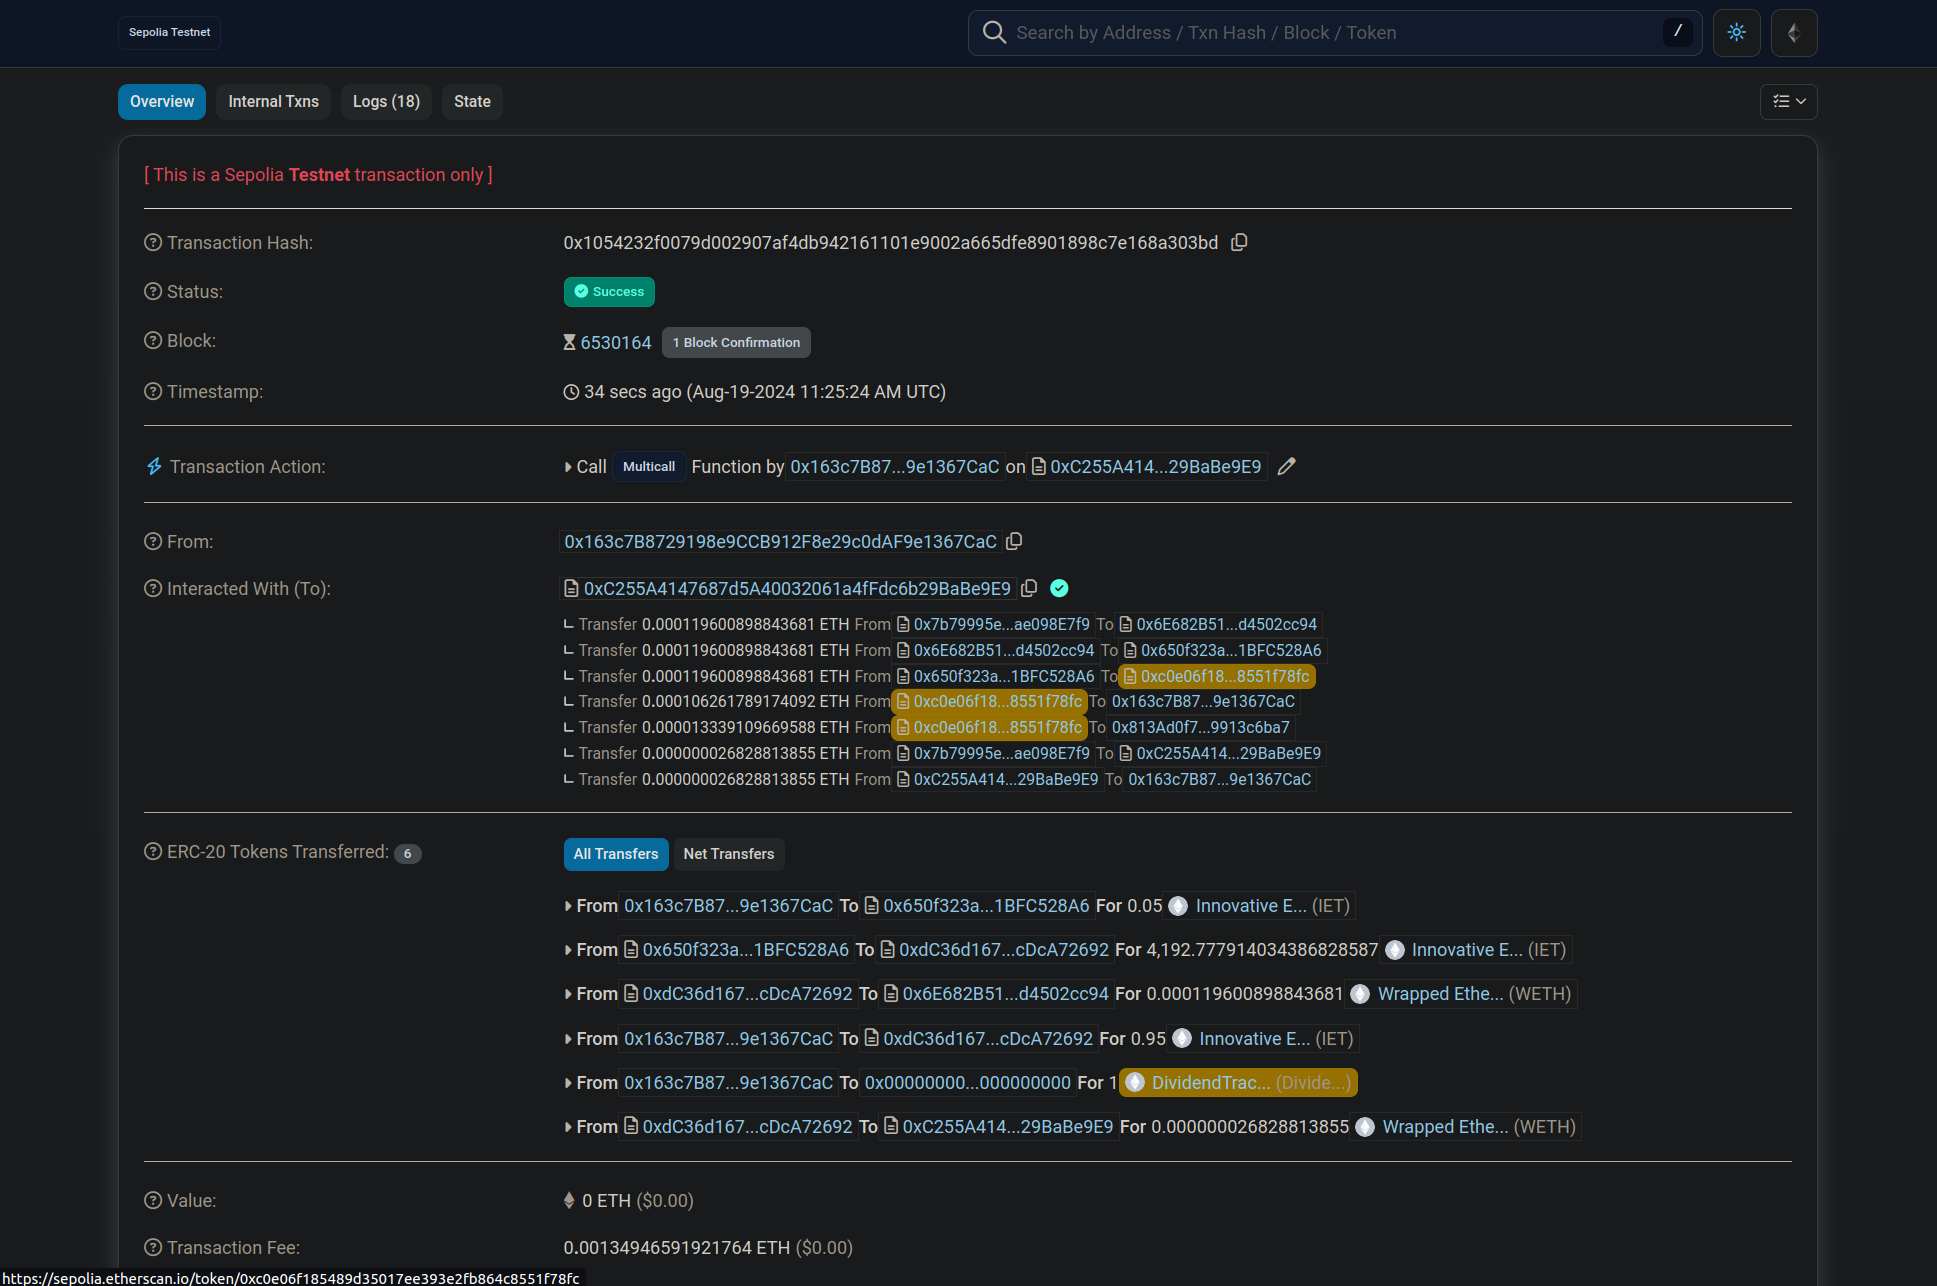
We can see that a lot of operations took place in this transaction. Let's review what exactly happened and how to see the distribution logic here.
- In the "Interacted With (To)" section, we can first see transfers of ETH between several contracts, mainly DEX contracts and Token contract. These ETH were obtained after swapping collected tokens from dividend tax.
- Then Token contract sent these ETH to 0xc0e0...78fc - this is the address of Dividend Tracker contract which is used internally and is connected to IET token. As soon as it receives ETH, it will try to perform distributions according to settings.
- The next 2 transfers coming from Dividend Tracker are the dividend payouts to eligible holders, 2 payouts because 2 holders were eligible. These amounts vary because these addresses hold different amounts of IET.
Now dividends will begin to accumulate again for the next distribution cycle, with automatic claiming possible no sooner than in 2 hours for the above addresses. Of course, any address can claim dividends manually by calling the claim function if they prefer to have them earlier.
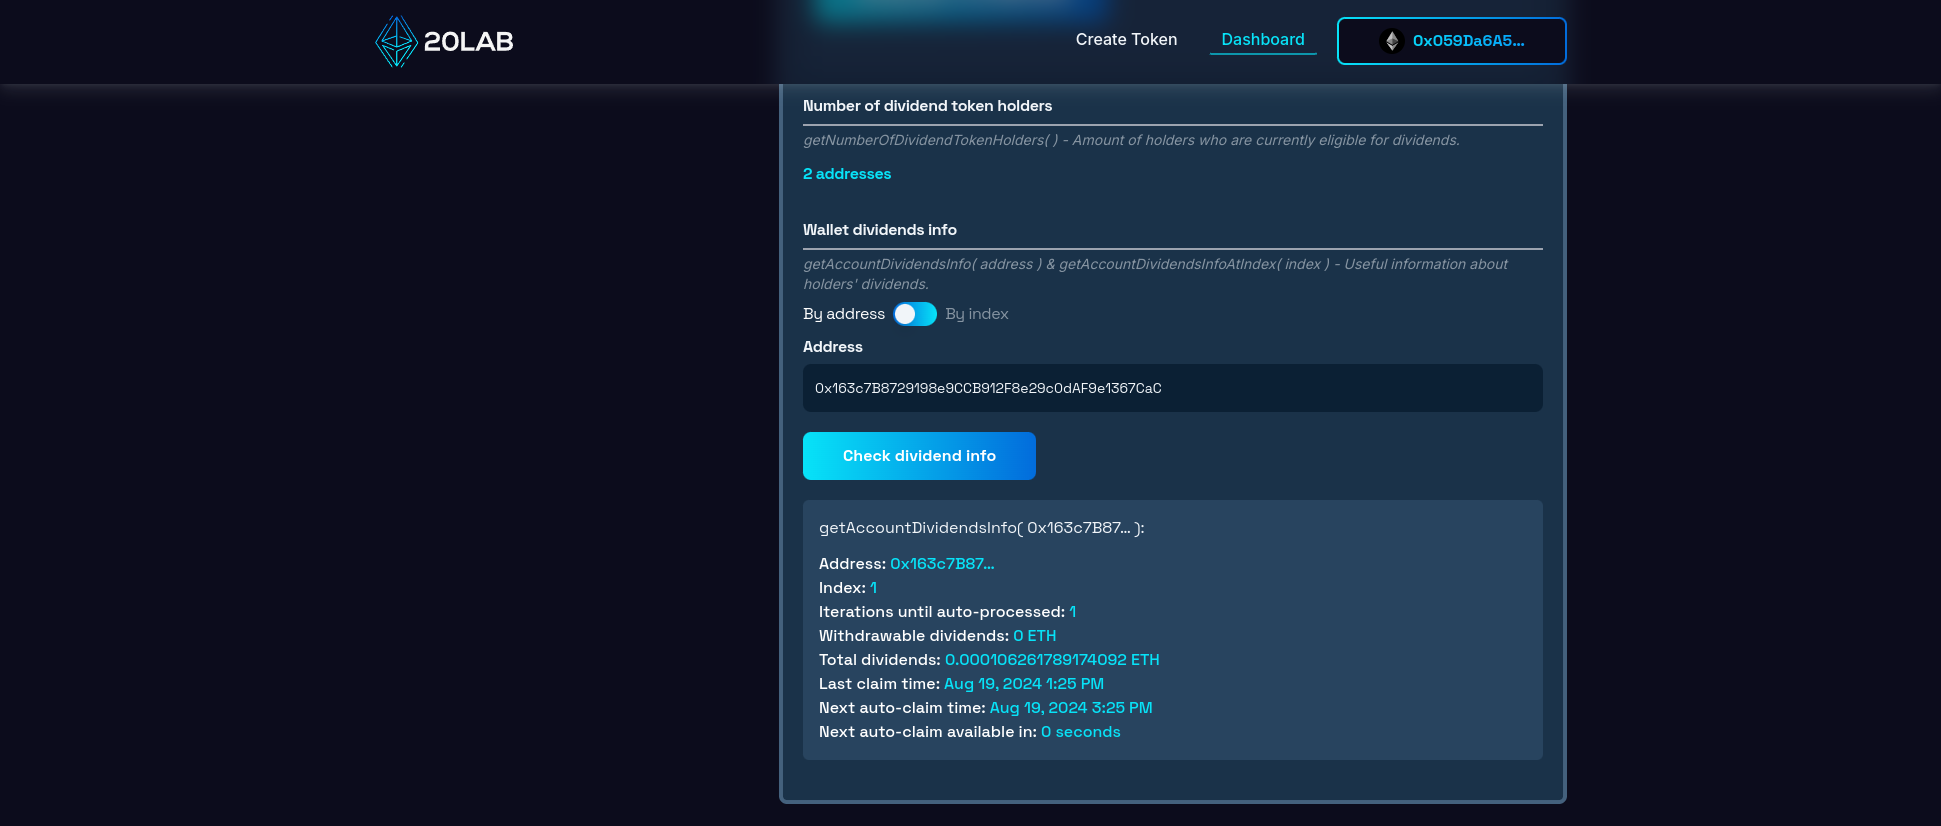
Checking Dividends Data
As a final step, we can easily use the dashboard to check one of the addresses that just received the dividend. This function is located at the very bottom of the "Dividend Tracker" section of the dashboard. We can get a lot of valuable information, such as the total dividends received by a particular address, dividends that can still be claimed, or information about automatic claiming.
Conclusion
Creating an ERC-20 token with dividends is a powerful way to incentivize holders and build a strong, engaged community around your project. By leveraging 20lab's user-friendly token generator, you can easily implement a sophisticated dividend system without the need for complex coding or deep blockchain expertise.
Throughout this guide, we've explored the intricacies of setting up dividend taxes, configuring distribution criteria, and testing the functionality of your token. We've seen how the dividend tracker provides valuable insight and control over your token's reward mechanism, ensuring transparency and efficiency in dividend distribution.
20lab's platform simplifies the process of creating a dividend token, allowing you to focus on your project's unique value proposition instead of getting bogged down in technical details. With features like customizable tax rates for different transaction types, adjustable payout intervals, and detailed holder information, you have all the tools you need to create a token that stands out in the competitive DeFi landscape.
If you have any questions about creating or managing your ERC-20 token, don't hesitate to reach out to us via our Telegram channel.


