
Developing an ERC-20 token has become a popular pursuit among entrepreneurs, developers, and blockchain enthusiasts. Whether your goal is to initiate a new project, tokenize existing assets, or establish a distinctive digital currency, it is imperative to understand the complexities involved in token creation.
One notable feature that is increasingly popular in the crypto community is the wallet tax concept - a system that allows token creators to automatically collect transaction fees and remit them to a designated address. This detailed guide will walk you through the steps necessary to create an ERC-20 token with wallet tax functionality, examining its benefits and the various configuration options that allow you to customize your token's operations.
Why the Wallet Tax Matters
The wallet tax feature has emerged as a game-changer in the ERC-20 token world, offering several benefits to both token creators and their communities. Understanding its importance can help you make informed decisions when designing your token's economy:
Sustainable Funding for Project Development
By implementing a wallet tax, project teams can secure a continuous stream of funding without relying solely on initial token sales or outside investment. This approach brings ongoing resources for development, marketing and ecosystem growth.
Community Rewards and Tokenomics
Some projects use wallet tax to fund community rewards programs or contribute to liquidity pools. This can create a more engaging and beneficial ecosystem for token holders, driving community growth and token utility.
Transparent Revenue Model
With a wallet tax, a project's revenue generation becomes transparent and verifiable on the blockchain. This openness can build trust among investors and community members, as they can easily track the collection and use of funds.
Flexibility in Economic Design
The ability to set different tax rates for different types of transactions (buys, sells, transfers) allows for sophisticated tokenomics. This flexibility allows projects to tailor their economic model to specific goals and market conditions.
Automated Operational Funding
By automatically directing a portion of each transaction to a designated wallet, teams can ensure a steady flow of resources for operational expenses, reducing the need for manual fund management.
Creating Your ERC-20 Token with Wallet Tax
Creating an ERC-20 token with wallet tax functionality has never been easier, thanks to platforms like 20lab's Token Generator. This powerful tool simplifies the process and allows you to implement different types of wallet taxes without extensive coding knowledge.
When setting up your token's wallet tax structure, one of the most important decisions you'll make is choosing the right name and purpose for your tax. Let's explore some popular wallet tax names and how they can align with your project's goals:
- Marketing Tax: Designed to fund promotional activities, advertising, and community outreach, this tax is ideal for projects focused on growth and brand awareness.
- Development Tax: Designed to support ongoing technical improvements and feature additions, this tax is perfect for projects with a long-term development plan.
- Charity tax: For projects with a strong focus on social responsibility, this tax allocates funds to charitable causes or social impact initiatives.
- Buyback Tax: Designed to accumulate funds to buy back tokens from the market, this tax can help create deflationary pressure or stabilize the token price.
- Team Tax: Aimed at compensating core team members and contributors, this tax is suitable for projects with dedicated full-time teams that require ongoing funding.
When using 20lab's user-friendly interface, you'll have the opportunity to select and implement these tax types, customizing your token's wallet tax structure to align with your project's specific goals and tokenomics. Remember, the name you choose should accurately reflect the purpose of the tax and align with your overall vision. Transparency about how these taxes are used is critical to building trust and support within your community.
Now that we've explored the different wallet tax options, let's walk through the steps to create your ERC-20 wallet tax token using 20lab. Moreover, creating such a token will take as little time as reading this post!
Step 1: Initiating Your ERC-20 Token Creation
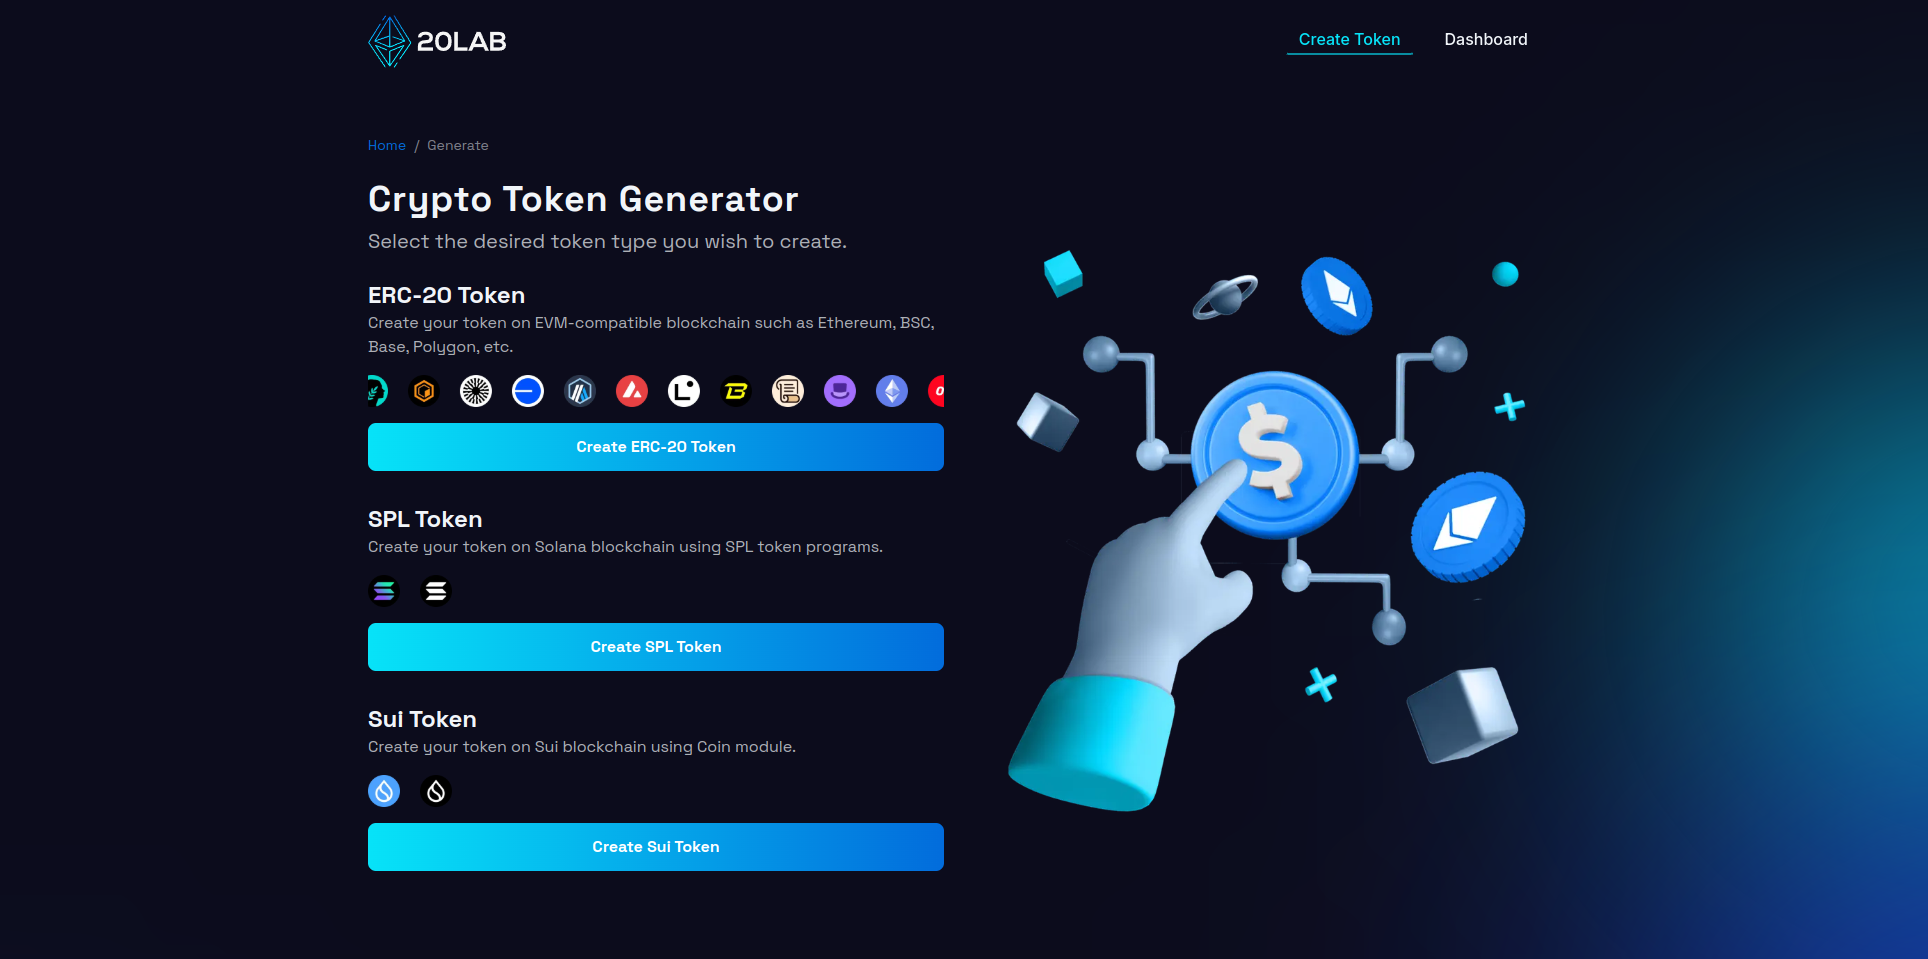
First, visit 20lab.app and navigate to the generator page. Click on "Create ERC-20 Token" to start the process.
The next important step is to connect your Web3 wallet to the platform. 20lab supports a wide range of wallets including MetaMask, Coinbase Wallet and Trust Wallet. Once connected, your wallet address will appear in the top right corner of the page, confirming successful integration.
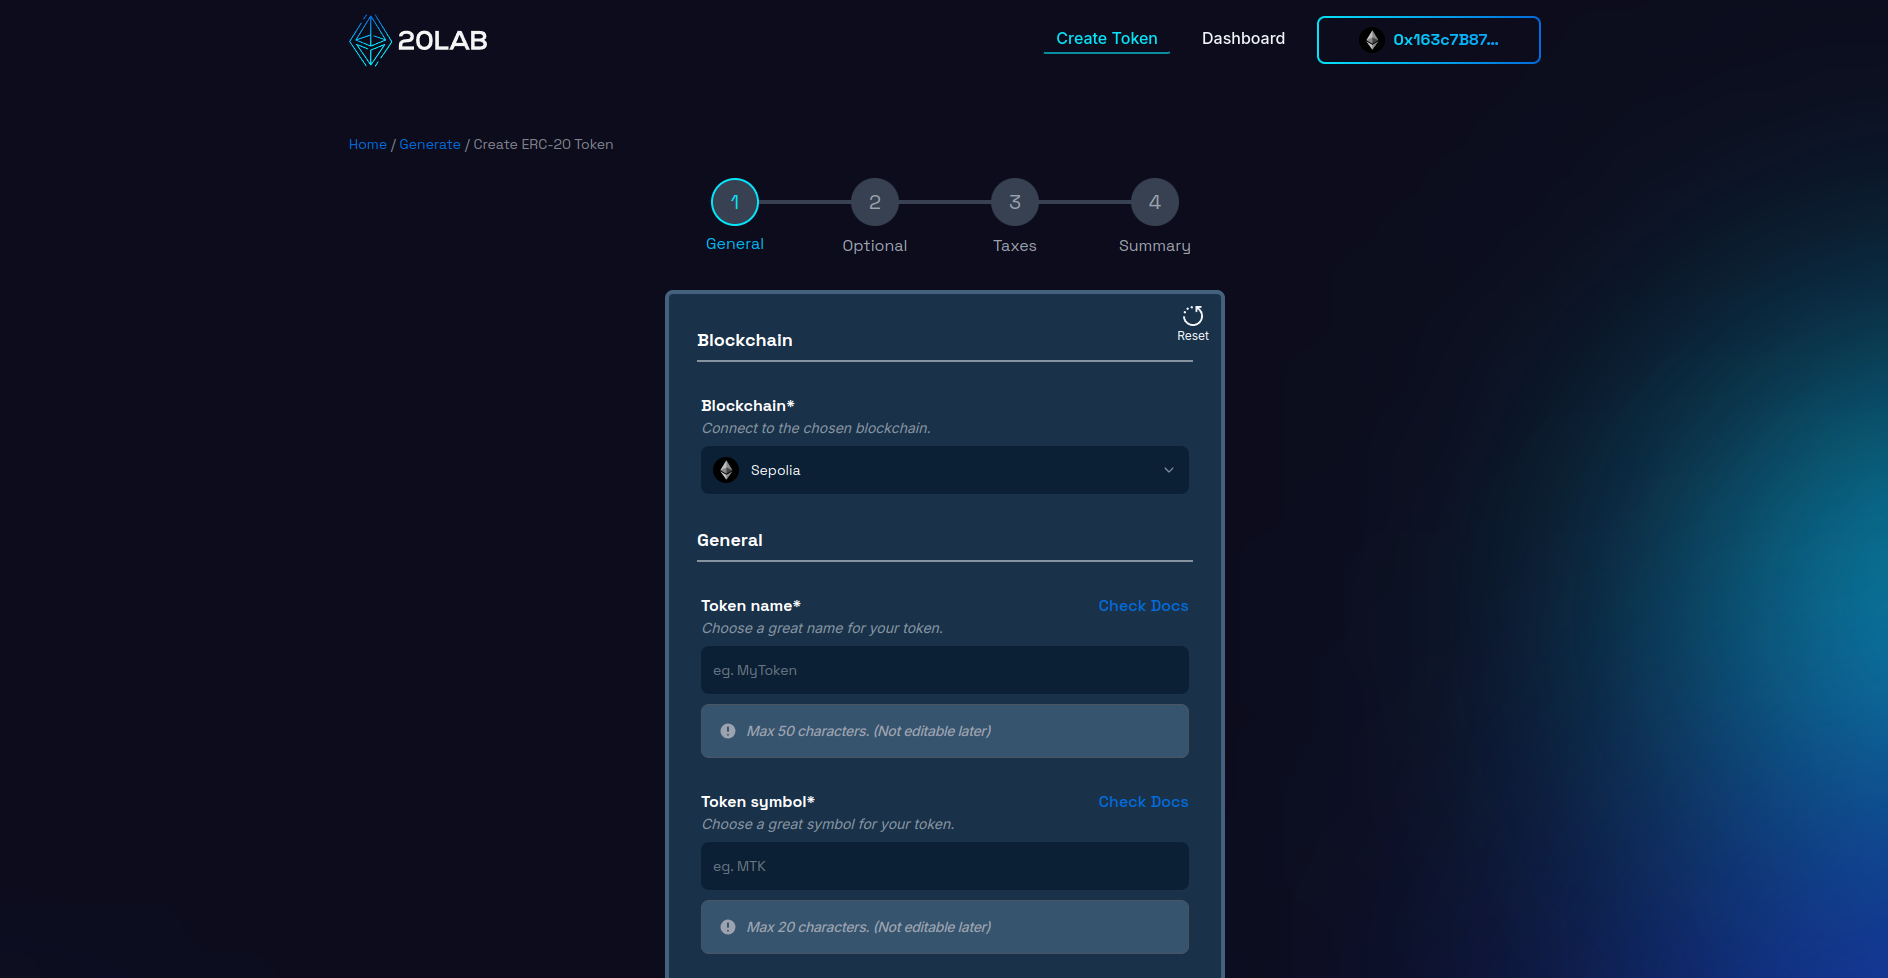
Before proceeding, make sure you're on the appropriate blockchain network:
- For production tokens, select the desired Mainnet,
- For testing purposes, choose a suitable Testnet.
20lab offers a range of popular blockchains, allowing you to select one that aligns with your project requirements. Consider factors such as:
- Transaction costs,
- Network speed,
- Ecosystem compatibility,
- Target audience preferences.
Your choice of blockchain will significantly impact your token's functionality and adoption, so carefully evaluate your options based on your project's specific needs and long-term objectives.
Step 2: Establishing Your ERC-20 Token's Core Parameters
This phase is critical because it defines the essential attributes of your ERC-20 token. Start by creating a distinctive and meaningful name for your token, accompanied by a short, memorable ticker symbol. It's a good idea to do some research to ensure that your chosen identifiers are unique in the crypto space.
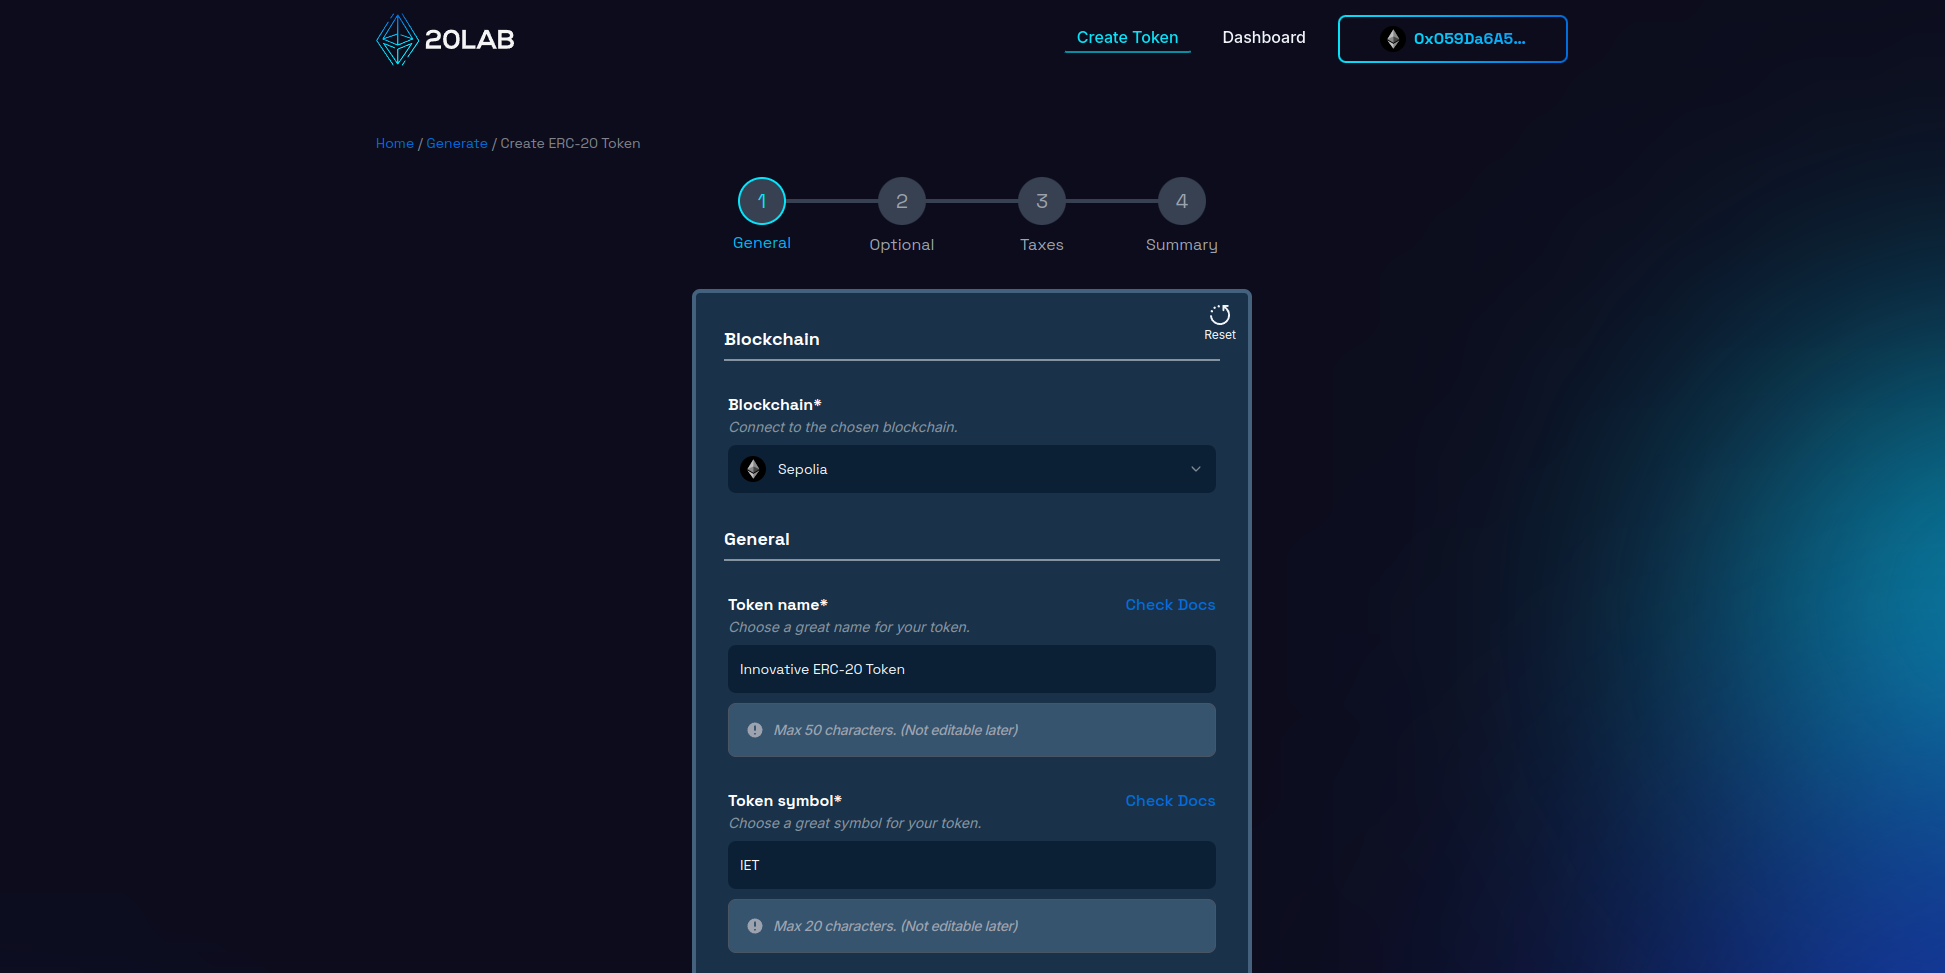
Next, specify the total supply of tokens. For example, setting a supply of 100,000,000 tokens can provide sufficient liquidity while maintaining a sense of scarcity.
Determine the divisibility of the token by setting the number of decimal places. The industry standard for ERC-20 tokens is 18 decimal places, mirroring the divisibility of Ethereum and other major cryptocurrencies. This level of precision facilitates microtransactions and fine-tuned token economics.
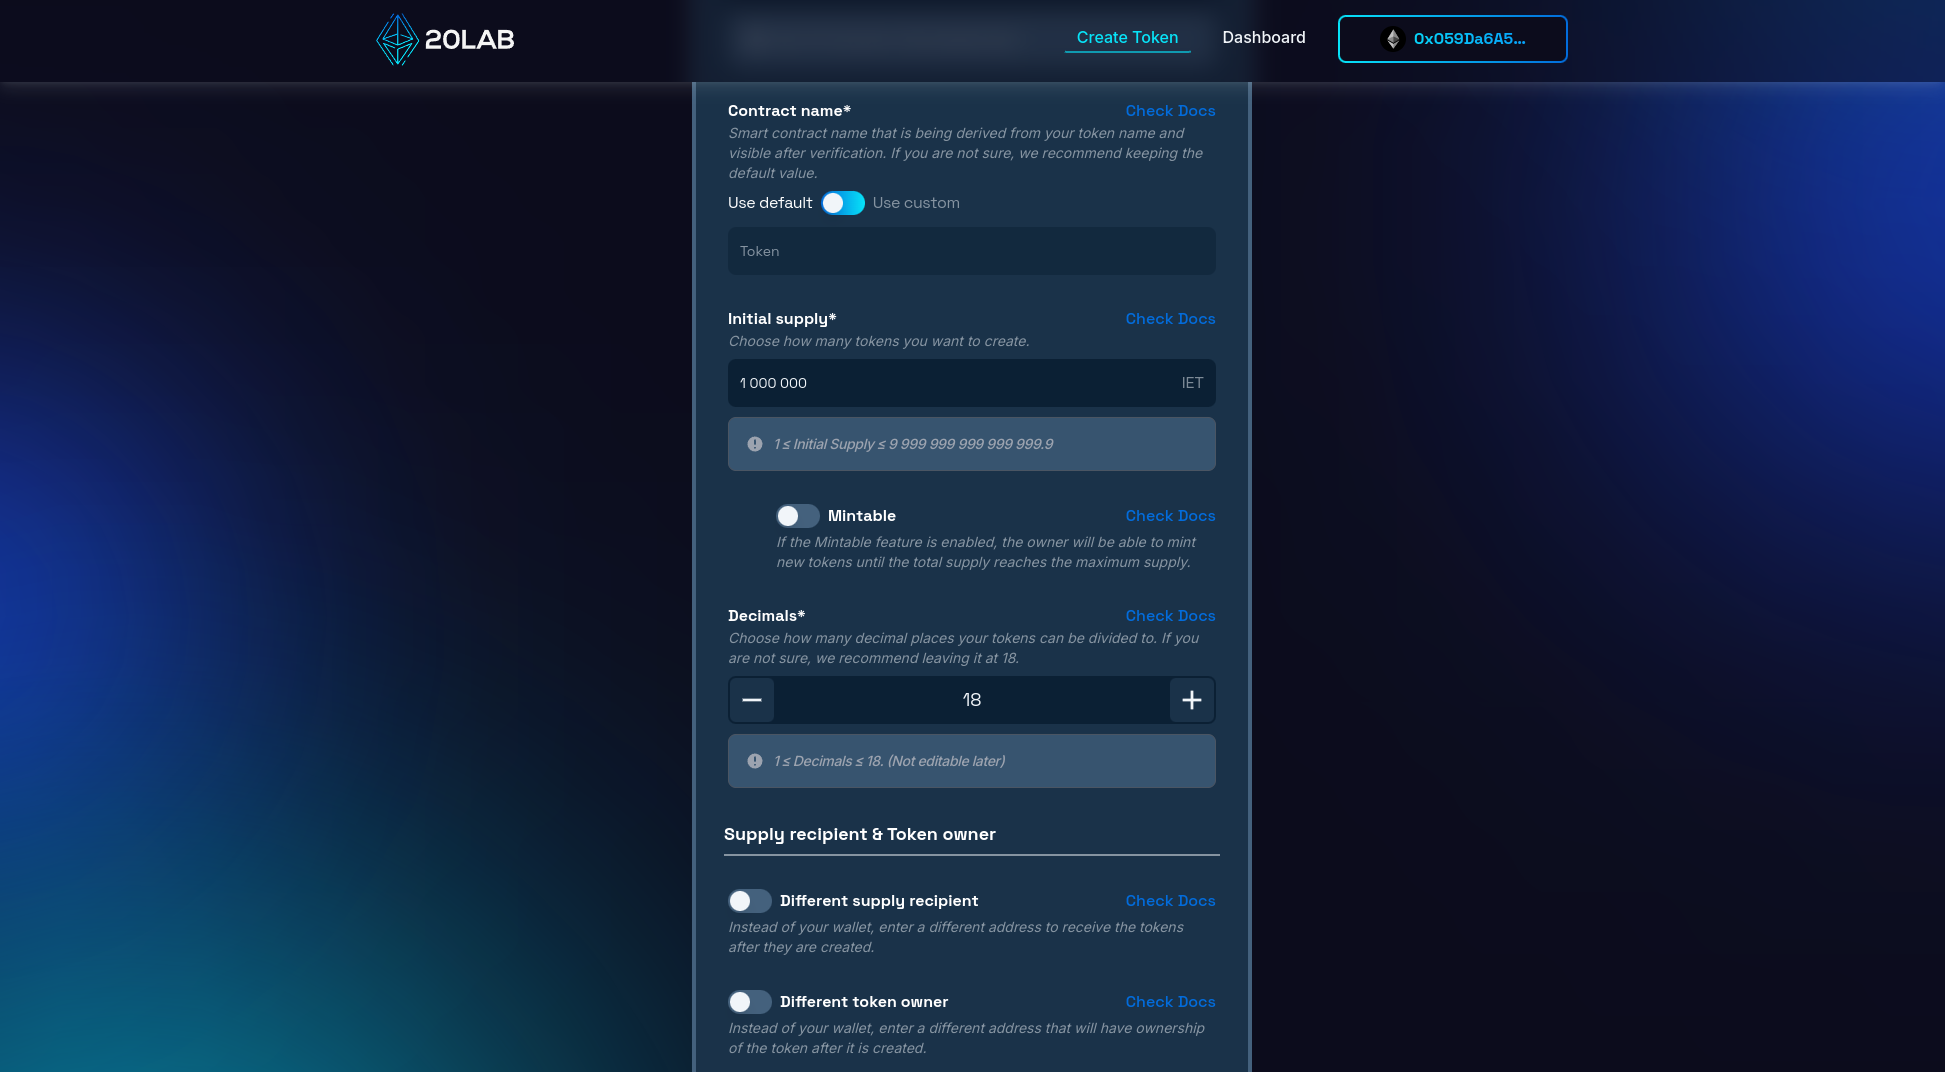
You have the option to specify a unique contract name that will be the identifier for your smart contract on Block Explorer after verification. This can be the same as your token name or a more technical name such as "InnovativeTokenV1".
Critical decisions include selecting the wallet to receive the initial token supply and determining the token owner. The supply recipient will hold the entire token allocation at launch, which can be your personal wallet or a dedicated project wallet. The token owner will have administrative rights to owner-restricted functionality. While this is often the same as the deployer, it can be a separate address if desired. For added security, consider implementing a multi-signature wallet.
These basic settings shape the identity and operational framework of your token. Make informed choices, taking into account your project's long-term goals and scalability potential. Decisions made at this stage will affect your token's perception, utility, and integration capabilities with decentralized applications, ultimately impacting the user experience.
Step 3: Implementing the Wallet Tax/es
Now that you've set up the basic parameters of your ERC-20 token, it's time to implement the wallet tax feature. 20lab's token generator makes this process easy and allows you to customize your tax structure according to the needs of your project. Navigate to the "Taxes" page of the creation form on the 20lab platform and find the "Wallet Taxes" section.
The first decision you'll need to make is whether to keep enabled or disable the default exchange setting. This choice has a significant impact on how your wallet tax works.
With default exchange disabled, the wallet tax is applied uniformly to each transaction type. For example, if you set a 2% wallet tax and someone buys 100 tokens, they'll receive 98 tokens. The remaining 2 tokens are automatically transferred to the designated wallet tax recipient in the same transaction.
With default exchange enabled, you can set different tax rates for different transaction types, such as buy, sell, and transfer (other). You can also set the token or coin in which your wallet tax will be sent to the recipient's wallet.
When setting up your wallet tax, keep the following in mind:
- Tax recipient: Specify the address that will receive the collected tax.
- Tax name: Choose a name that reflects the purpose of the tax (e.g. "Marketing Tax", "Development Tax").
- Tax rate: Select a percentage to be applied to transactions.
- Receiving currency: Decide whether the fees will be collected in your token or another currency (only if default exchange is enabled).
Important Note: The wallet tax name and receiving currency cannot be changed after deployment, so choose carefully!
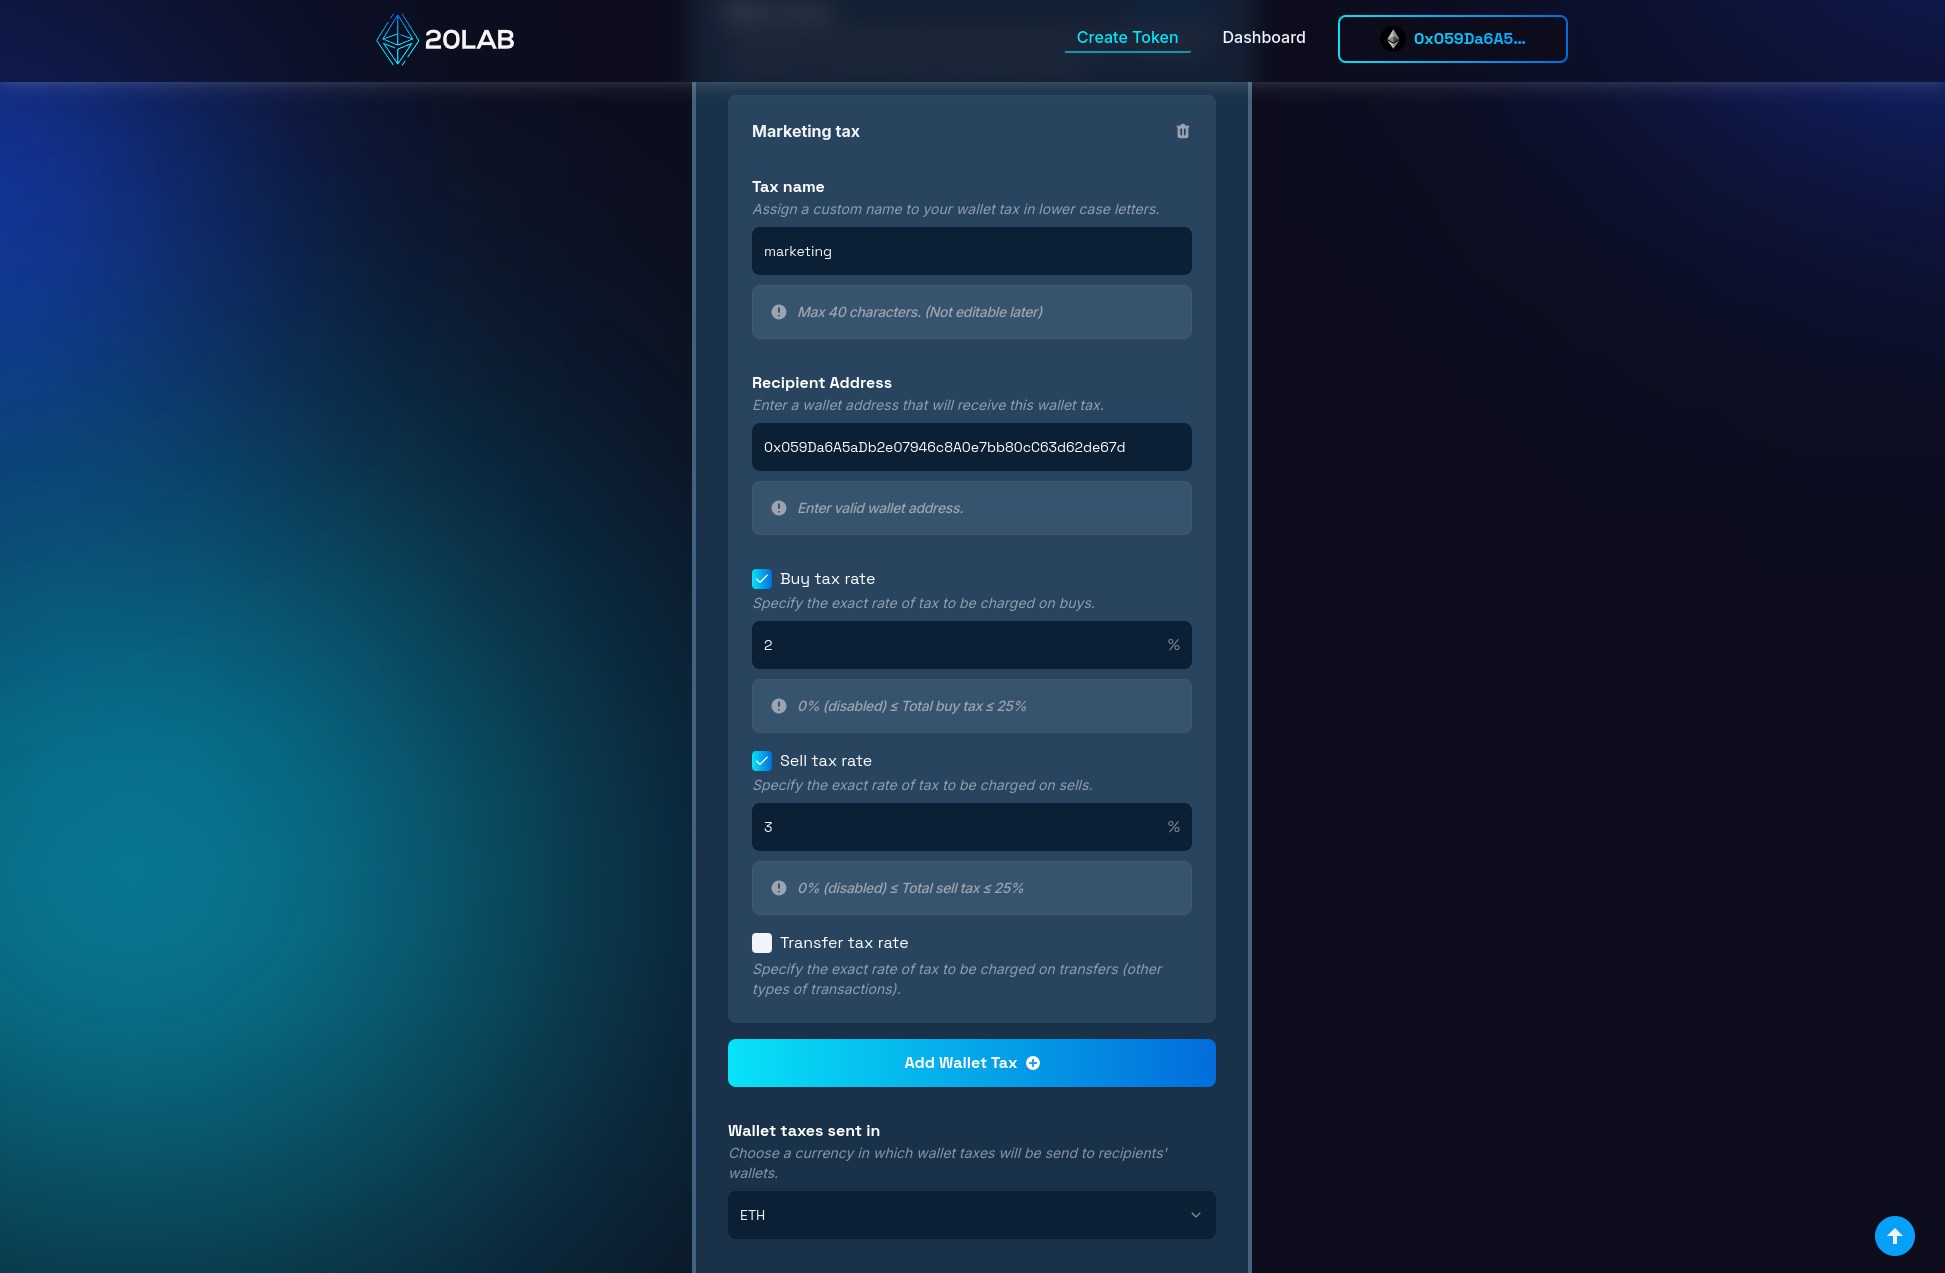
If you choose to receive the tax in a currency other than your token, the smart contract will perform an internal swap. This process converts the collected tax tokens into the desired currency before sending them to the tax recipient's address. If the tax is collected in a different currency, you can set a swap threshold. This feature controls how often the swap occurs, allowing you to optimize for gas fees and efficiency.
Using 20lab's intuitive interface, you can easily implement up to 5 different wallet taxes, creating a token that not only meets your project's funding needs, but also aligns with your overall tokenomics strategy.
Step 4: Review and Deploy
Before finalizing your token creation, it's important to carefully review all configured parameters on the "Summary" page. This final review stage acts as an important check, allowing you to catch and correct any potential errors or oversights that could become costly after deployment.
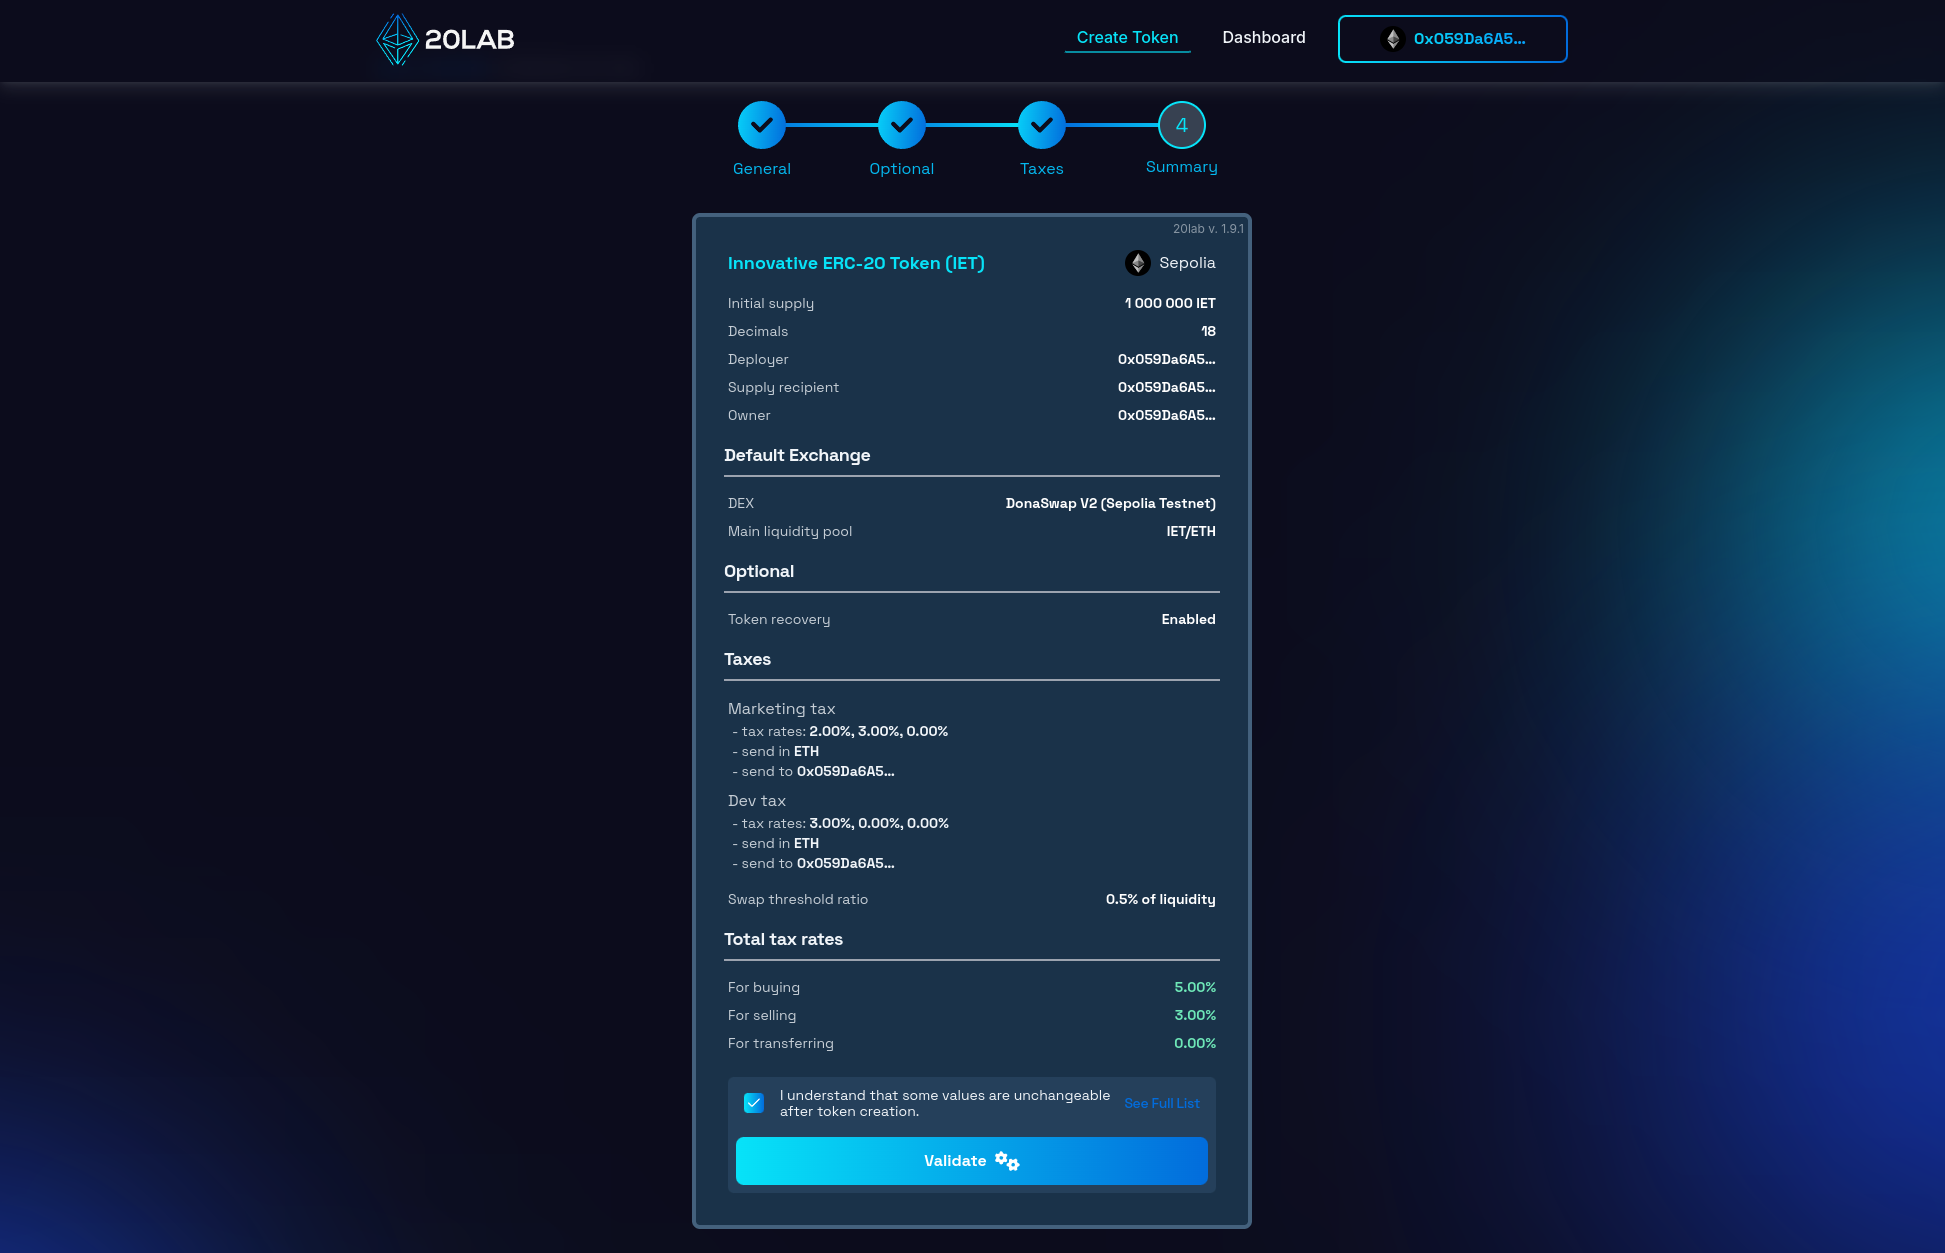
Once you have thoroughly reviewed all the details, click the button to initiate the validation process. This automated check serves as an additional layer of protection, identifying any technical inconsistencies or issues that could compromise the functionality of your token on the blockchain.
Upon successful validation, you may be presented with a deployment modal that allows you to personalize your token's address pattern. This unique feature allows you to add a distinctive touch to your token's blockchain identifier, enhancing its memorability and brand alignment.
Now you're ready for the big moment. Click "Deploy" to begin the process of instantiating your token on your chosen blockchain network. This action will trigger a prompt from your connected wallet requesting transaction confirmation. Upon confirmation, your ERC-20 token will be live on the selected blockchain.
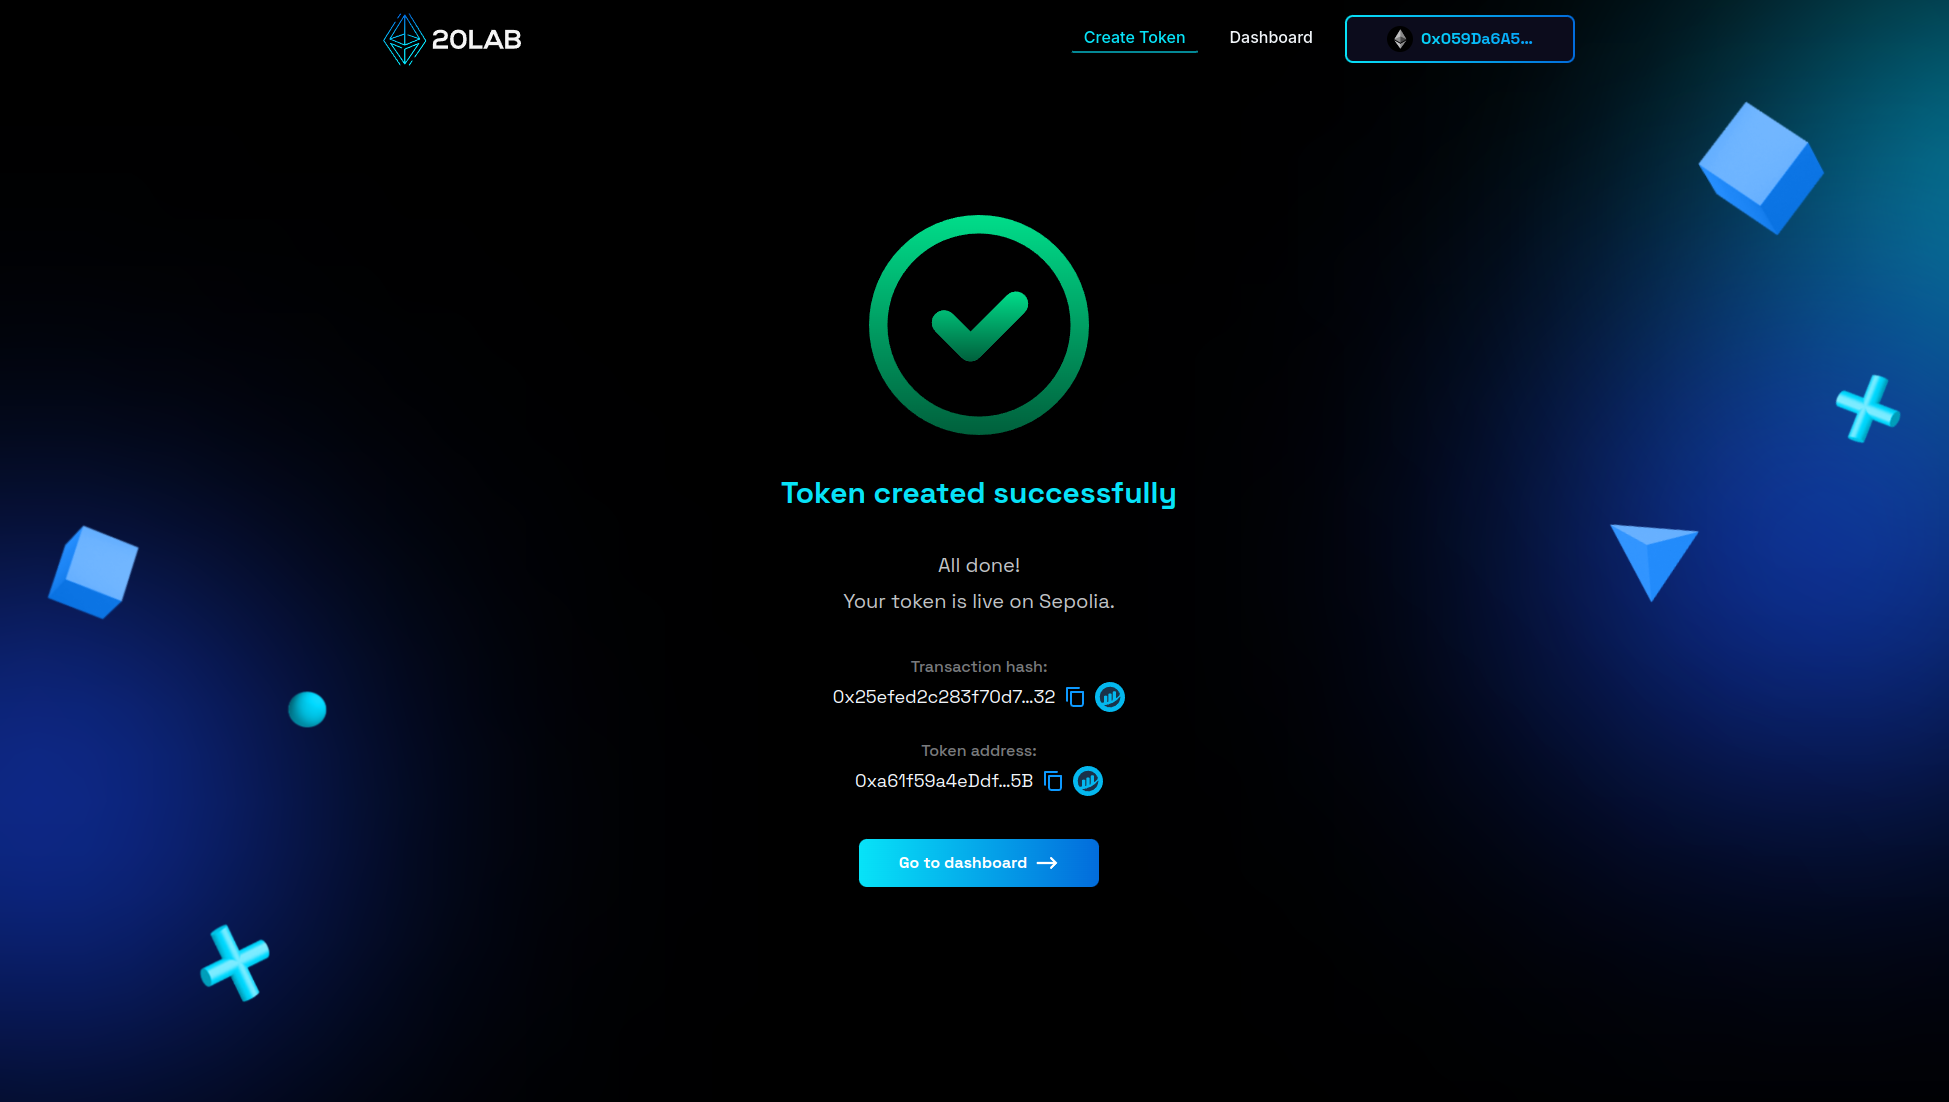
Managing Your ERC-20 Token with Wallet Taxes
After successfully launching your ERC-20 token with wallet tax on 20lab.app, you will gain access to an intuitive management dashboard. This comprehensive control panel provides a suite of tools to monitor and fine-tune your newly created token.
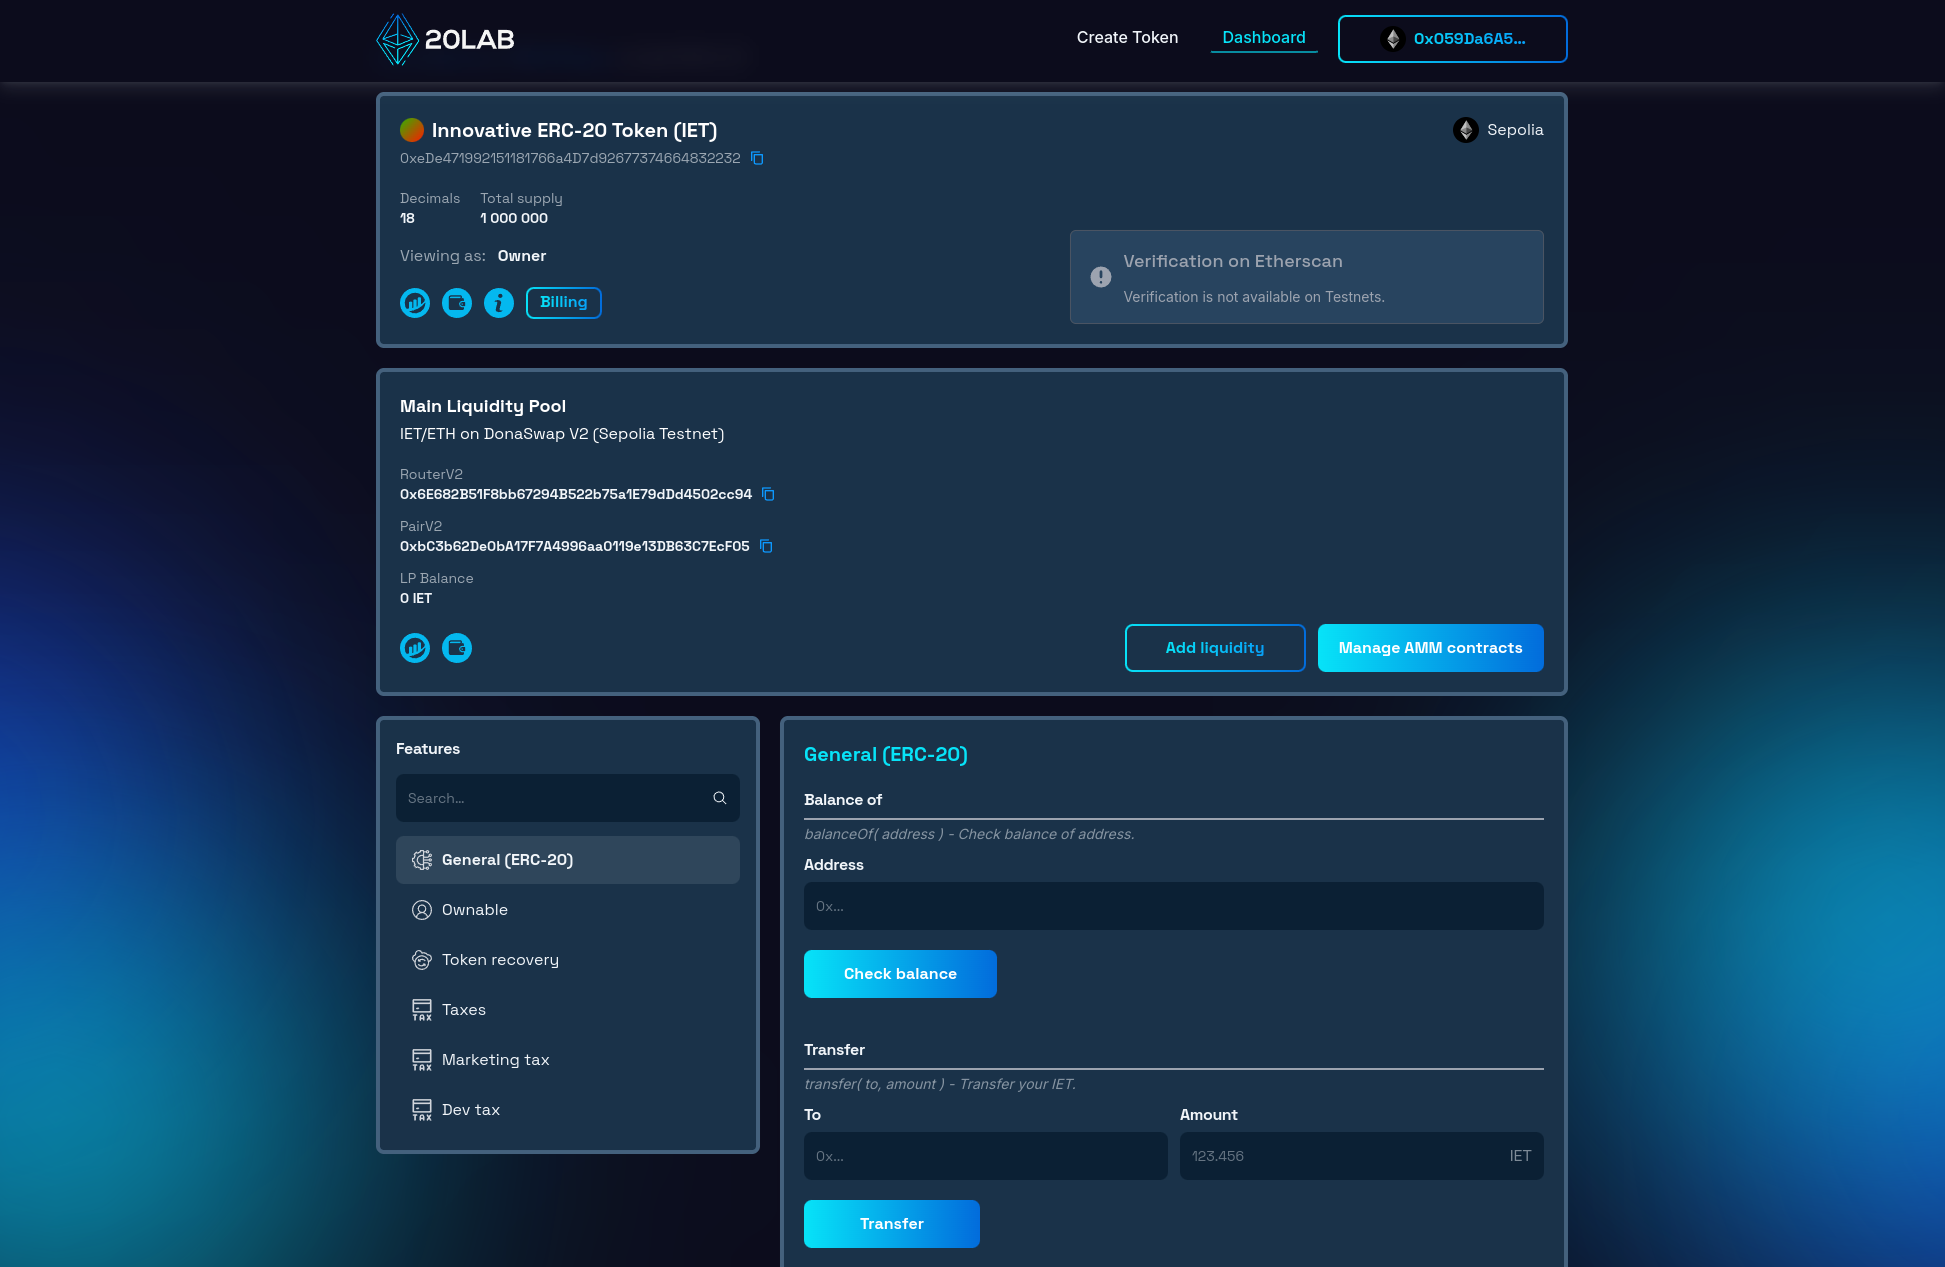
The dashboard provides a detailed view of key information about your token. At a glance, you can access critical details such as your token's blockchain address, total supply, token name, ticker symbol and decimal precision. This ensures that you're always aware of your token's fundamental metrics.
A critical component of the dashboard is the ownership management suite. As the token creator, you retain initial ownership unless delegated during the creation process. The "Ownable" section allows you to view current permissions, transfer ownership to a new address, or renounce ownership as needed.
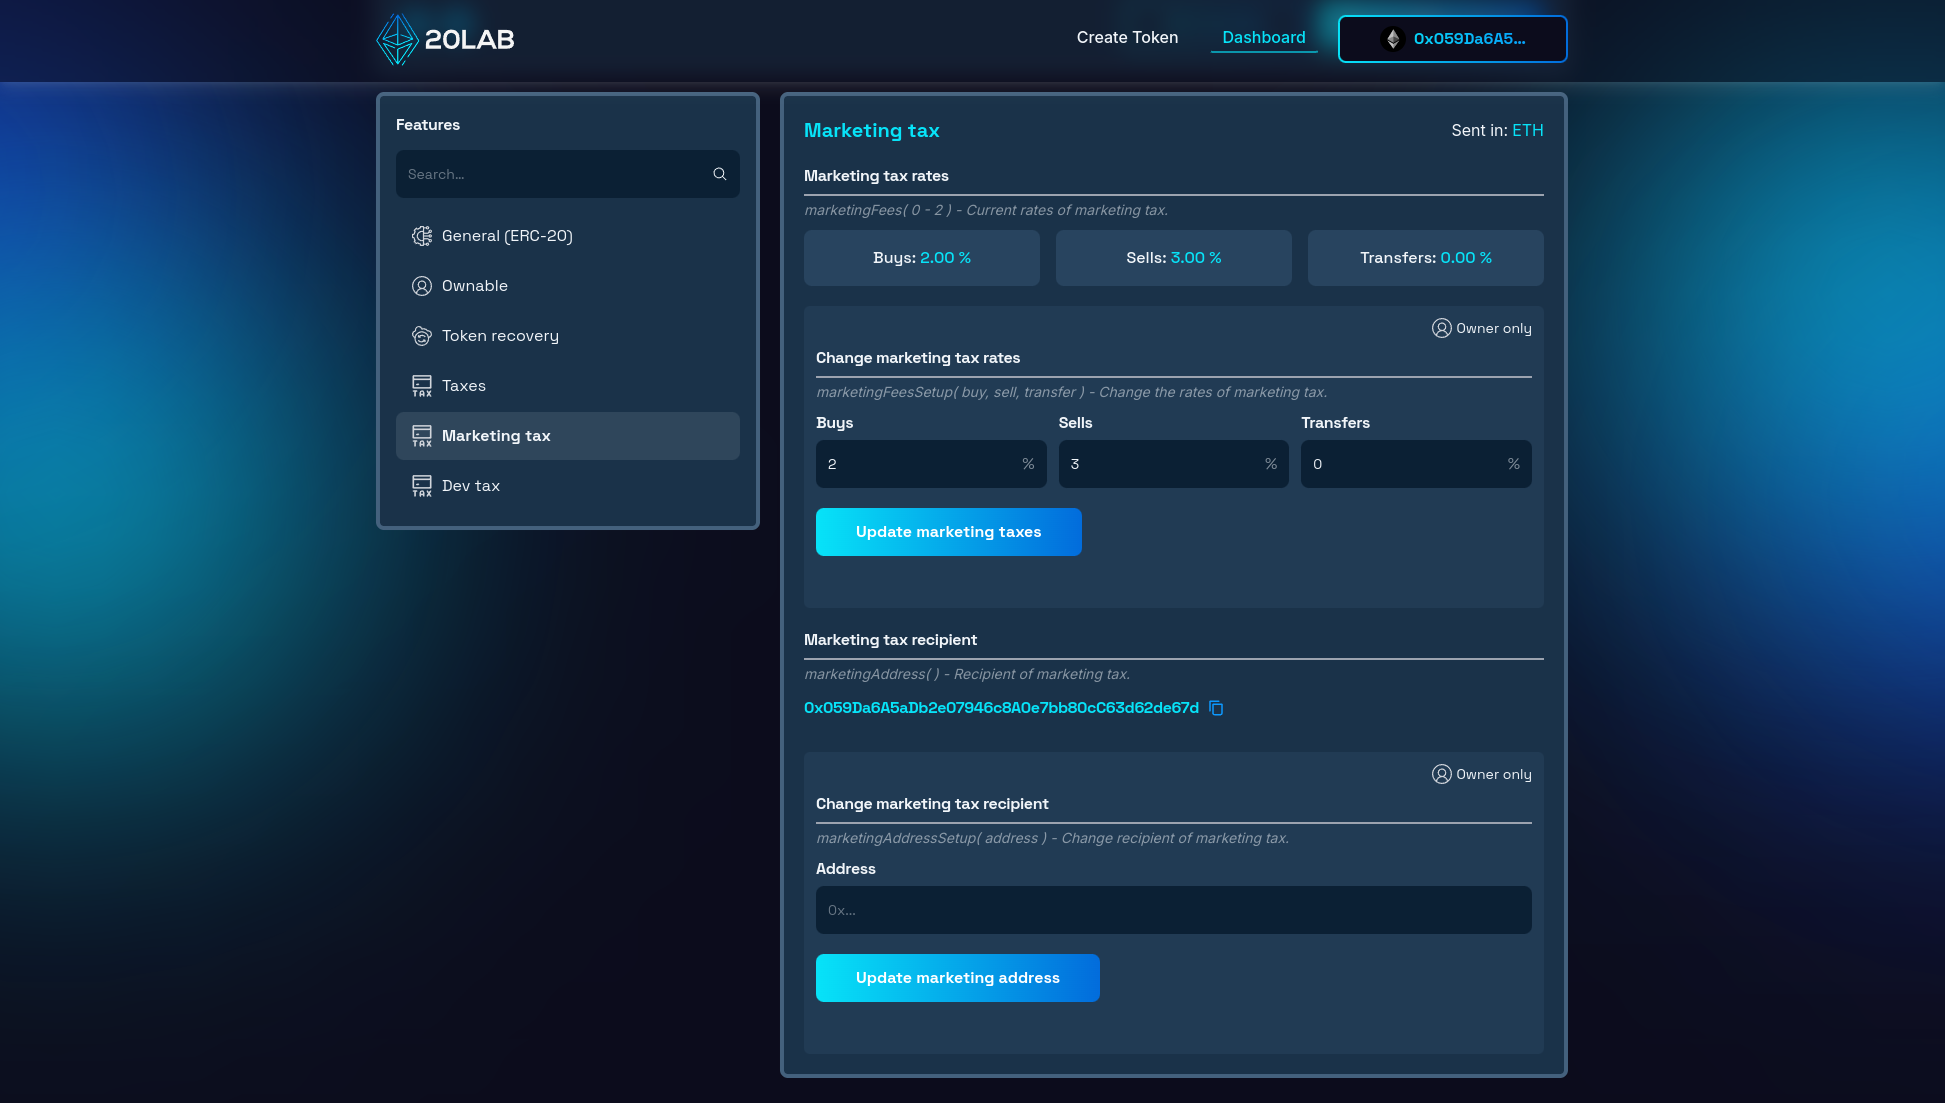
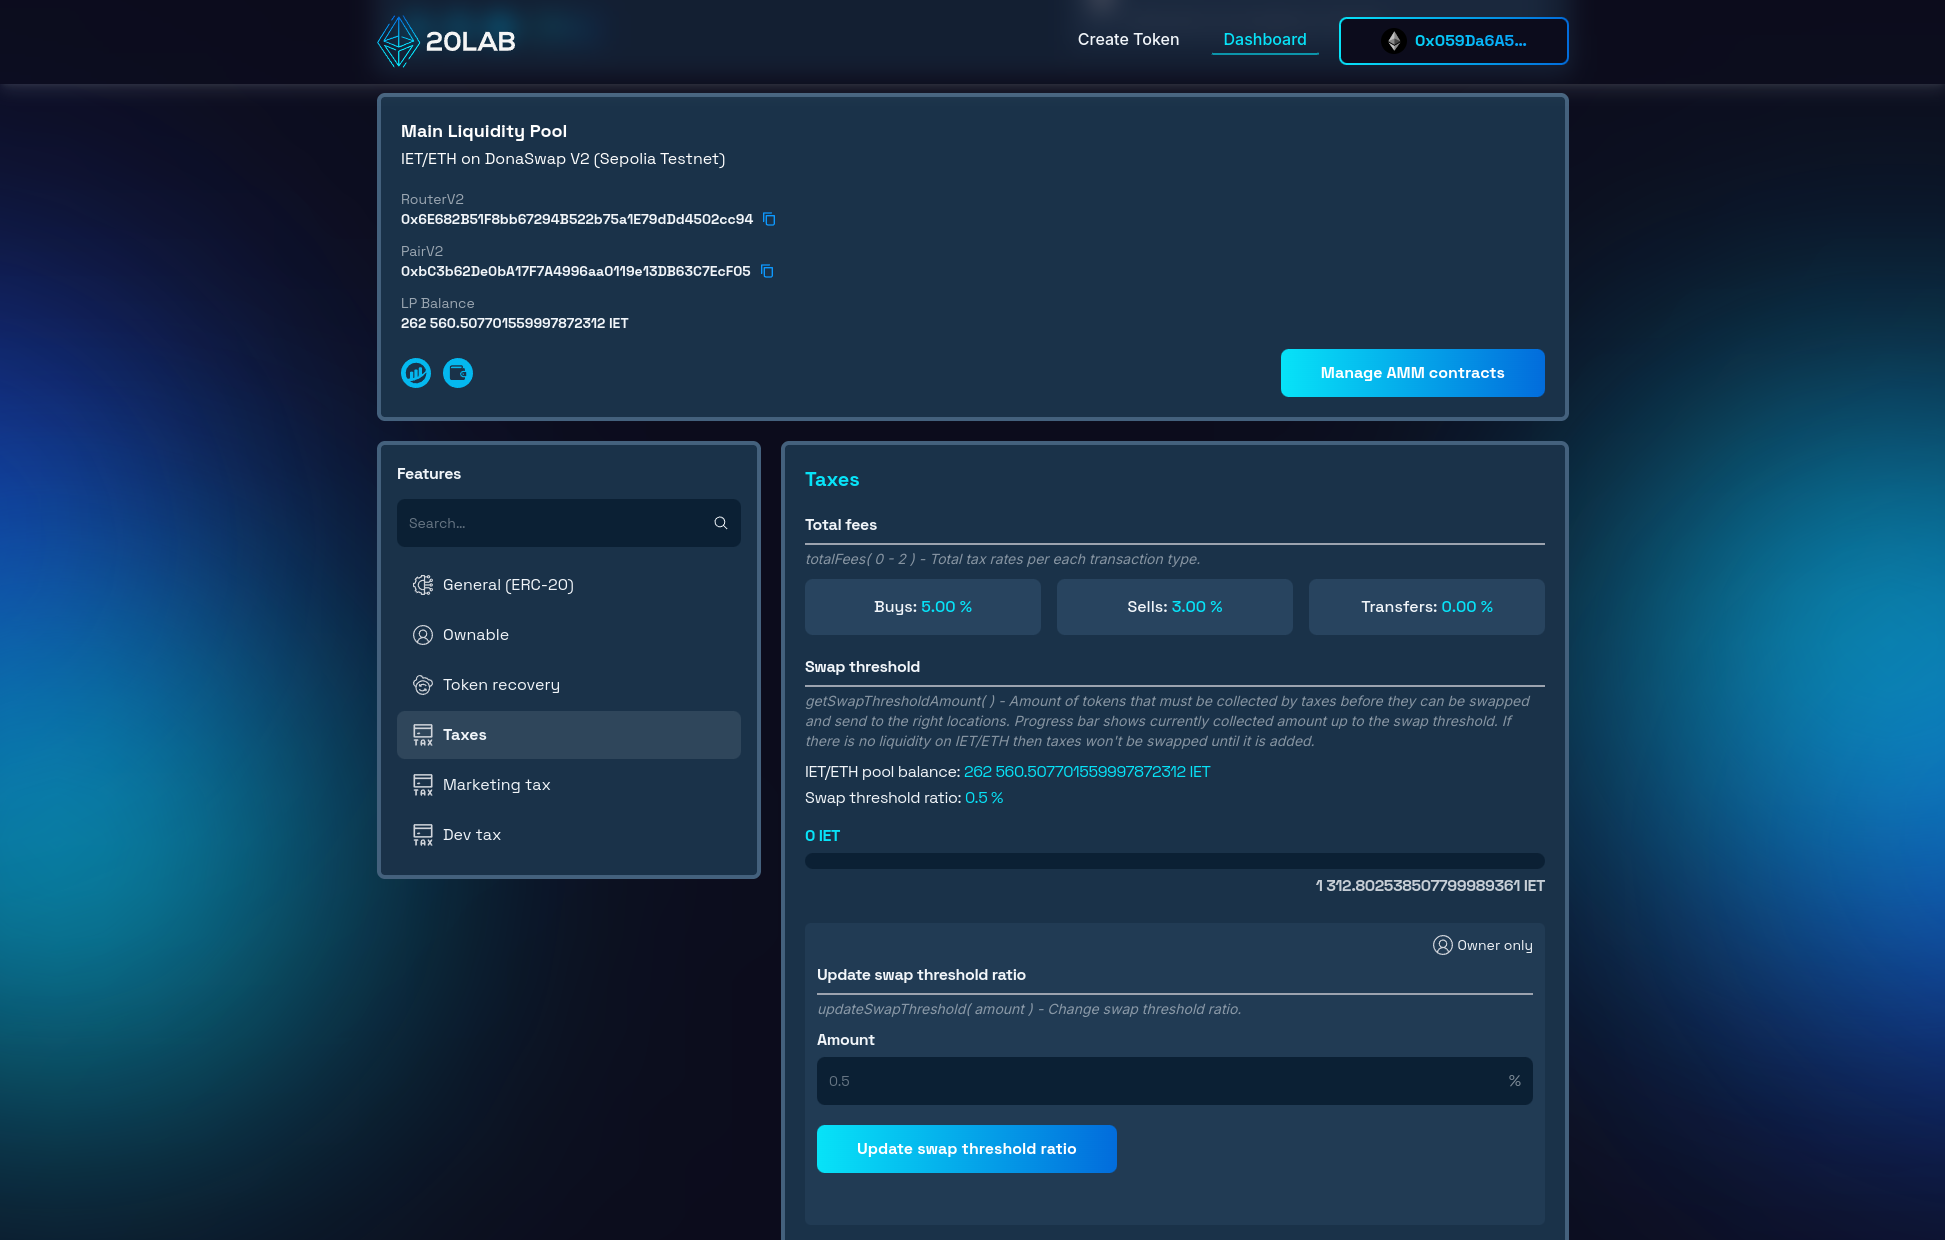
Since the wallet taxes are built into your token's smart contract, new sections of the dashboard allow you to monitor and manage this feature. For each wallet tax, there is a separate section that displays the current tax rates for different transaction types (buy, sell and transfer) and the recipient's wallet address. The "Taxes" section allows you to manage the current swap threshold and whitelist from paying fees.
You can check the addresses whitelisted by default in our documentation or directly in your token's dashboard.
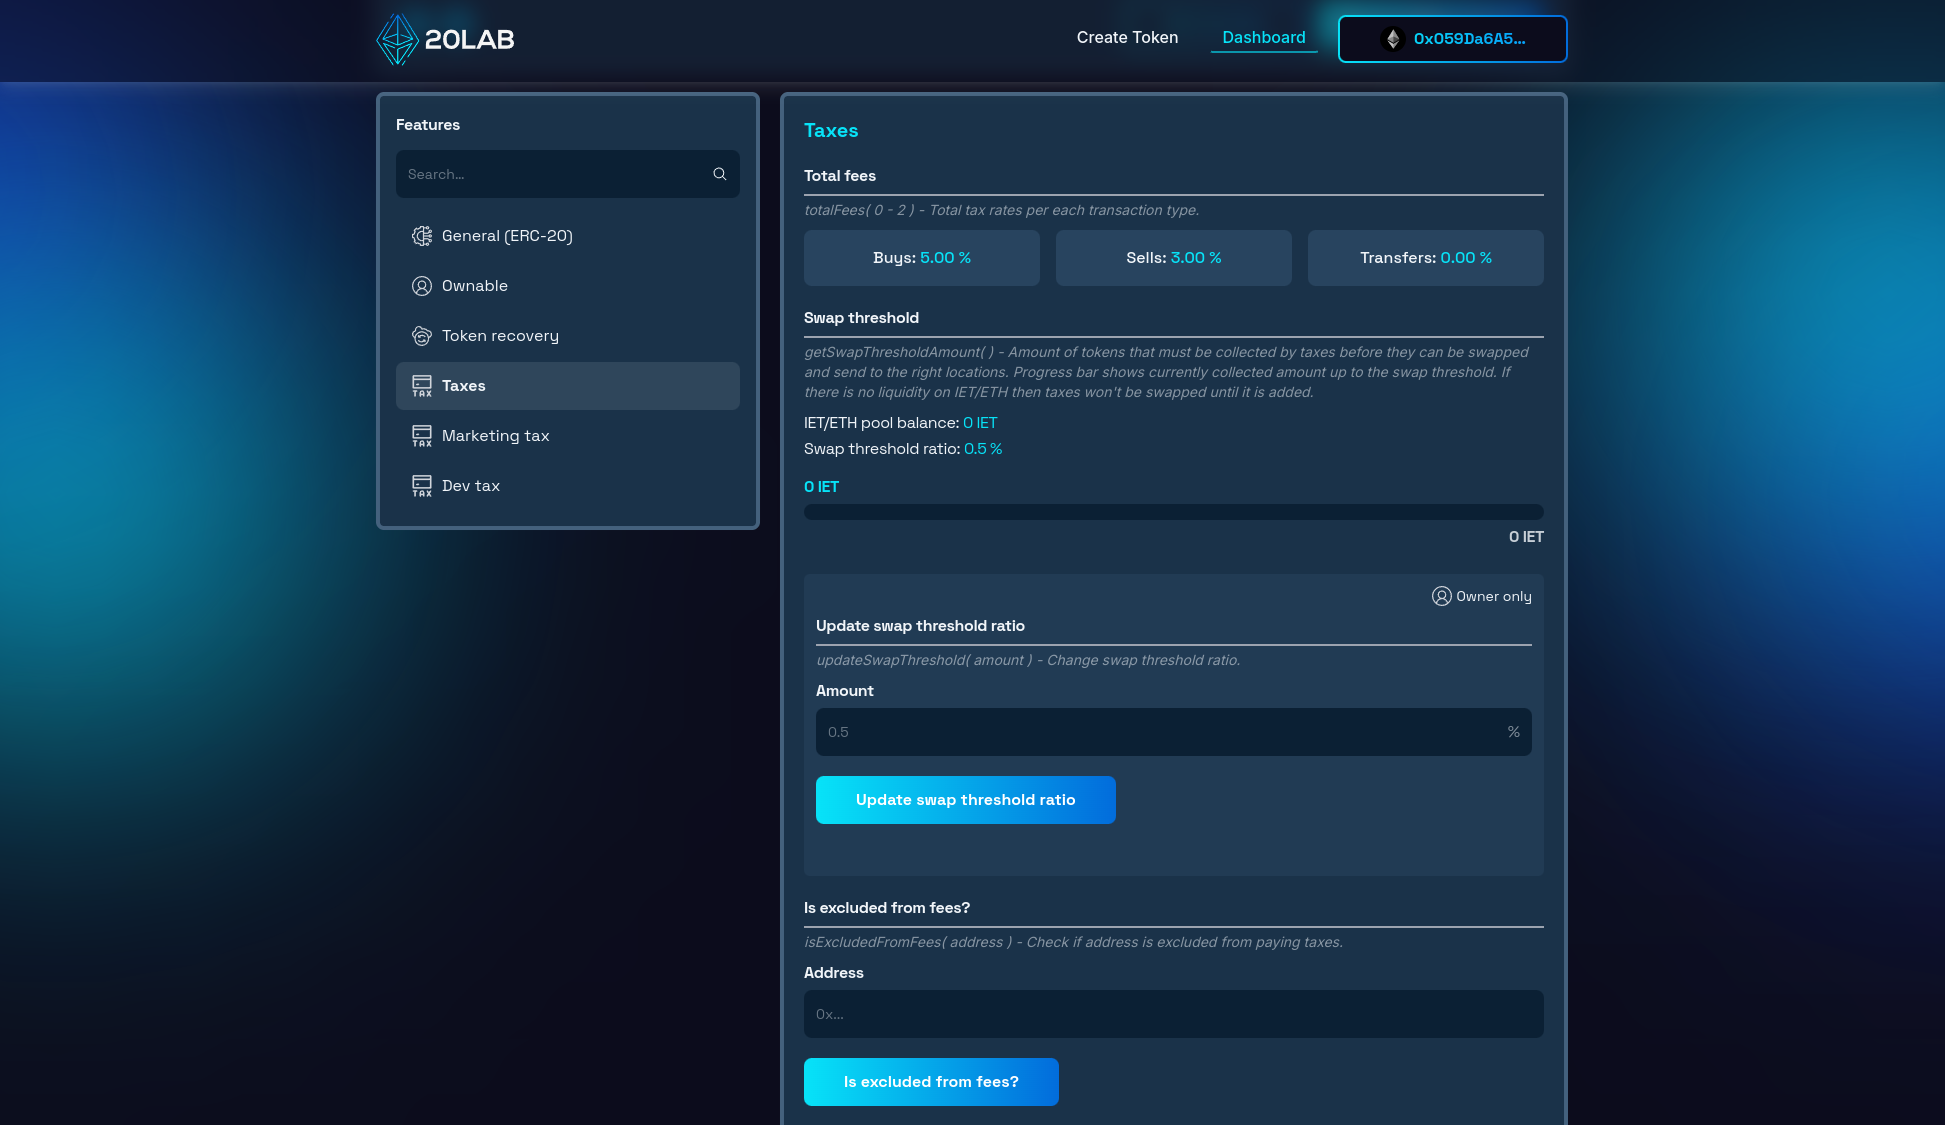
Importantly, you can adjust wallet tax rates even after deployment, as long as token ownership is not renounced. This flexibility allows you to adapt to changing market conditions or project needs. To change the rates, select the desired wallet tax and simply enter new percentages for each transaction type in the appropriate update fields and confirm the transaction from the token owner's wallet. If you don't want to charge taxes on a particular transaction type, simply enter 0%.
If you've enabled the default exchange option, you can manage AMM pair contracts in the DEX section of the dashboard. This feature allows you to add or remove recognized exchange pairs, ensuring that your wallet tax works seamlessly across different decentralized exchanges if your token has liquidity on more than one exchange pair.
For tokens with the internal swap mechanism enabled (where taxes are sent in a different currency), you can monitor and adjust the swap threshold from the dashboard. This feature helps you optimize for gas fees and efficiency by controlling how frequently the collected taxes are swapped and sent to the recipient's address.
Putting Wallet Taxes to the Test
Let's dive into a practical demonstration of how wallet taxes function in real-world scenarios. We'll walk through various token interactions to see these mechanisms in action.
Adding Liquidity on a Decentralized Exchange (DEX)
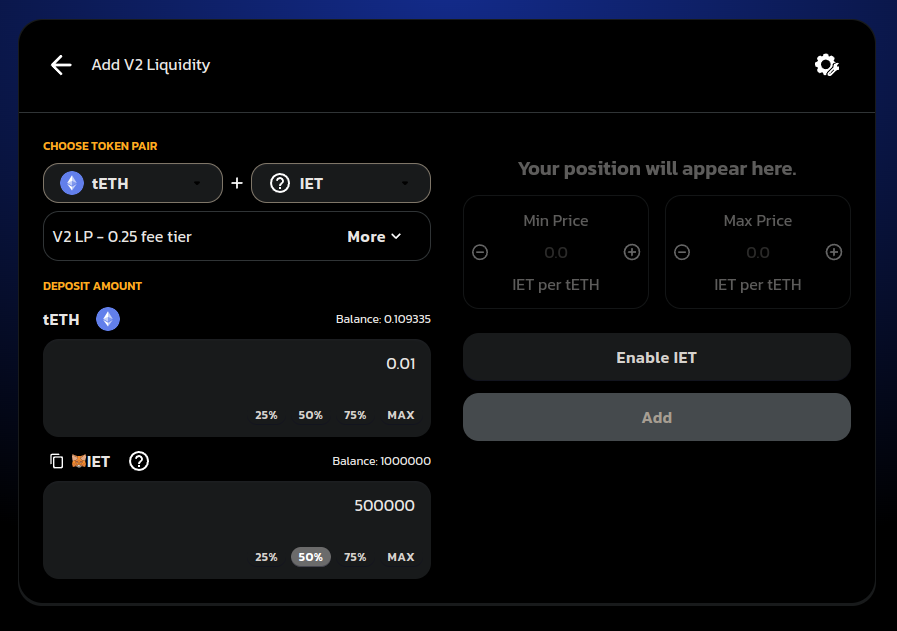
Once you've minted your ERC-20 token with 20lab's wallet tax, your next step is usually to add liquidity to your token. This usually involves creating a trading pair on a decentralized exchange (DEX) that links your token to a widely used cryptocurrency to allow for smooth trading.
Buying using Different Address
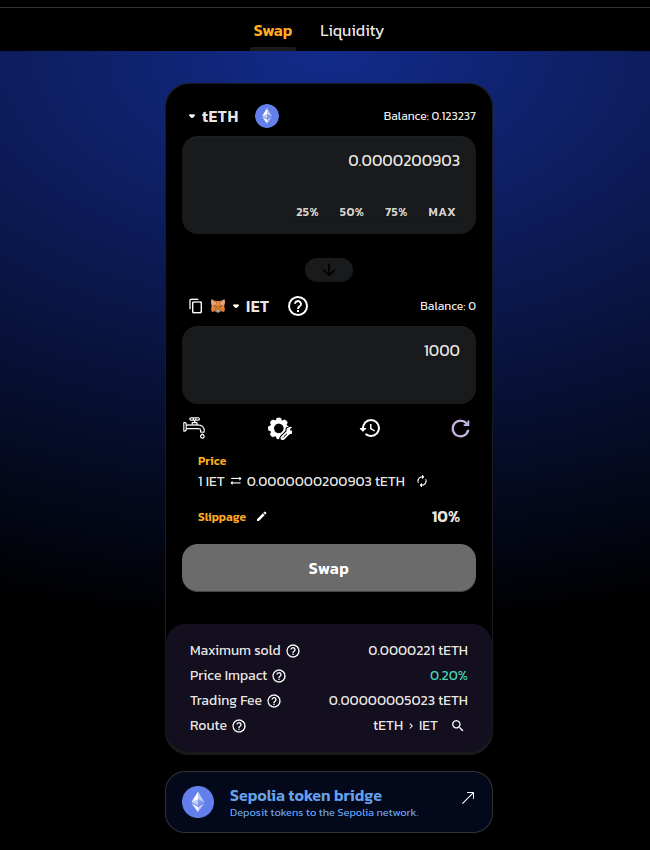
When a user buys your token on the default exchange, the buy tax is applied. For example, if you have a 3% buy tax and someone buys 1000 tokens, they will receive 970 tokens, with 30 tokens taken as tax. Similarly, if you have a 5% sell tax and a user sells 1000 tokens, they will receive the equivalent of 950 tokens in native coin, with 50 tokens collected as tax.
For transfers between wallets that are not buy or sell transactions on the default exchange, the transfer tax rate is applied. If this is set at 2%, and a user transfers 1000 tokens to another wallet, the recipient will receive 980 tokens, with 20 tokens collected as tax.
Let's try to buy 1000 tokens using a different address to see how the fee is calculated.
After confirming the transaction in the wallet, let's go to the Block Explorer page to see more details about the purchase transaction.
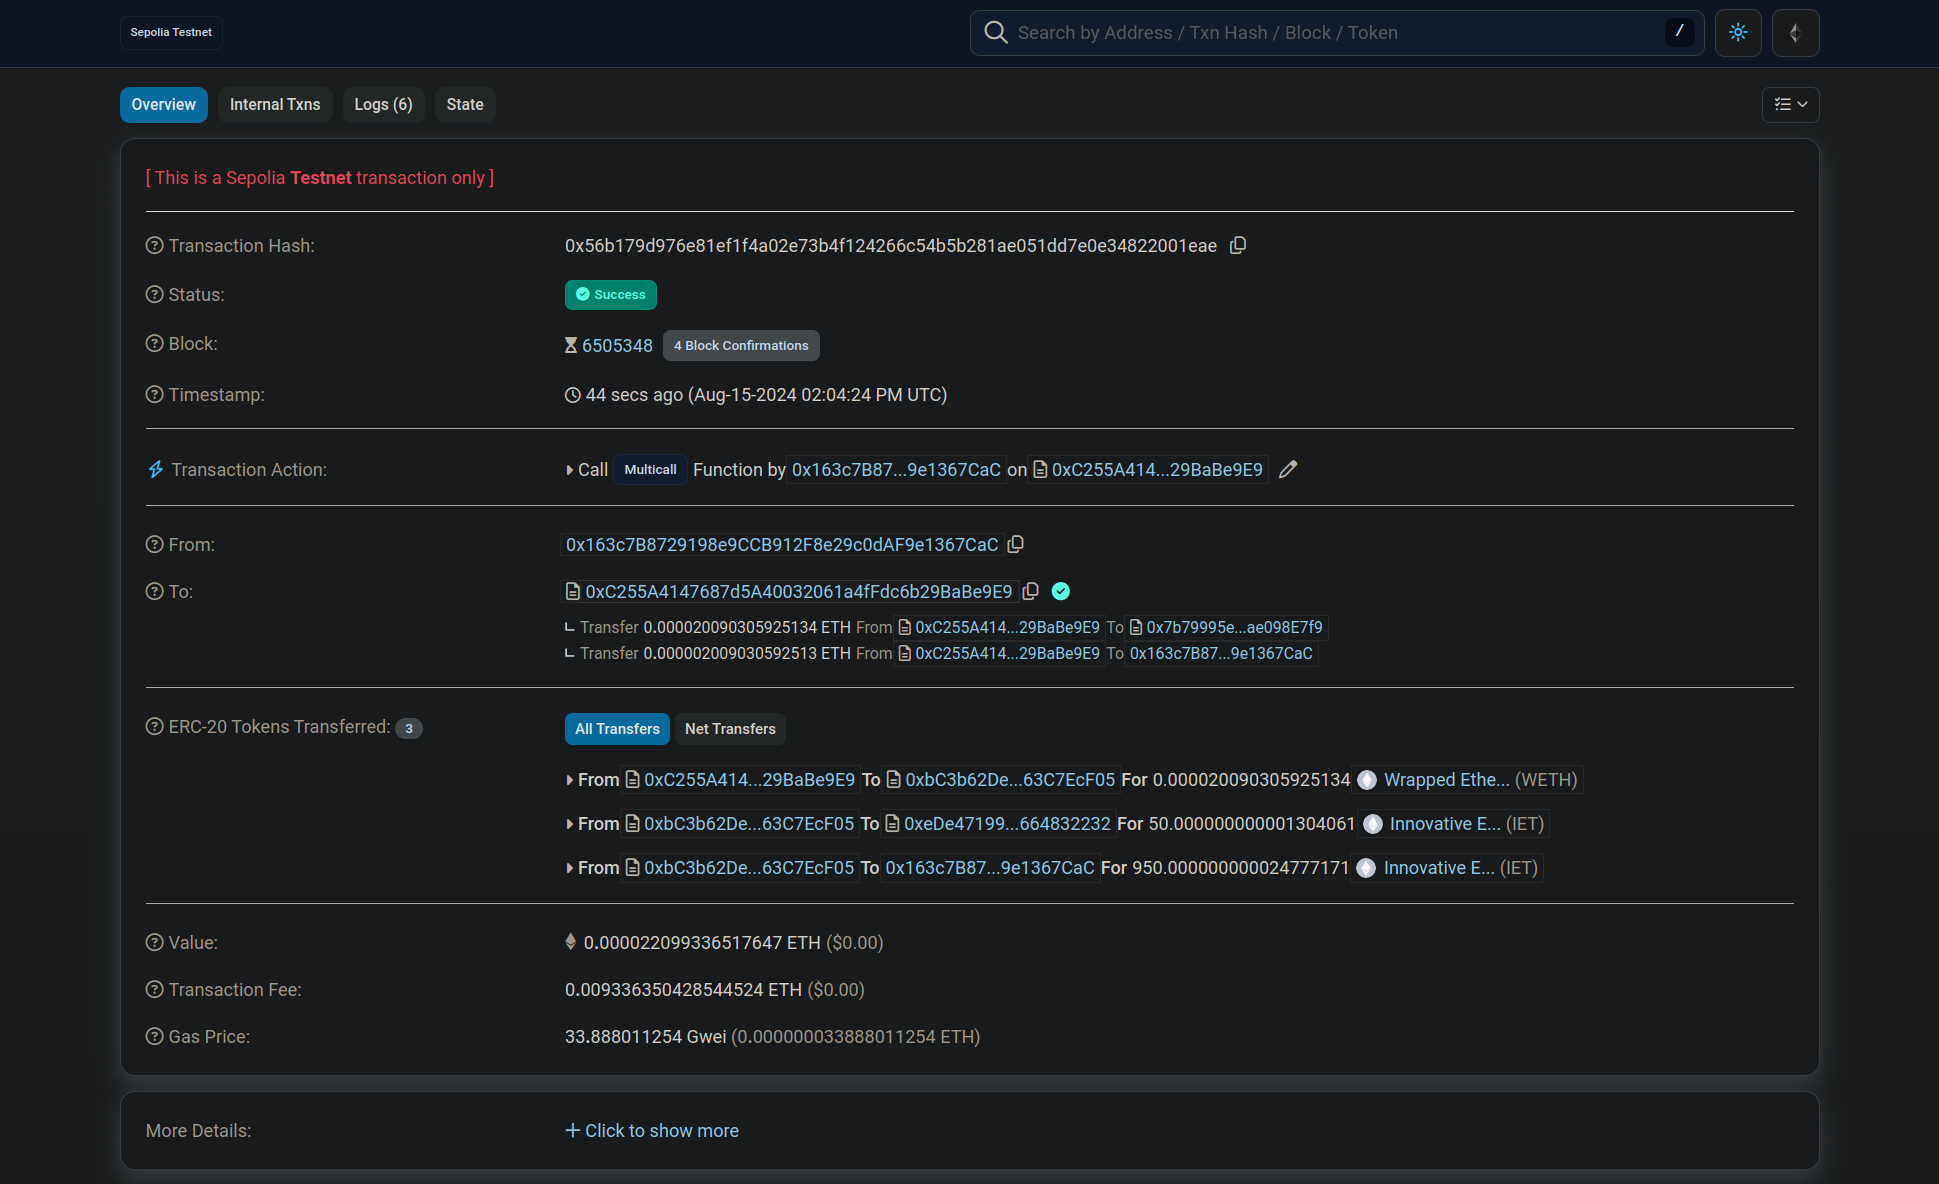
As we can see on the Block Explorer in the "ERC-20 Tokens Transferred" row, 50 IET were sent to the token contract and we received 950 IET, that's where my marketing and dev taxes take the cumulative 5% specified when generating the token.
Sending Payout in Native Coins
If you didn't select your own token as the receiving currency, the wallet taxes collected from these transactions will accumulate on your token contract until they reach the swap threshold. Once this threshold is reached, the smart contract automatically converts them to the specified receiving currency (e.g. BNB) and distributes proportional amounts to all of your wallet tax recipient wallets.
After buying from another address, let's go back to the dashboard and see the accumulation progress.
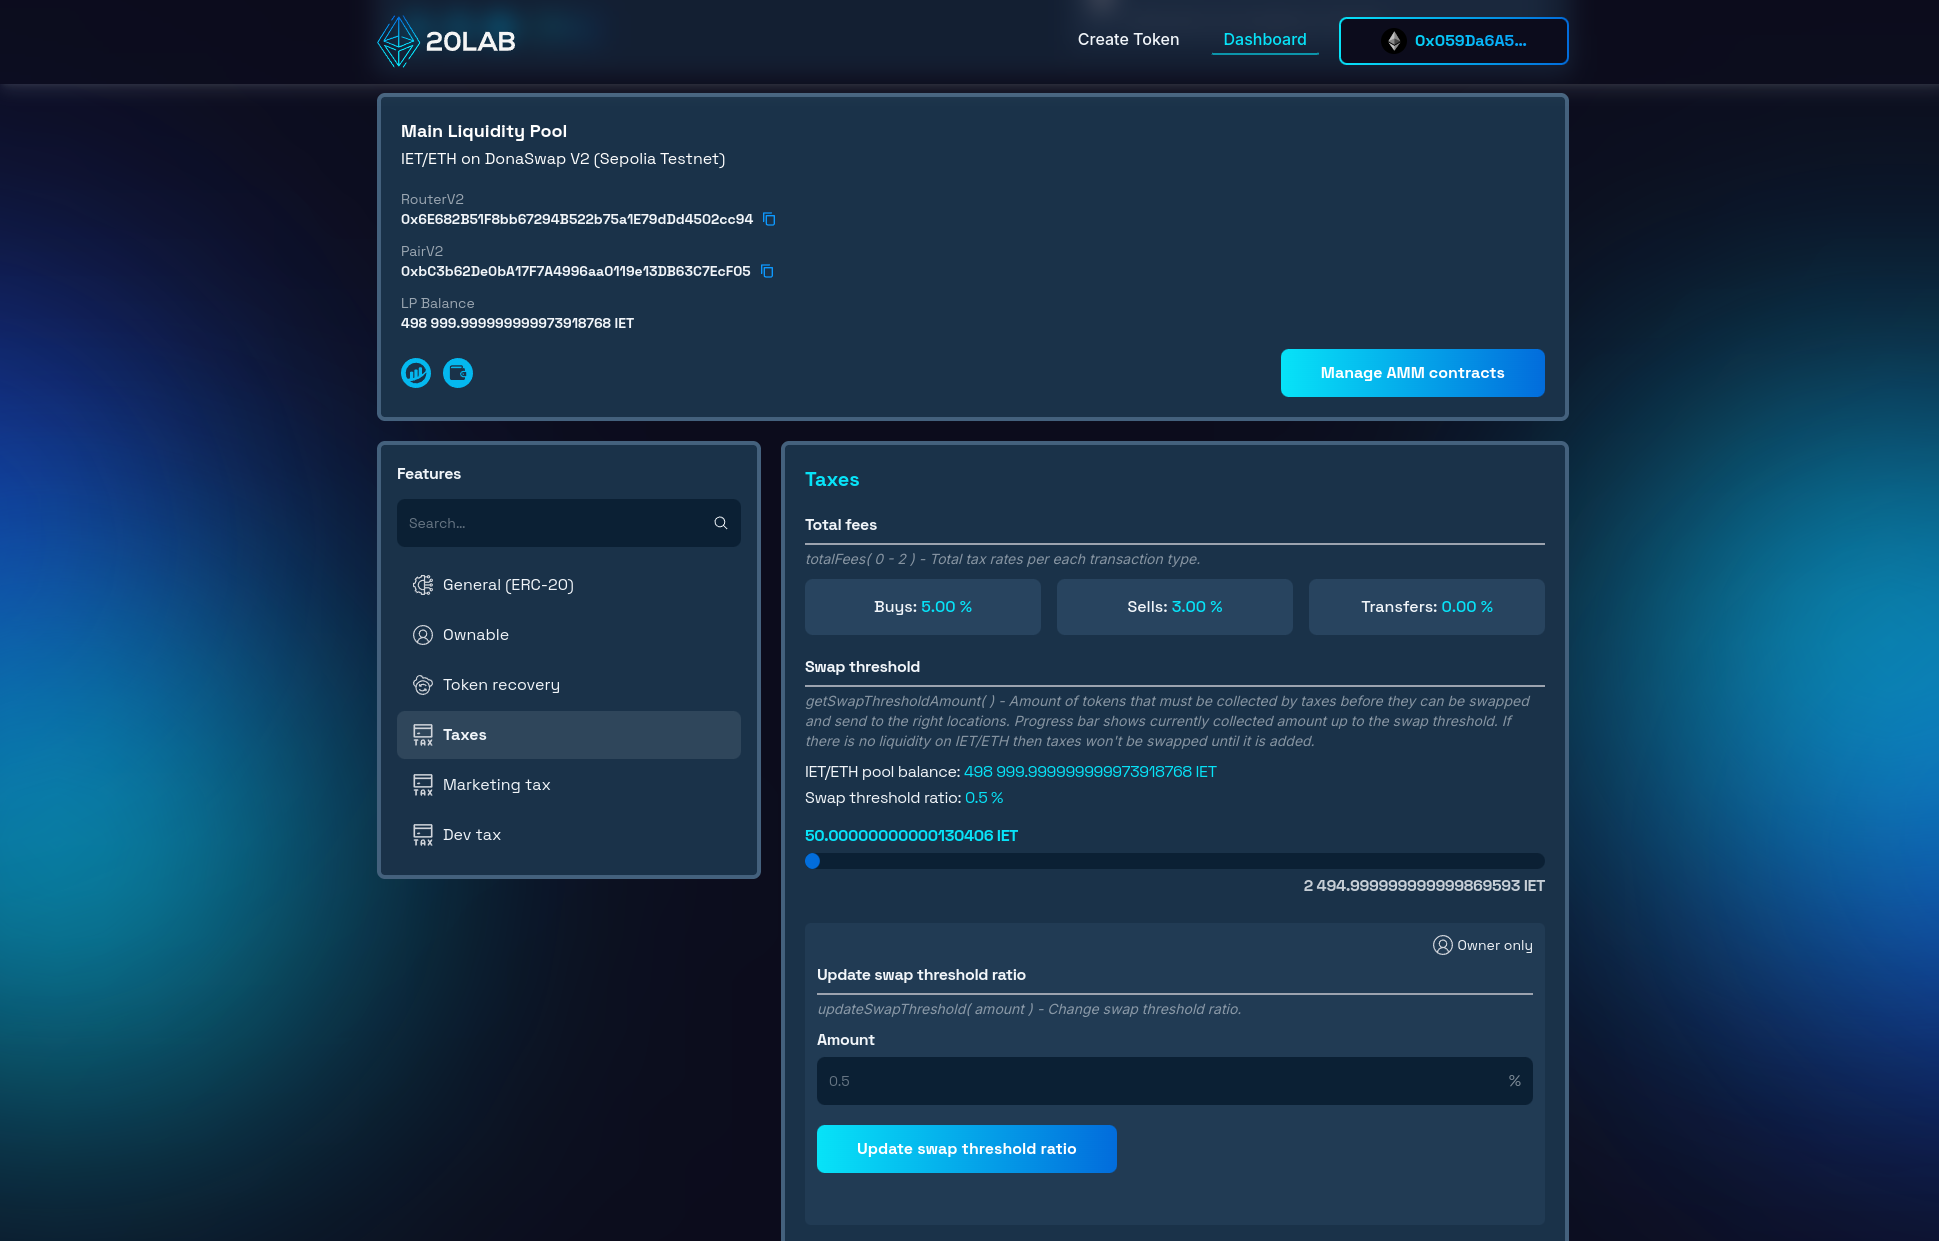
The 50 IET tokens from the purchase transaction are now sitting and waiting for the swap threshold to be reached. Let's make another larger purchase to see what happens after the progress bar is full.
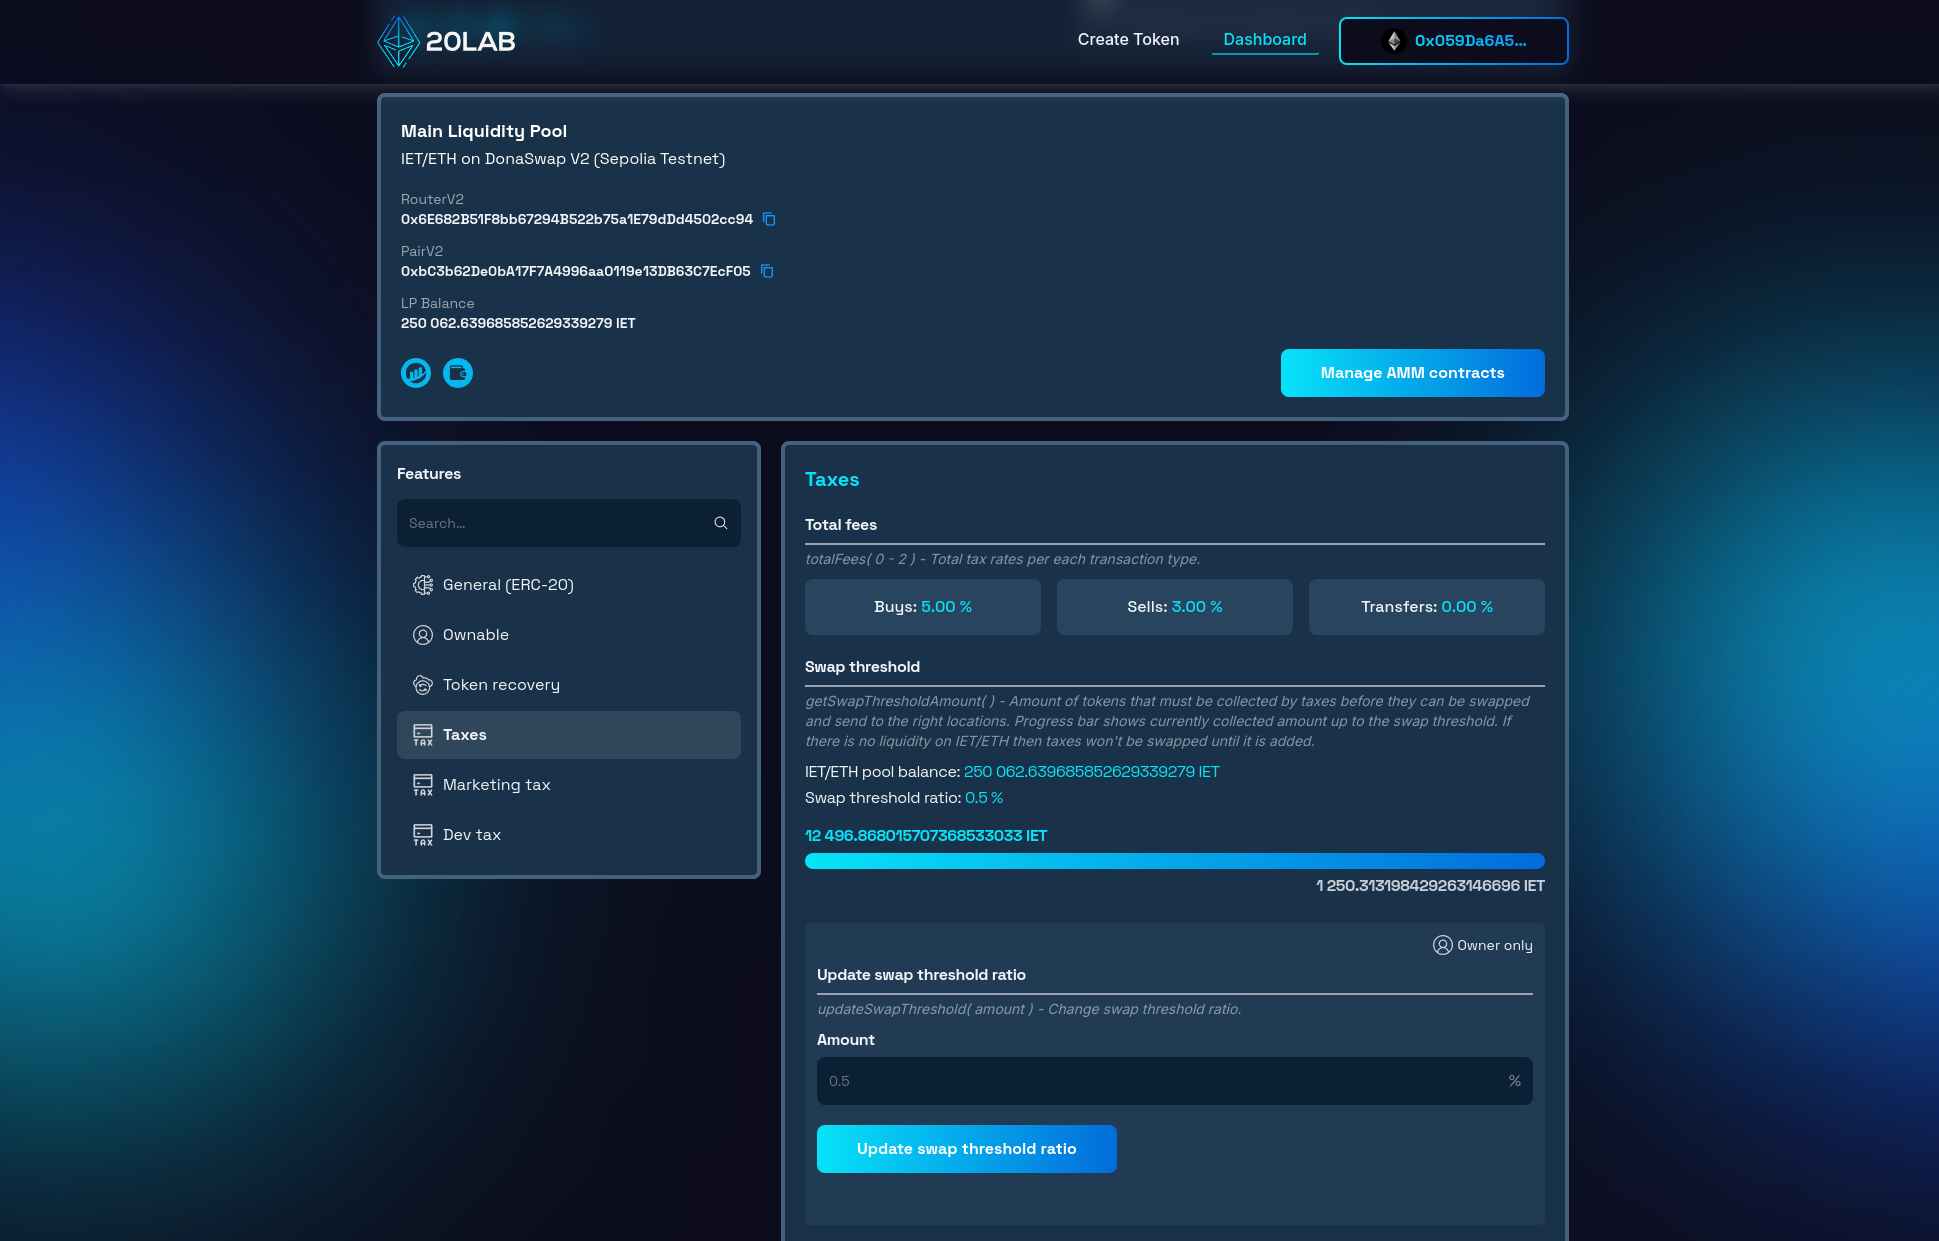
The amount of fees collected is now higher and ready to be exchanged and sent to pre-defined wallets. We were able to overfill the swap threshold because it cannot be triggered on buys. As soon as someone sells, transfers or buys tokens on another liquidity pool, the payouts will be sent.
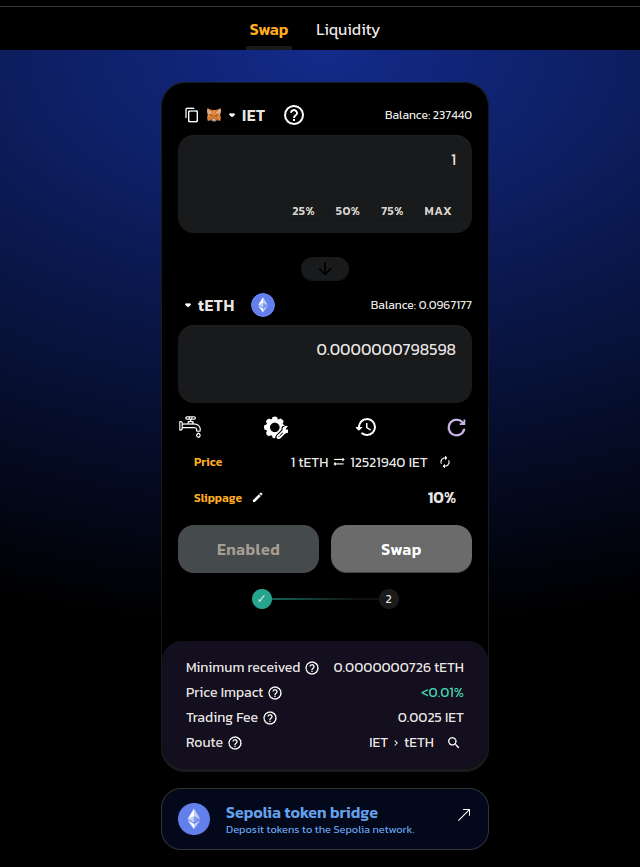
Now let's sell a small amount of tokens to activate the swaps.
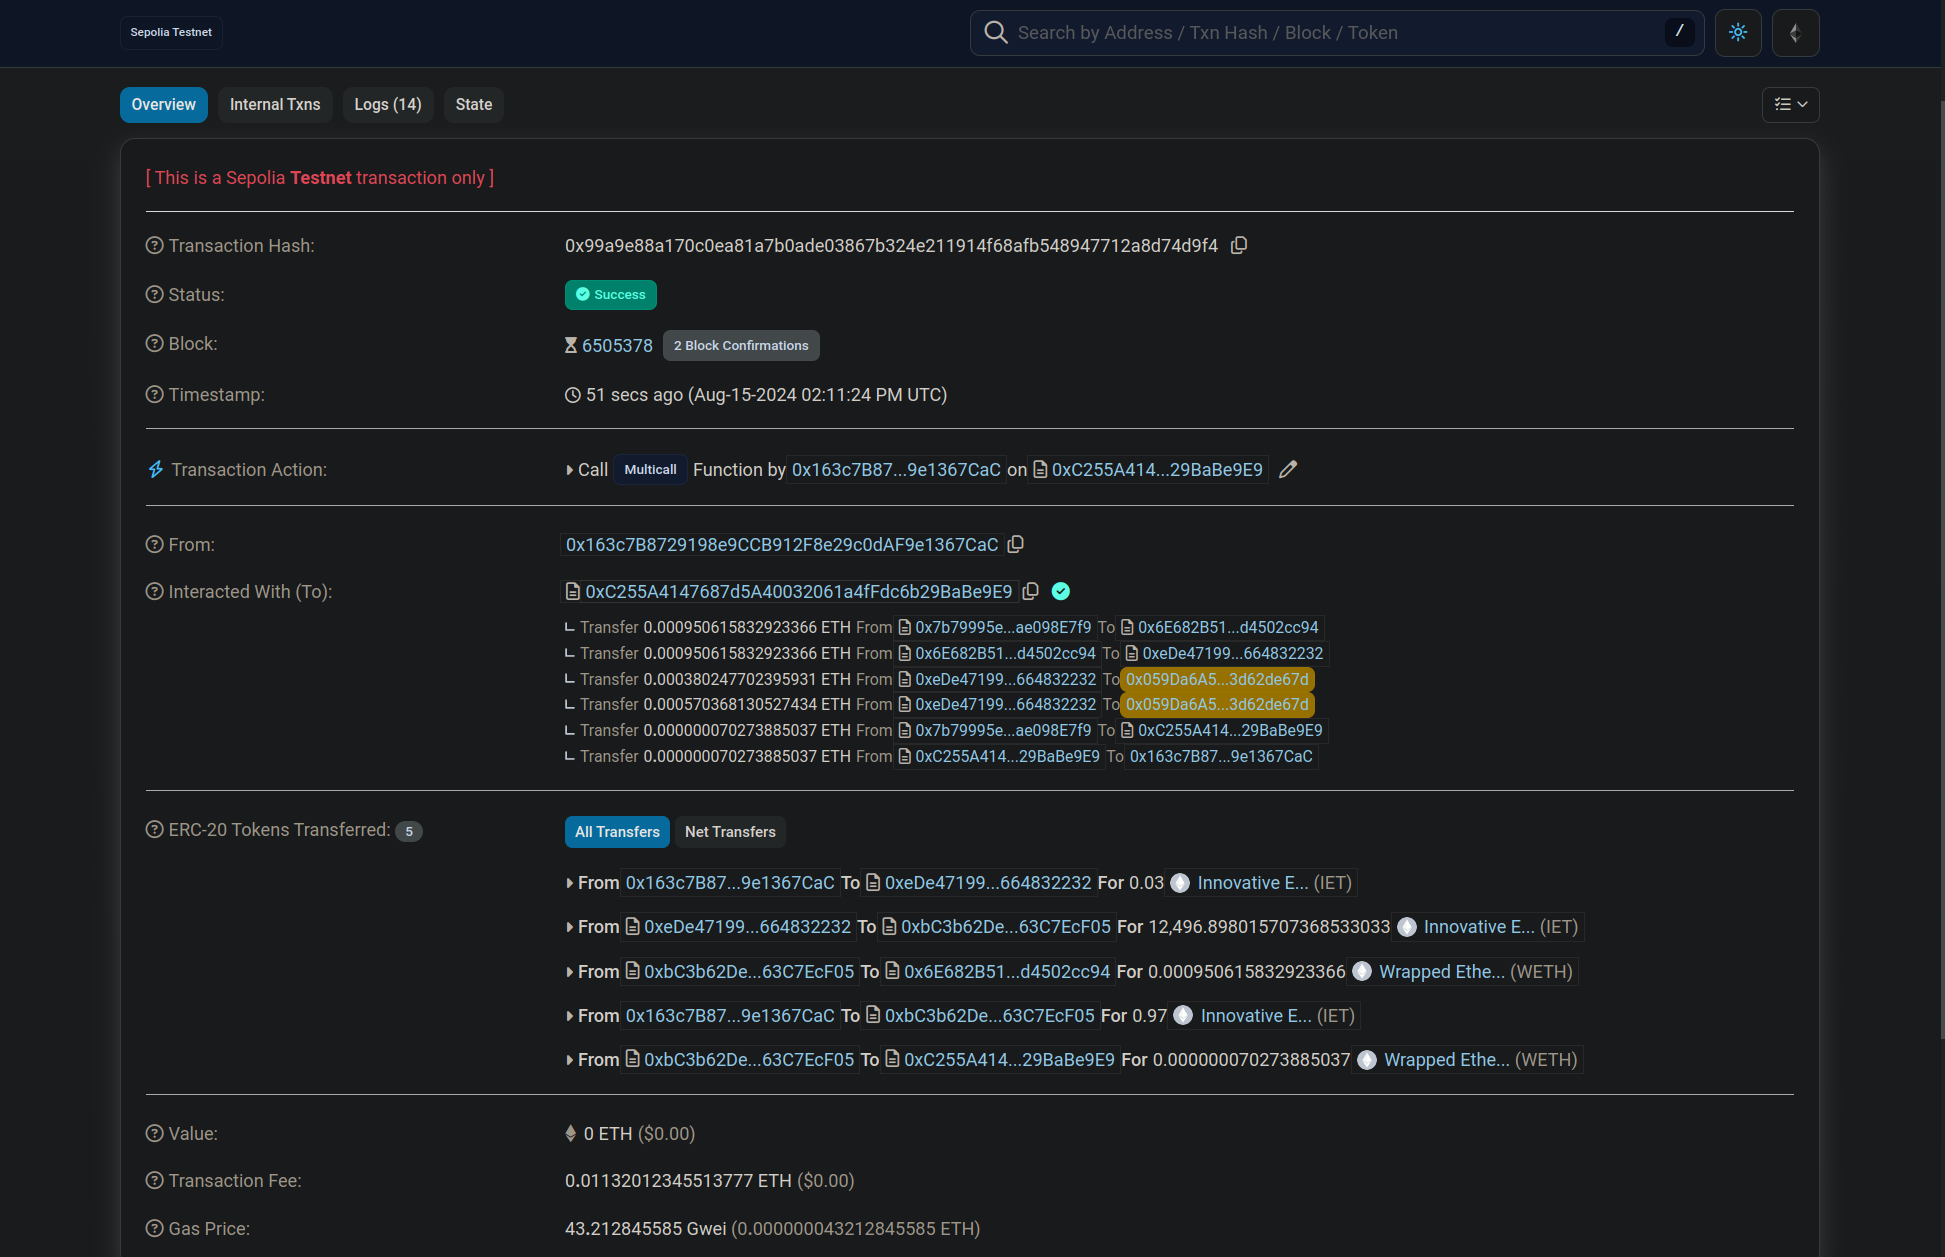
After the transaction is confirmed, the swap threshold will be cleared.
Checking this transaction on Block Explorer, we can see that the wallet tax recipient directly received 2 payouts, from marketing tax and dev tax respectively of IET token.
Conclusion
Incorporating wallet taxes into your ERC-20 token design is a game-changing strategy for promoting the longevity and robustness of your cryptocurrency project. By leveraging 20lab's state-of-the-art token generator, you're laying a solid foundation for your project's future success. The wallet tax mechanism serves multiple purposes, from funding crucial aspects like marketing and development, to potentially supporting buyback programs. This approach creates a self-reinforcing ecosystem where every transaction contributes to the project's growth and stability, demonstrating your commitment to long-term value creation.
20lab's platform makes the token creation process accessible to those without extensive programming expertise. The intuitive interface guides you through every step, from concept to deployment, ensuring that your vision is accurately translated into blockchain reality. Once launched, 20lab's comprehensive dashboard becomes your command center, providing real-time insight into your token's performance and enabling agile management of tax rates and distribution.
Whether you're a seasoned blockchain developer or a crypto enthusiast, 20lab gives you the tools and flexibility you need to bring your unique token concept to life.
If you have any questions about creating or managing your ERC-20 token, don't hesitate to reach out to us via our Telegram channel.


