
Impact of PancakeSwap on Your Token's Success
A successful token launch extends far beyond smart contract deployment - it requires establishing a robust, liquid market where traders can confidently buy and sell your token. PancakeSwap has emerged as a cornerstone of the decentralized finance ecosystem, processing billions in daily trading volume and serving millions of users worldwide.
Originally launched on BNB Smart Chain (BSC) where it quickly became the dominant decentralized exchange (DEX), PancakeSwap has now expanded its reach across multiple blockchains including Ethereum, Linea, and other major networks. This multi-chain presence offers token creators unprecedented flexibility in choosing their launch platform while maintaining access to PancakeSwap's substantial user base and battle-tested infrastructure.
This comprehensive guide will walk you through the process of adding initial liquidity to PancakeSwap V2, covering essential security considerations and proven launch strategies that can help your token achieve sustainable success in today's competitive market.
PancakeSwap V2 vs. V3
Understanding the differences between PancakeSwap V2 and V3 is crucial for choosing the right version for your token launch:
PancakeSwap V2
- Liquidity Management: Uses a simple constant product formula
(x * y = k) - Capital Efficiency: Liquidity is distributed evenly across all price ranges
- Token Compatibility: Supports tokens with transfer fees, reflection mechanisms, and other custom features
- Setup Complexity: Simple and straightforward pool creation process
- Risk Management: More predictable for new projects due to uniform liquidity distribution
- Trading Experience: Consistent liquidity depth across all price ranges
- Fee Structure: Fixed 0.25% fee per trade
PancakeSwap V3
- Liquidity Management: Uses concentrated liquidity with customizable price ranges
- Capital Efficiency: Up to 4000x more efficient when liquidity is properly concentrated
- Token Compatibility: Very limited support for tokens with transfer fees
- Setup Complexity: Requires careful planning of price ranges and fee tiers
- Risk Management: Higher complexity due to active position management needs
- Trading Experience: Variable liquidity depth based on configured ranges
- Fee Structure: Flexible with options for 0.01%, 0.05%, 0.3%, and 1% fees
Why is V2 Often Preferred for Token Launch?
Despite V3's advanced features, PancakeSwap V2 remains a popular choice for token launches due to its proven reliability and straightforward approach. Here's why V2 continues to be the go-to choice for many projects:
Robust compatibility
PancakeSwap V2 offers full support for tokens with taxes or reflection mechanisms, making it ideal for projects with complex tokenomics. The simple pool creation process works seamlessly with virtually any ERC-20 or BEP-20 token, regardless of its specific features. Additionally, the platform benefits from widespread integration with trading tools and analytics platforms, providing comprehensive market visibility and trading options.
Predictable mechanics
At its core, V2 uses the proven constant product formula, ensuring reliable and predictable trading behavior. Liquidity is evenly distributed across all price ranges, creating a stable trading environment for both buyers and sellers. The platform maintains a straightforward fee structure of 0.25% per trade, making it easy for projects to calculate costs and potential returns.
User experience
Traders and investors benefit from a familiar interface that reduces the learning curve for new participants. The platform offers significantly lower gas fees compared to Ethereum-based alternatives, making it more accessible for retail traders. Furthermore, PancakeSwap boasts an active trading community and established market presence, providing natural visibility for new projects.
Adding Liquidity with 20lab
If you've created your token using 20lab's token generator, you have two potential scenarios:
1. PancakeSwap V2 pre-configured
When you select PancakeSwap as your default exchange during token creation on 20lab, several important preparations are automatically made:
- An empty liquidity pool is created
- The pool is properly connected to your token contract in order to distinguish between buy and sell transactions
- The token contract is configured to interact seamlessly with PancakeSwap
To add liquidity to your pre-configured pool:
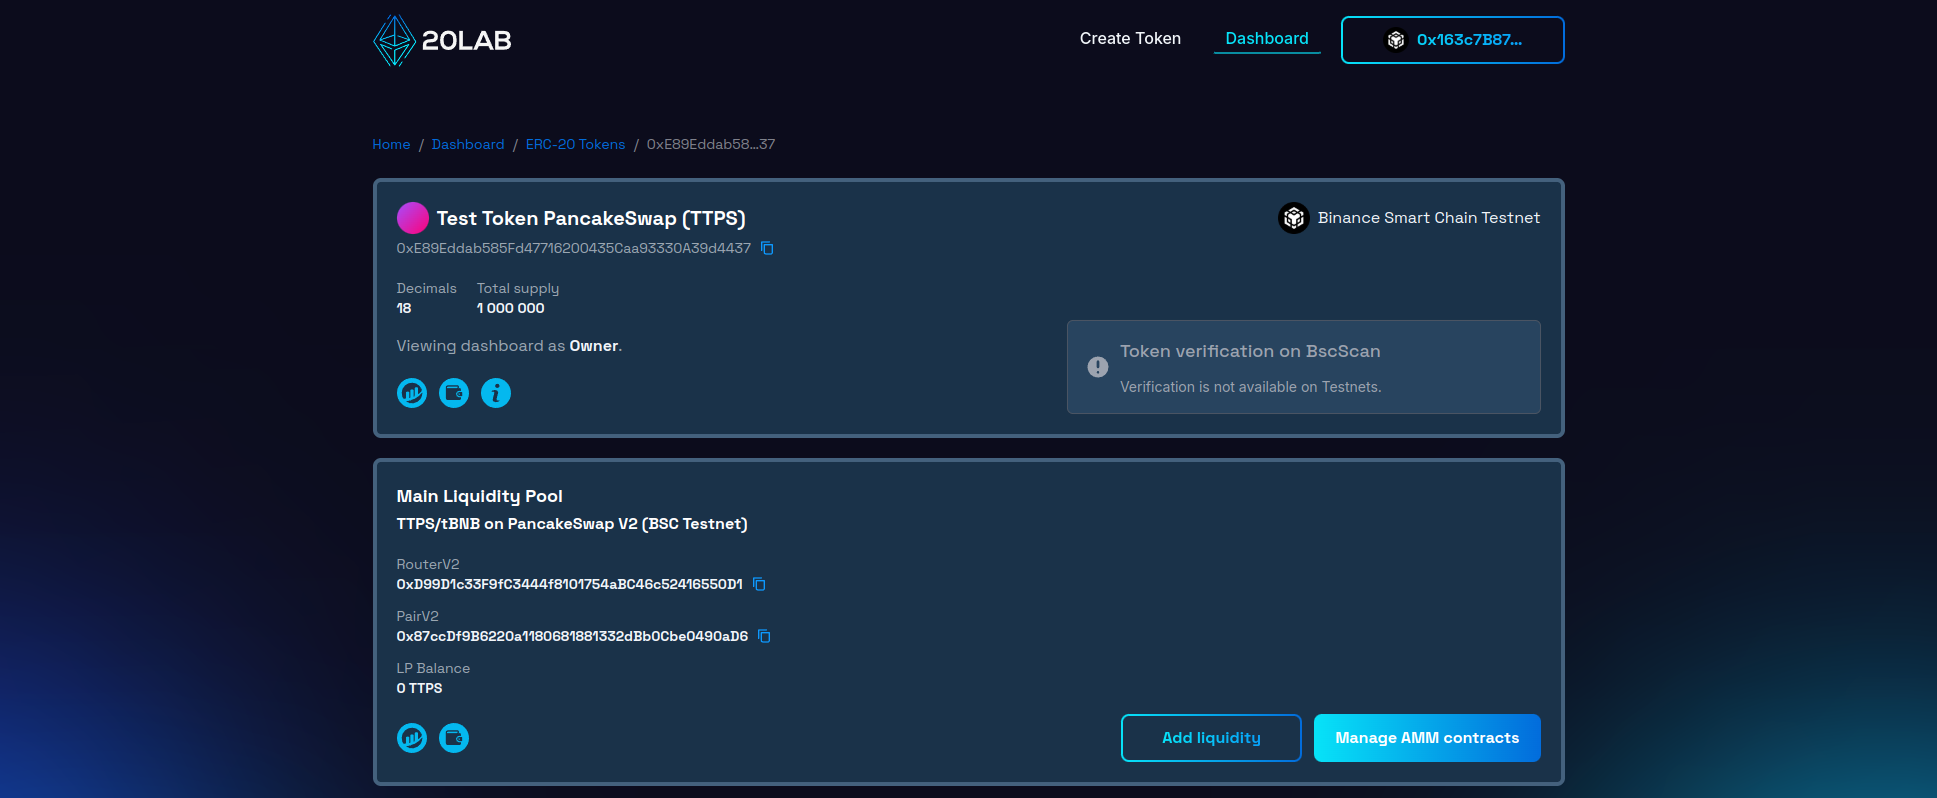
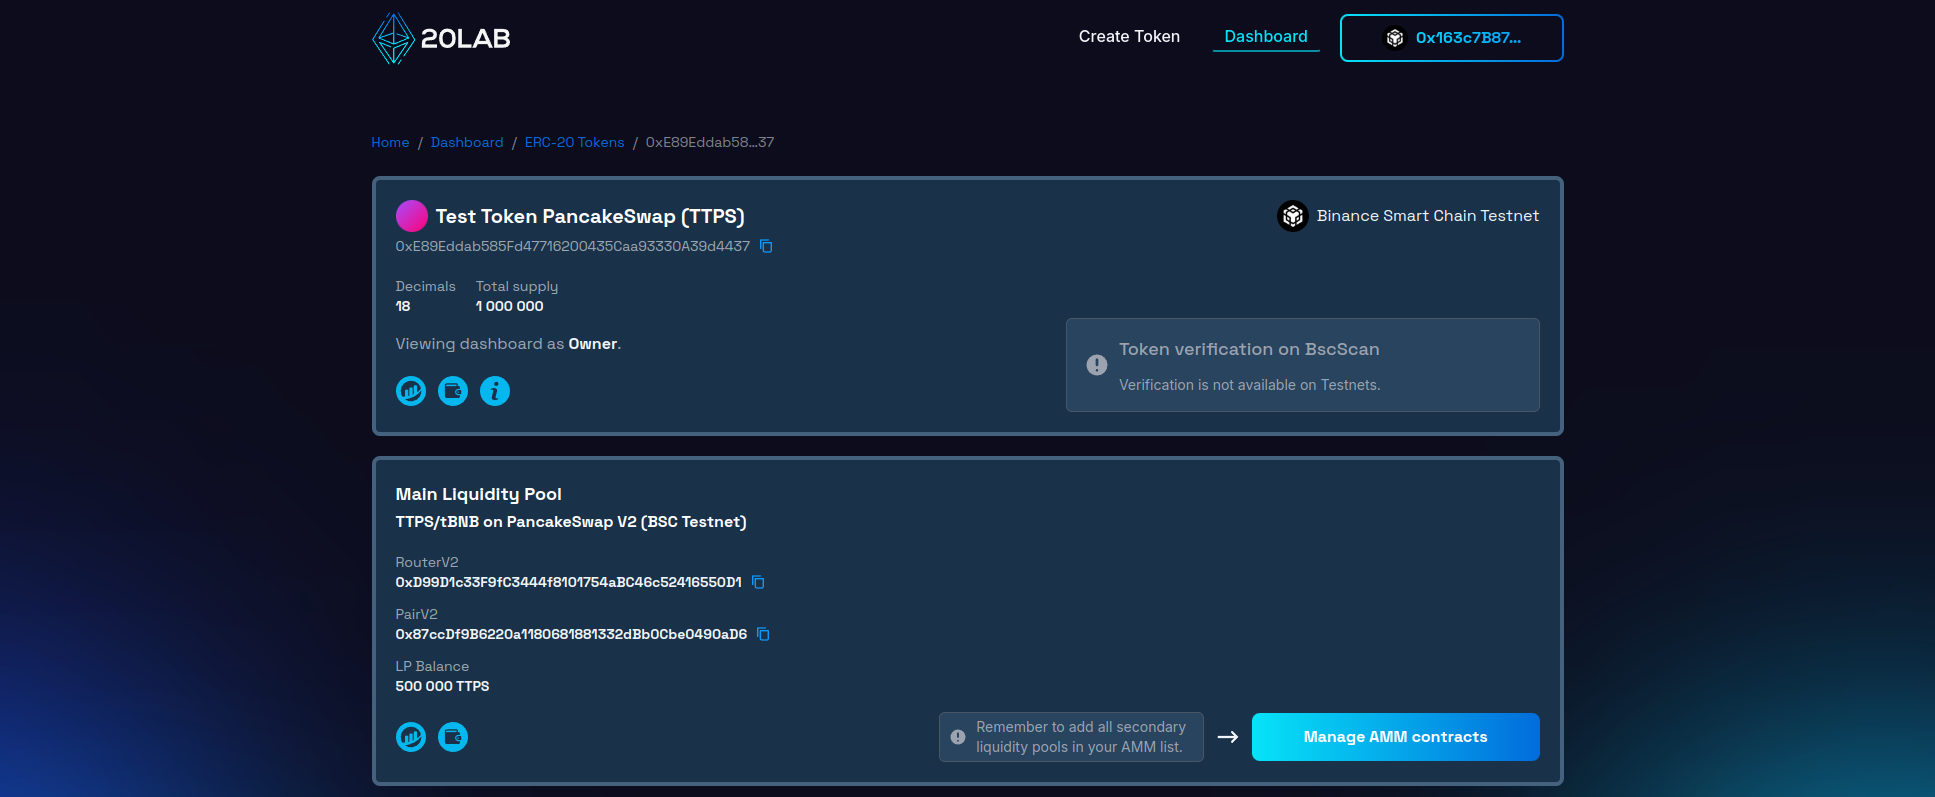
- Access your 20lab owner dashboard
- Locate your token in your created tokens list
- Find the "Main Liquidity Pool" section showing "PancakeSwap V2"
- Click the "Add liquidity" button to be redirected to the correct PancakeSwap page
2. Manual setup required
If you didn't select PancakeSwap as your default exchange during token creation, created your token outside 20lab, or want to add additional liquidity pools, you'll need to follow the manual setup process detailed below.
Step-by-Step Liquidity Addition Guide
Preparation
Before proceeding to PancakeSwap, ensure you have:
- The full address of your token contract
- Sufficient amount of your token in your wallet that will be needed for the liquidity pool
- BNB (or other collateral coin) in your wallet for both liquidity and transaction fees
Accessing PancakeSwap
- Visit PancakeSwap's official interface
- Connect your Web3 wallet
- Expand the "Earn" dropdown and click on "Farm / Liquidity" option
- Open "My positions" tab
- Click on "Add Liquidity" button
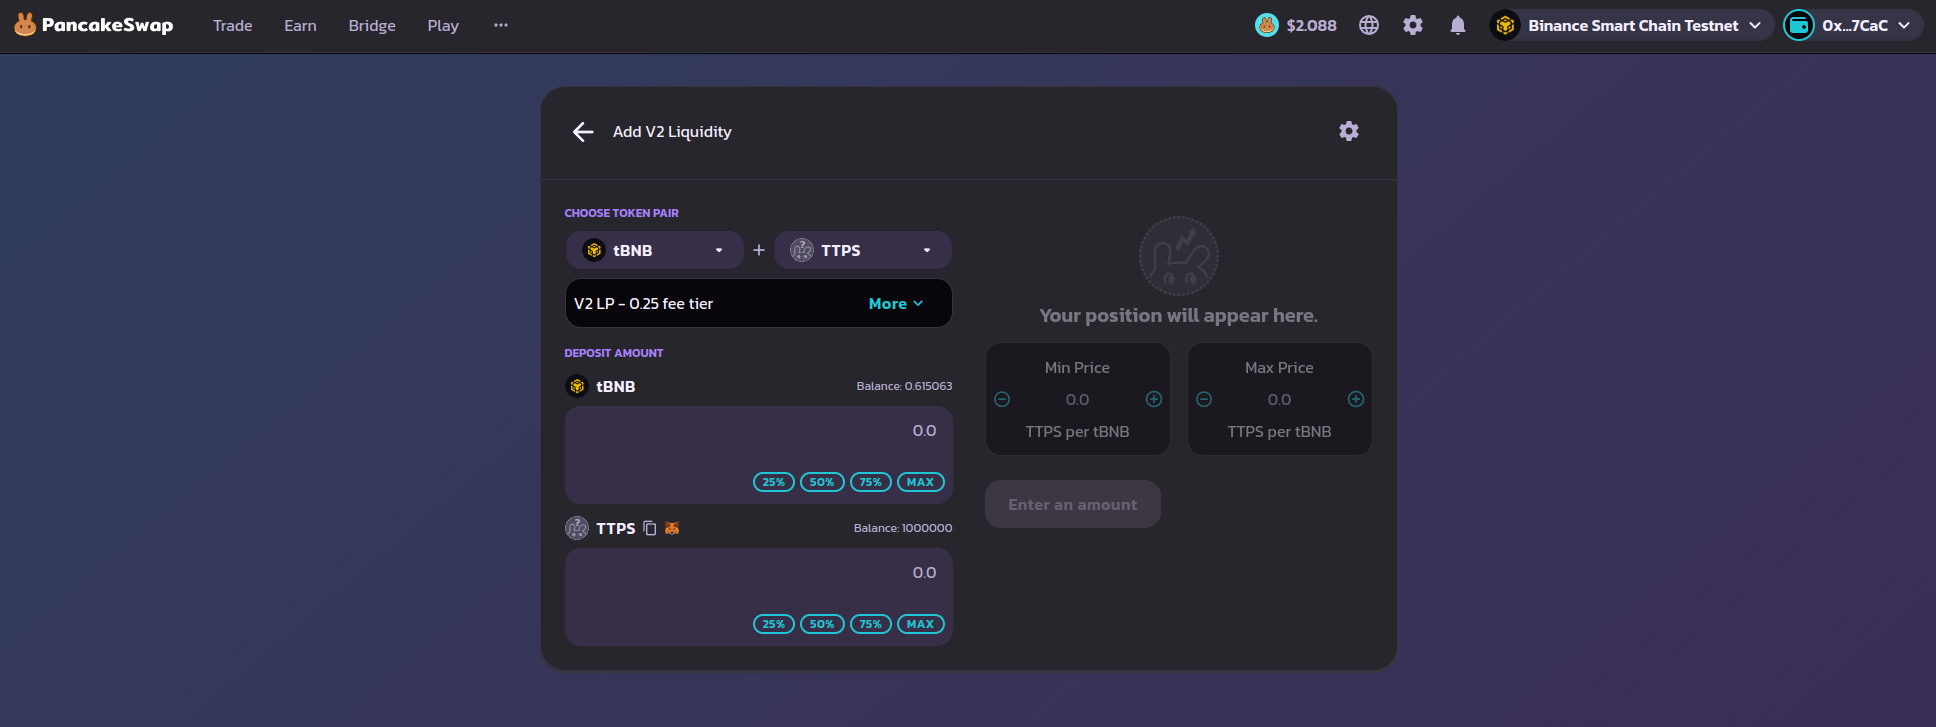
Creating the liquidity pool
Now you should see liquidity adding interface:
- Select BNB as the base pair (or other token if preferred)
- Enter your token's contract address in the second field
- Choose "Add V2 liquidity" option
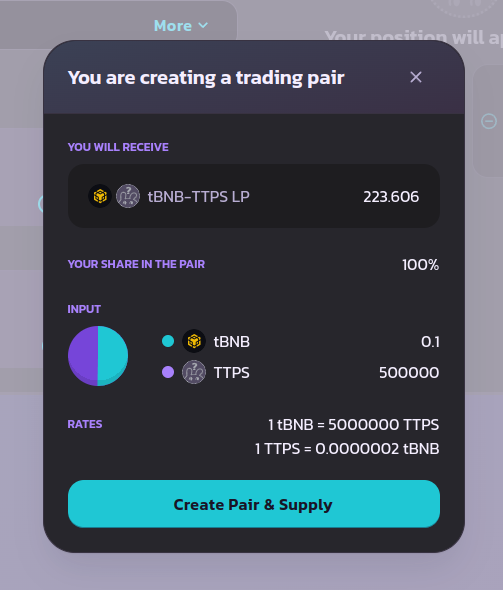
- Set your initial token price by adjusting the ratio between amount of tokens and amount of collateral
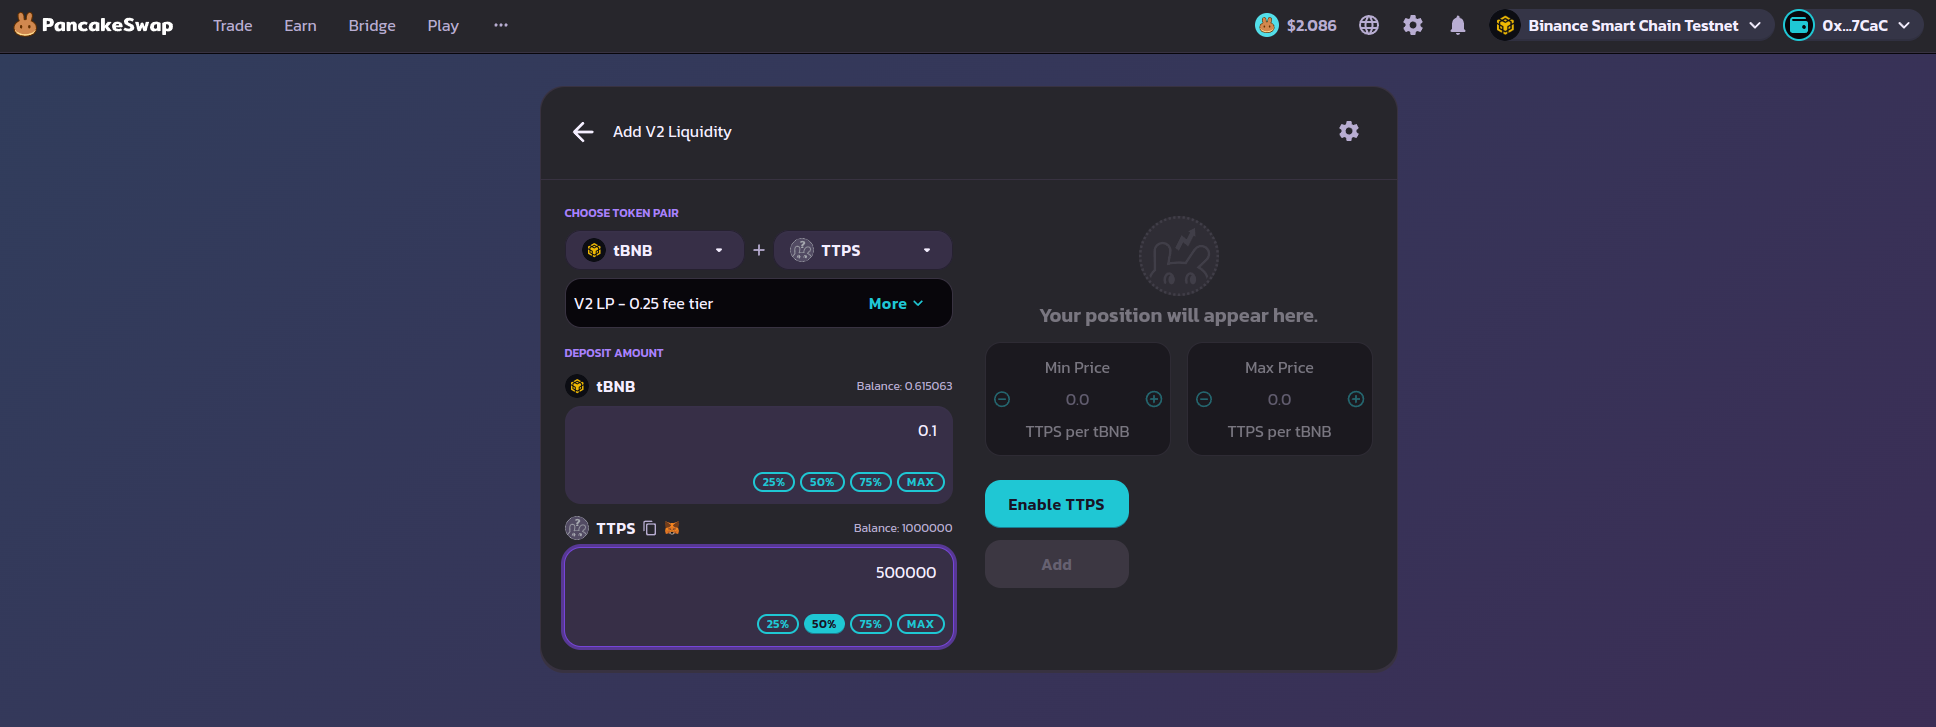
The last thing that is left to do is to approve the tokens for PancakeSwap's router contract and finally add liquidity by confirming 2 transactions in your wallet.
Security and Launch Management
After adding initial liquidity, securing your liquidity pool should be your immediate priority. You have 2 main options for securing LP tokens: locking or burning them. LP token locking involves using trusted platforms like PinkLock or Unicrypt to make your LP tokens temporarily inaccessible. When choosing this option, set an appropriate timeframe of at least 6 months to build investor confidence, and always verify the lock status through the platform's interface after completion.
The better alternative is burning your LP tokens by sending them to a dead address (like 0x0000...dead or 0x0000...0000), making them permanently inaccessible. While burning provides the strongest security guarantee, it makes removing liquidity in the future impossible. Consider your project's long-term needs when choosing between locking and burning - locking offers flexibility for future liquidity management, while burning demonstrates maximum commitment to the project.
Several critical factors can impact your token's launch success. First, insufficient initial liquidity leads to high price volatility and poor trading experience - always ensuring adequate liquidity of at least 2-5 BNB (or similar value of other coins) for a serious project. Set realistic initial values that align with your token's utility and market conditions.
To protect your launch from malicious actors, you can implement limits such as anti-bot cooldown, max wallet limit or max transaction limits features within your token contract. Another options might include using a blacklist to target malicious actors directly or setting higher sell fees in the first few hours after launch to decrease chances of sniping the pool.
Managing Liquidity Through 20lab Dashboard
If you used 20lab's token generator and selected PancakeSwap as your default exchange, you gain access to additional management features:
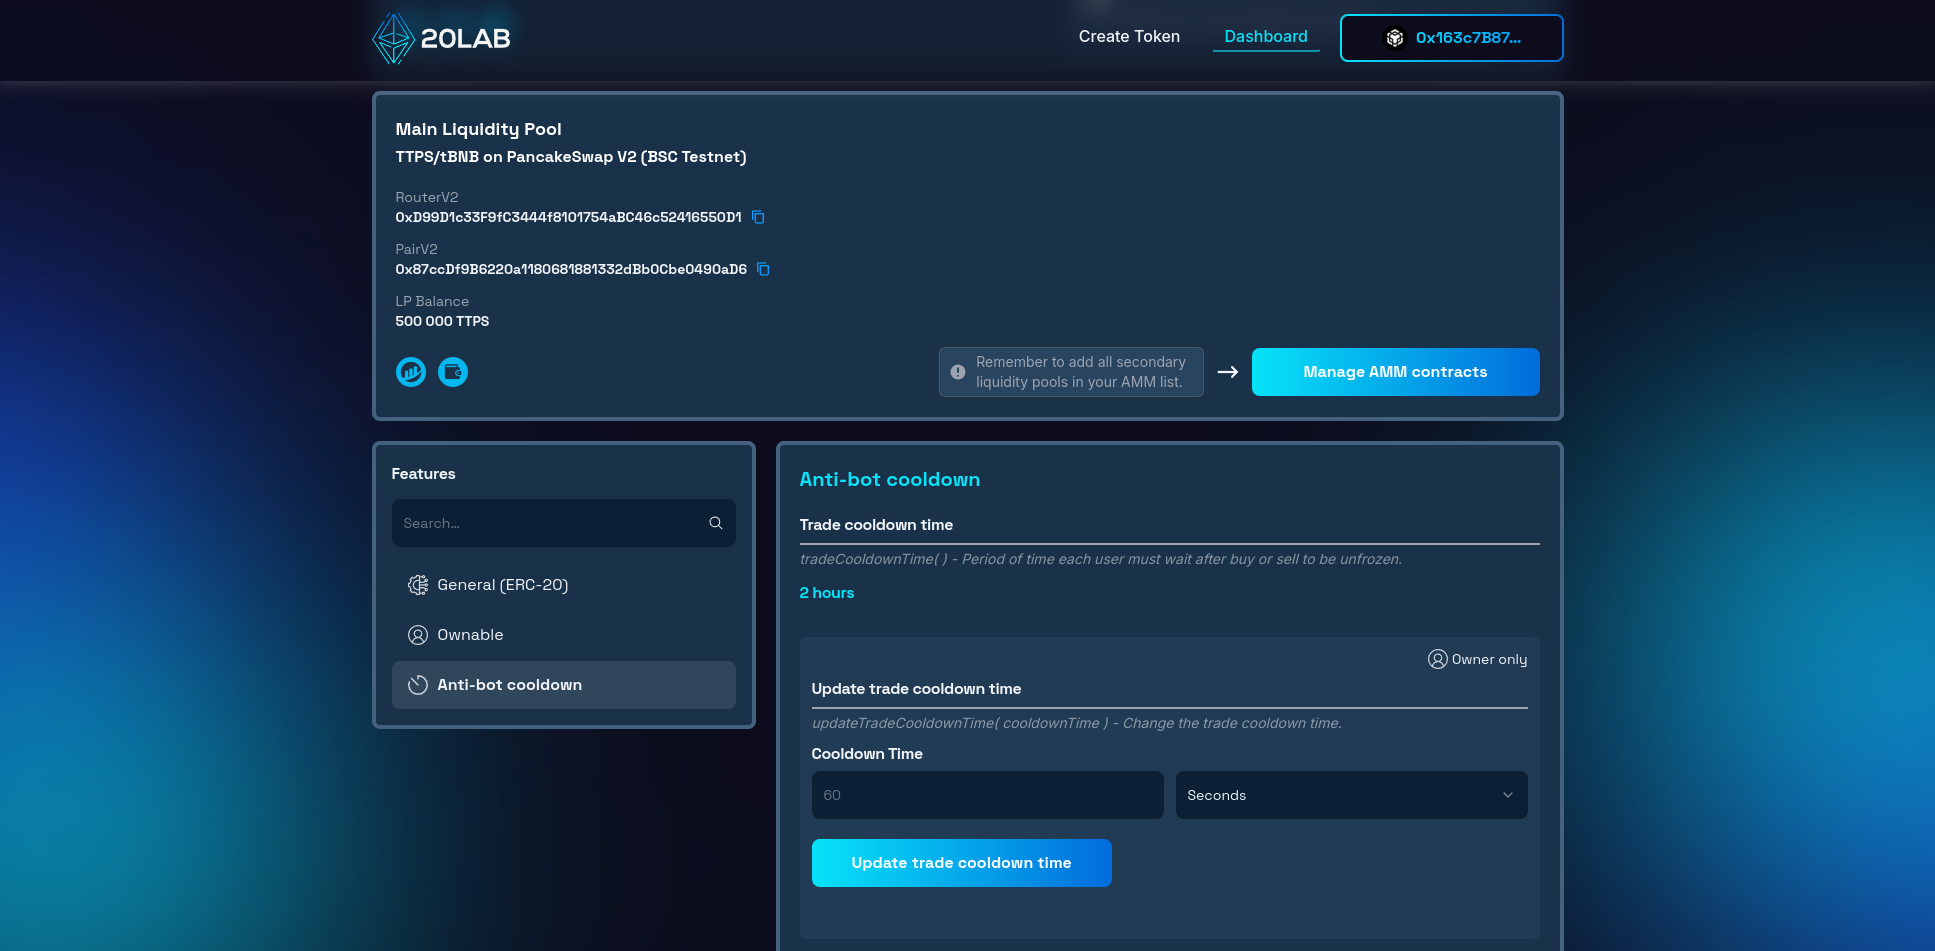
Real-time LP balance monitoring
- View your main liquidity pool position directly in the dashboard
- Track LP token balance amount in real-time
- Add secondary pools of your token if needed
Trading controls integration
If you included any optional features, such as enableTrading function or anti-bot cooldown in your token, you can:
- Control when trading begins independently of liquidity addition
- Prevent early trading and sniping bots
- Manage trading restrictions through the dashboard
Conclusion
Successfully launching your ERC-20 or BEP-20 token on PancakeSwap requires careful planning and execution. While V2 may seem simpler compared to newer versions, its reliability and widespread compatibility make it an excellent choice for most token launches. Remember to prioritize security, implement proper controls, and maintain transparent communication with your community throughout the launch process.
By following this guide and adapting these strategies to your specific project needs, you'll be well-positioned for a successful token launch on PancakeSwap. Remember that the initial liquidity addition is just the beginning - maintaining a healthy liquidity pool and active community engagement are key to long-term success.
For more support with 20lab's token creation and liquidity pools, join our Telegram channel. Our team is here to help you succeed.


