
Creating a secure and well-controlled ERC-20 token is critical to the success of your project. One powerful feature that can significantly increase the security and market stability of your token is the implementation of transaction limits.
Max transaction limits are more than just a technical feature - they are a strategic tool that can protect your token from large-scale dumps, potential attacks and market manipulation. These limits can help ensure fairer token distribution, increase investor confidence, and even prepare your project for future regulatory compliance.
By the end of this tutorial, you'll not only understand how to set transaction limits for different types of transactions (buys, sells, and transfers), but also why these limits are critical to your token's ecosystem. Let's dive in and explore why maximum transaction limits are important, and how you can use them to create a robust token that stands out in the crowded crypto marketplace.
Why the Max Transaction Limits Matter
Implementing max transaction limits in your ERC-20 token is more than just a technical feature - it's a strategic decision that can significantly impact the ecosystem and long-term viability of your token. Here's why incorporating maximum transaction limits is critical:
- Increased security: By capping transaction amounts, you create an additional layer of protection against large-scale theft or hacks. If a malicious actor gains unauthorized access to a wallet, their ability to drain funds quickly is severely limited.
- Market stability: Large, sudden transactions can cause significant price volatility. Max transaction limits help prevent "whale" movements that can destabilize the market value of your token, ensuring a more stable trading environment for all holders.
- Fair distribution: Transaction size limits encourage a more even distribution of tokens among holders. This can lead to a healthier, more decentralized ecosystem where no single entity has outsized influence.
- Bot Protection: In the DeFi space, trading bots can sometimes manipulate markets through rapid, high-volume transactions. Transaction limits can help mitigate the impact of such automated trading strategies.
Creating Your ERC-20 Token with Max Transaction Limits
By using 20lab's ERC-20 token generator to implement these limits, you're not just creating a token - you're designing a thoughtful, secure and sustainable digital asset. In the next section, we'll look at how you can easily set these critical limits using our intuitive platform. Moreover, creating such a token will take as little time as reading this post!
Step 1: Initiating Your ERC-20 Token Creation
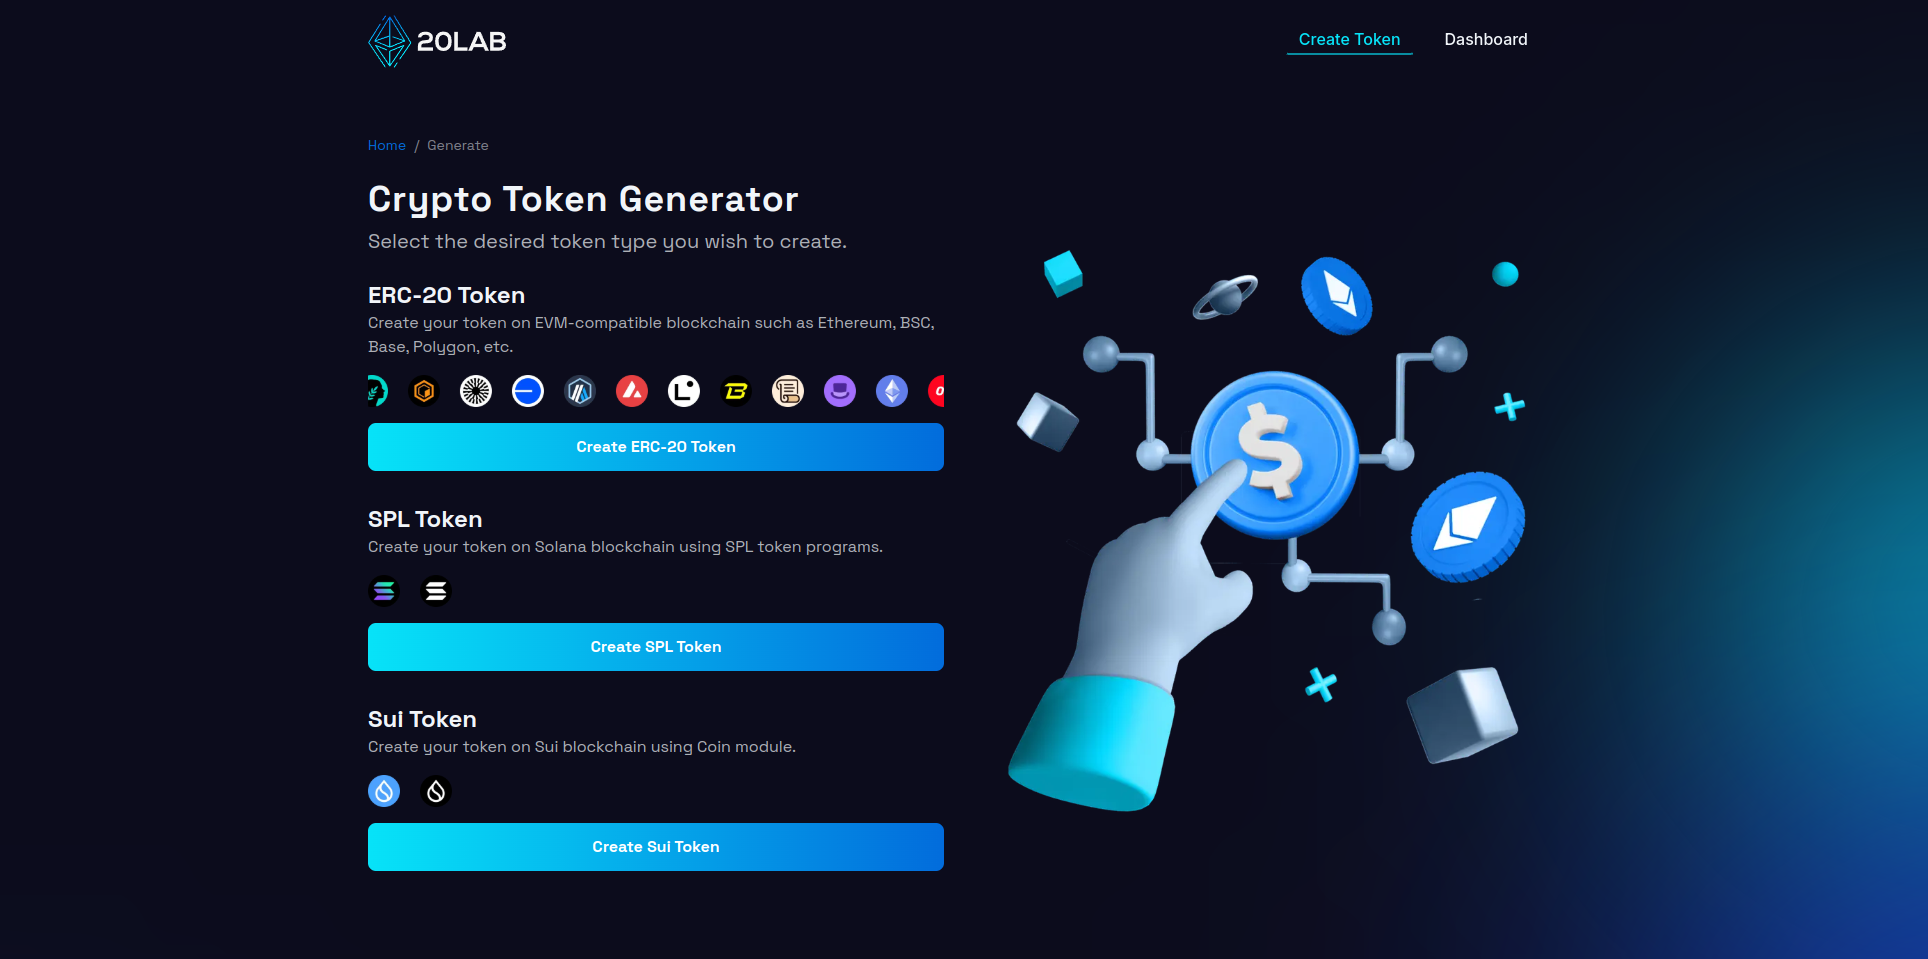
First, visit 20lab.app and navigate to the generator page. Click on "Create ERC-20 Token" to start the process.
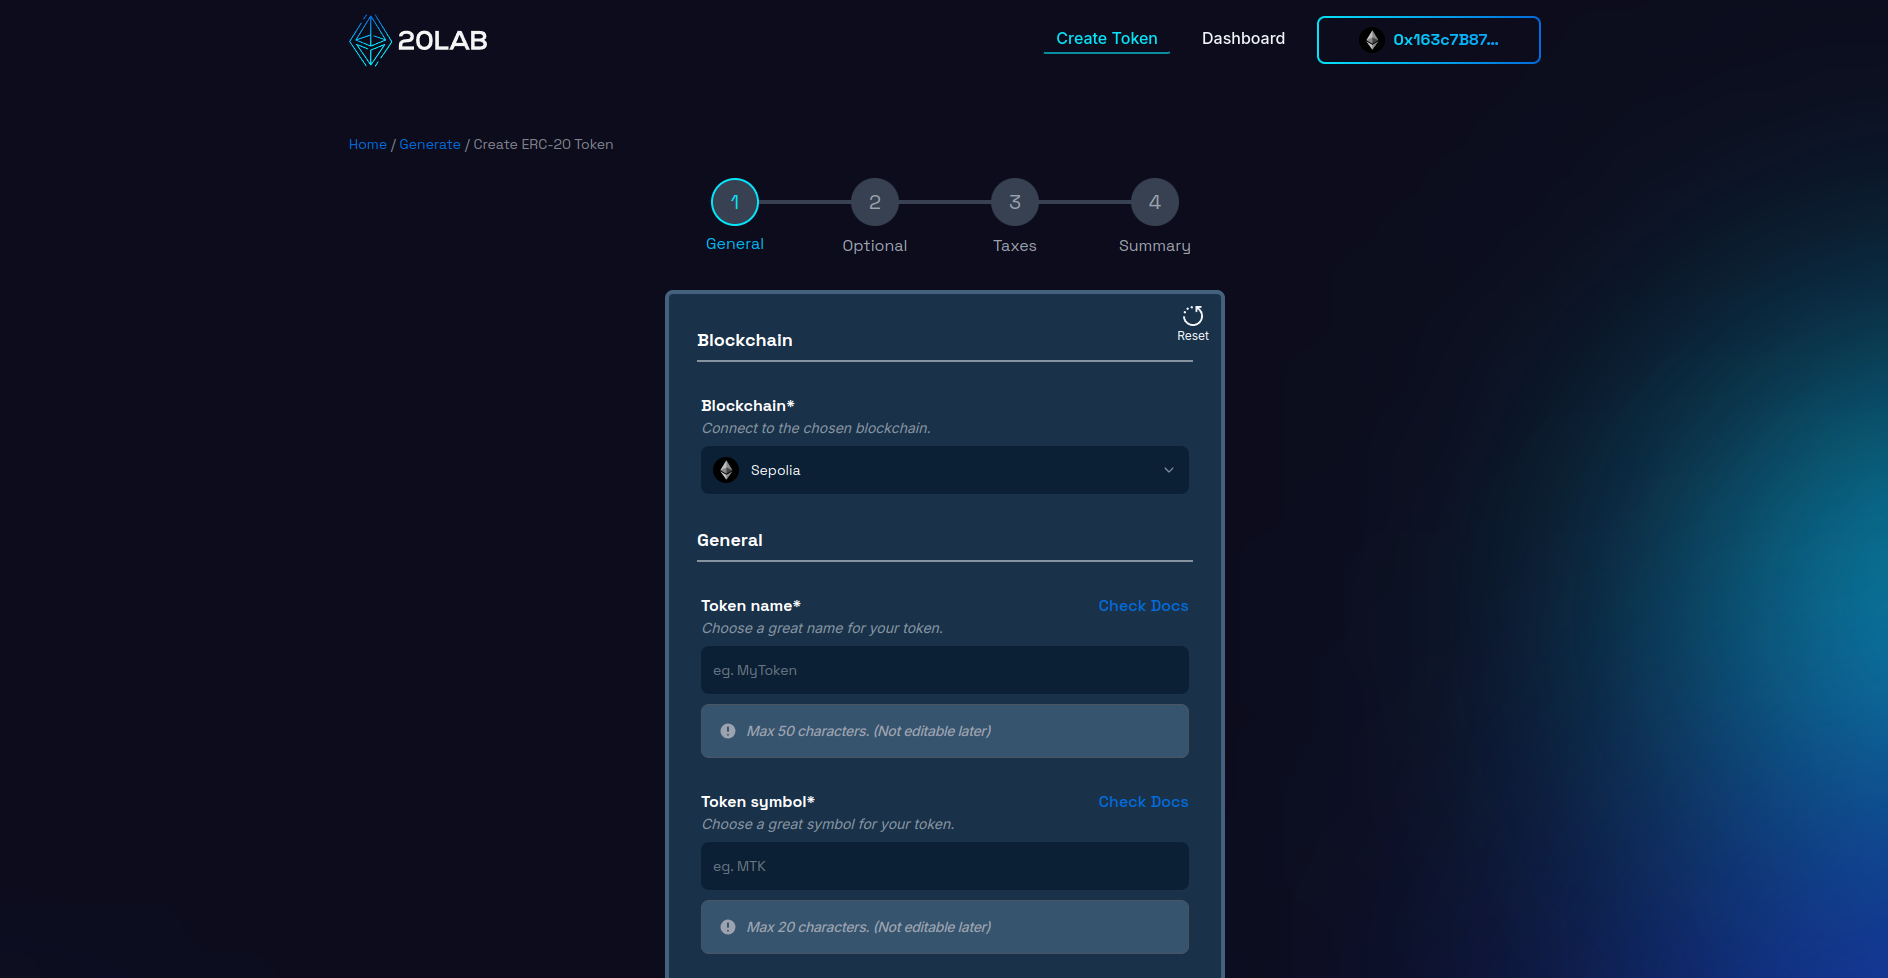
The next important step is to connect your Web3 wallet to the platform. 20lab supports a wide range of wallets including MetaMask, Coinbase Wallet and Trust Wallet. Once connected, your wallet address will appear in the top right corner of the page, confirming successful integration.
Before proceeding, make sure you're on the appropriate blockchain network:
- For production tokens, select the desired Mainnet,
- For testing purposes, choose a suitable Testnet.
20lab offers a range of popular blockchains, allowing you to select one that aligns with your project requirements. Consider factors such as:
- Transaction costs,
- Network speed,
- Ecosystem compatibility,
- Target audience preferences.
Your choice of blockchain will significantly impact your token's functionality and adoption, so carefully evaluate your options based on your project's specific needs and long-term objectives.
Step 2: Establishing Your ERC-20 Token's Core Parameters
This phase is critical because it defines the essential attributes of your ERC-20 token. Start by creating a distinctive and meaningful name for your token, accompanied by a short, memorable ticker symbol. It's a good idea to do some research to ensure that your chosen identifiers are unique in the crypto space.
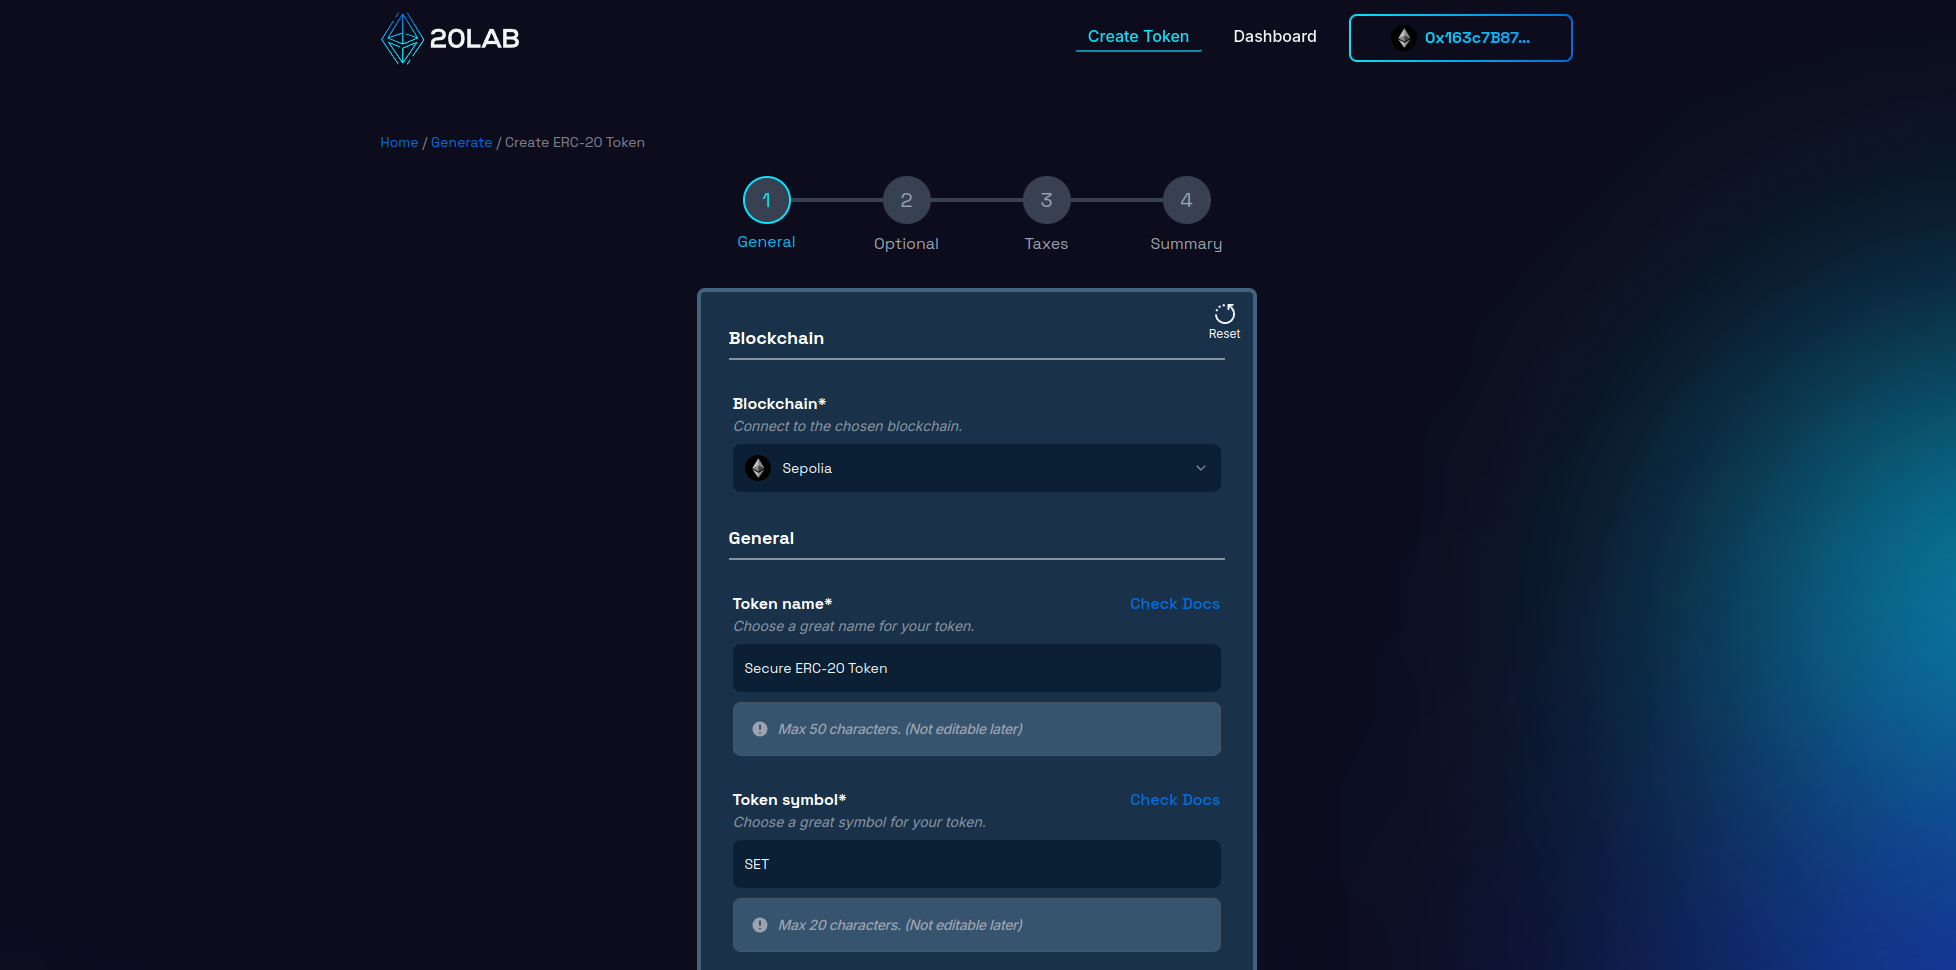
Next, specify the total supply of tokens. For example, setting a supply of 100,000,000 tokens can provide sufficient liquidity while maintaining a sense of scarcity.
Determine the divisibility of the token by setting the number of decimal places. The industry standard for ERC-20 tokens is 18 decimal places, mirroring the divisibility of Ethereum and other major cryptocurrencies. This level of precision facilitates microtransactions and fine-tuned token economics.
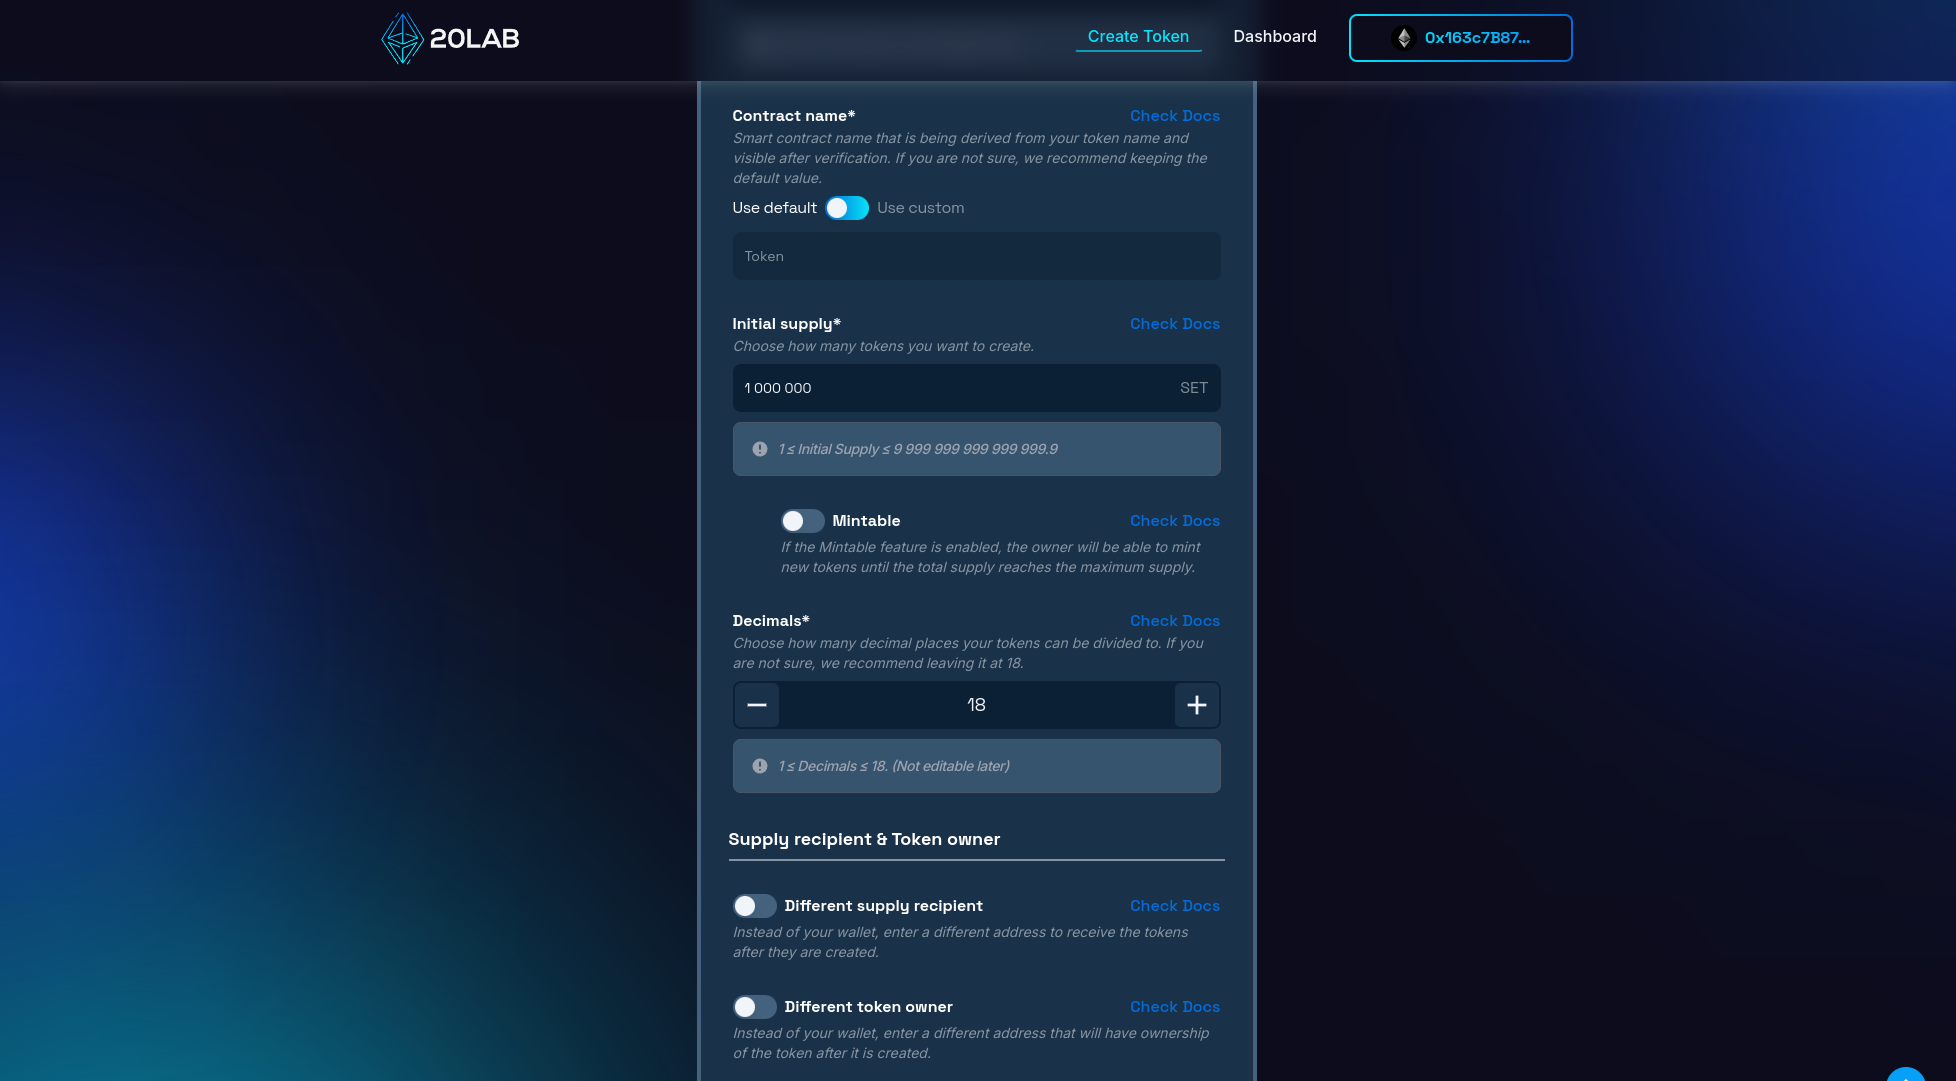
You have the option to specify a unique contract name that will be the identifier for your smart contract on Block Explorer after verification. This can be the same as your token name or a more technical name such as "SecureTokenV1".
Critical decisions include selecting the wallet to receive the initial token supply and determining the token owner. The supply recipient will hold the entire token allocation at launch, which can be your personal wallet or a dedicated project wallet. The token owner will have administrative rights to owner-restricted functionality. While this is often the same as the deployer, it can be a separate address if desired. For added security, consider implementing a multi-signature wallet.
These basic settings shape the identity and operational framework of your token. Make informed choices, taking into account your project's long-term goals and scalability potential. Decisions made at this stage will affect your token's perception, utility, and integration capabilities with decentralized applications, ultimately impacting the user experience.
Step 3: Implementing the Max Transaction Limits
After setting up the general token information, it's time to implement the max transaction limits feature. This critical element helps control the flow of tokens, increase security, and maintain market stability.
To set up the max transaction limits, navigate to the "Optional" page of the generation form and locate the "Max transaction limits" section.
First, decide whether to enable or disable the default exchange option:
- If disabled, you'll set a single limit that applies to all types of transactions.
- If enabled, you can set separate limits for buying, selling, and transferring.
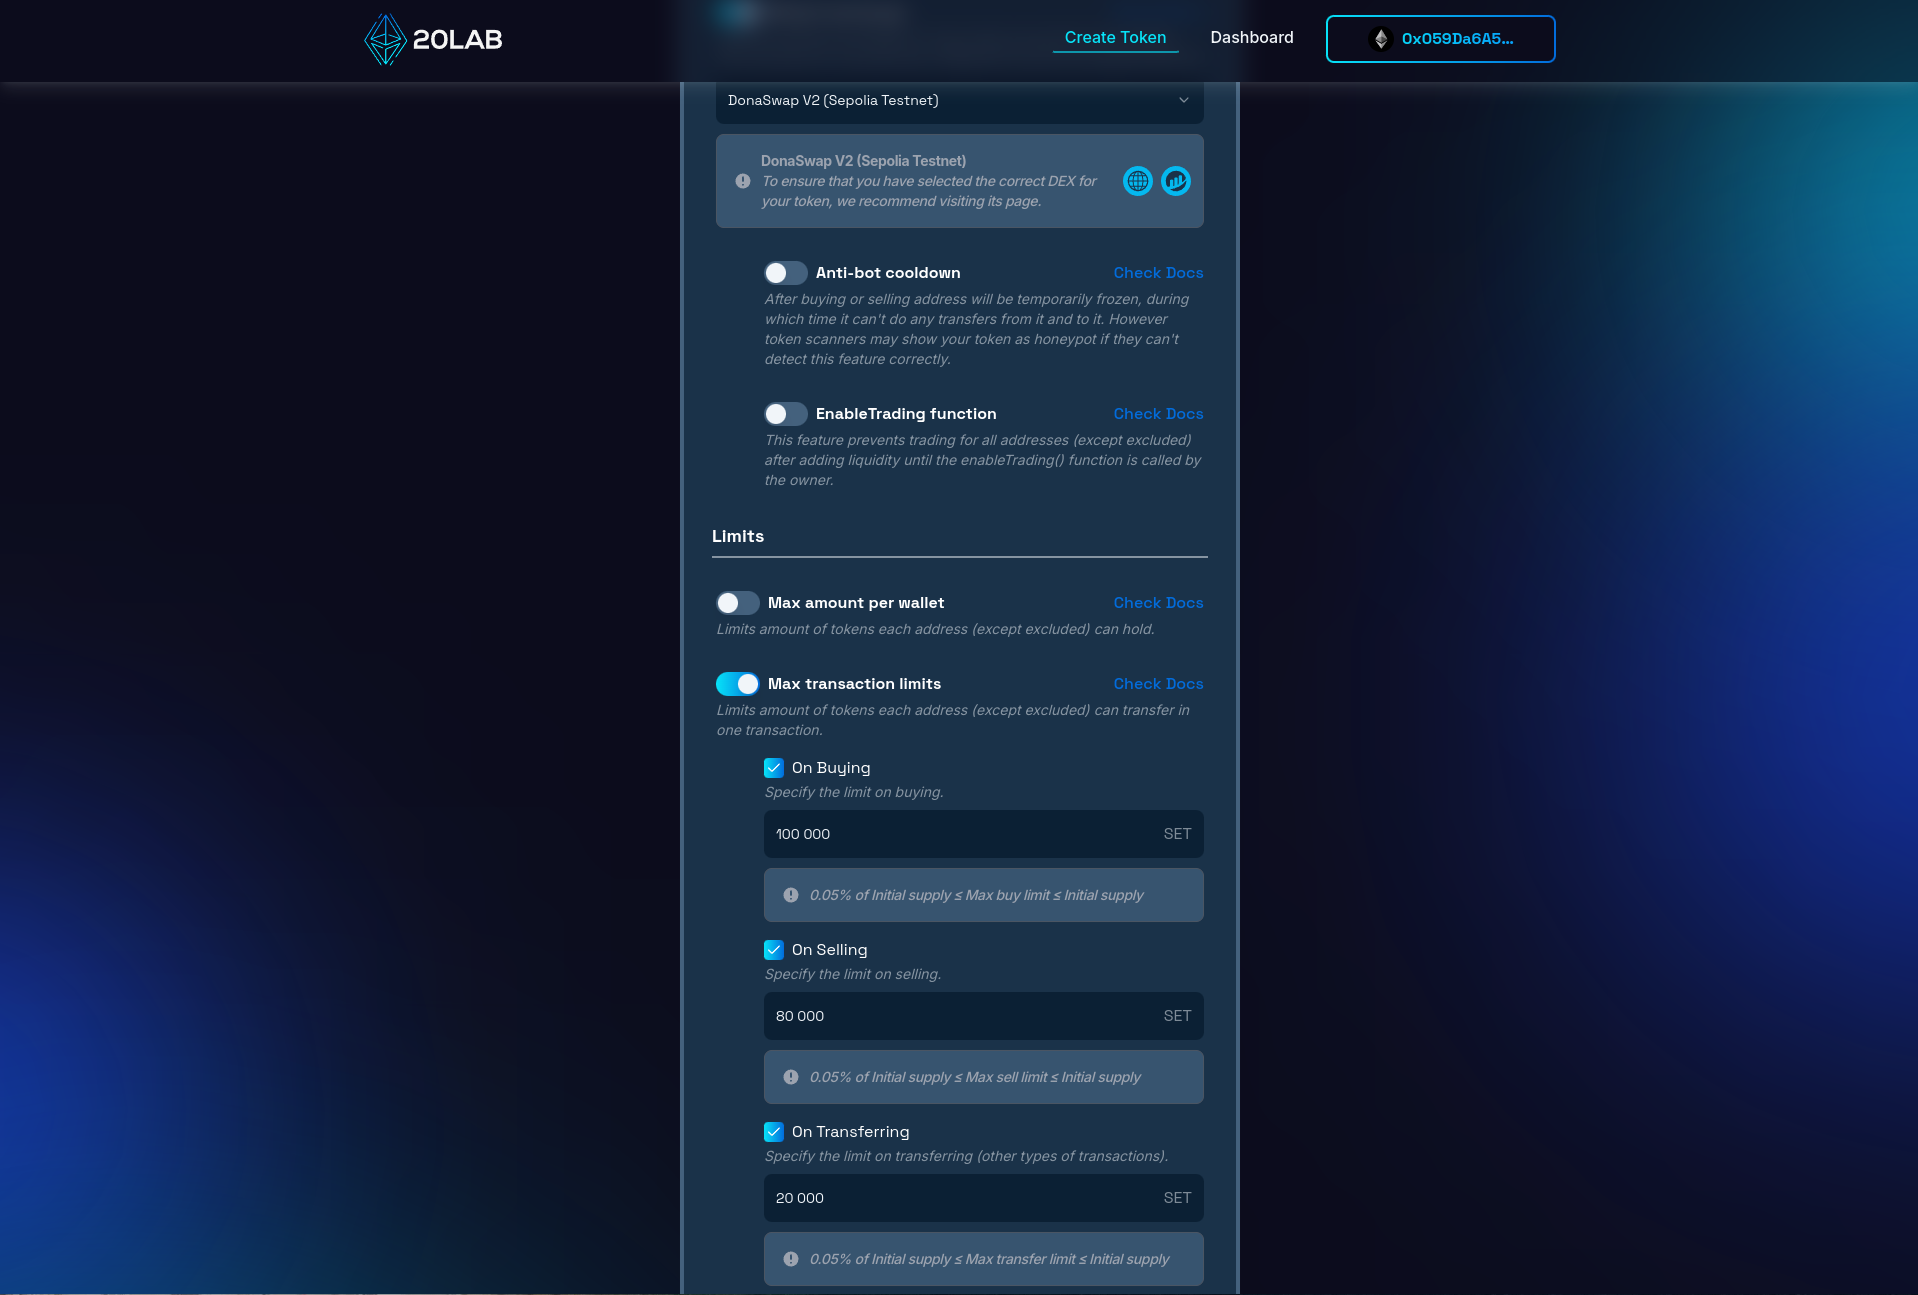
Enter the maximum number of tokens allowed for each transaction type, taking these guidelines into account.
For a single limit (default exchange disabled):
- A common practice is to set this between 0.1-1% of the total supply.
For separate limits (default exchange enabled):
- Buys: Often set slightly higher to encourage investments.
- Sells: Usually lower to prevent large dumps.
- Transfers: Typically between the buy and sell limits or not used at all.
Keep in mind that you can't add new limit types after token deployment. If you only set a maximum buy amount, you won't be able to add maximum sell or transfer amounts later.
By carefully considering these limits, you'll create a more secure and balanced token ecosystem. In the next sections, we'll explore how to fine-tune these limits for optimal performance in the 20lab dashboard.
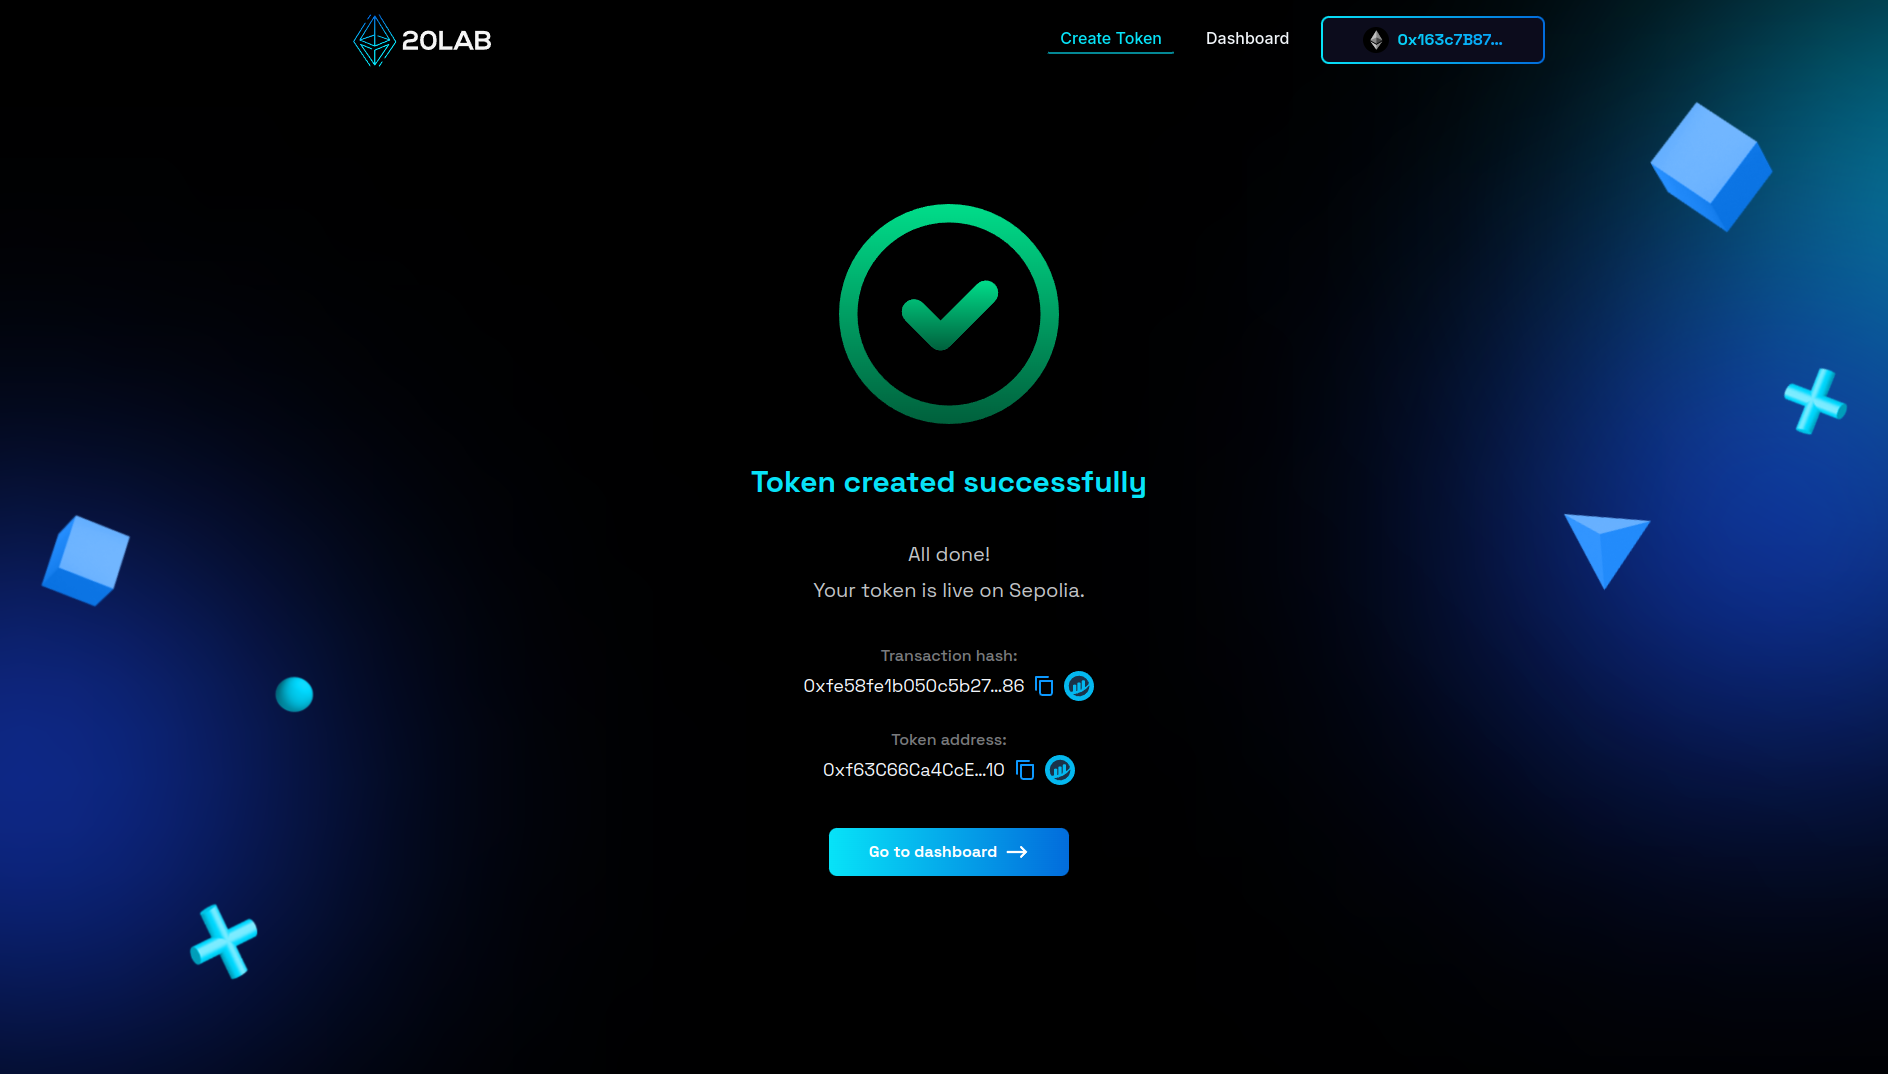
Step 4: Review and Deploy
Before finalizing your token creation, it's important to carefully review all configured parameters on the "Summary" page. This final review stage acts as an important check, allowing you to catch and correct any potential errors or oversights that could become costly after deployment.

Once you have thoroughly reviewed all the details, click the button to initiate the validation process. This automated check serves as an additional layer of protection, identifying any technical inconsistencies or issues that could compromise the functionality of your token on the blockchain.
Upon successful validation, you may be presented with a deployment modal that allows you to personalize your token's address pattern. This unique feature allows you to add a distinctive touch to your token's blockchain identifier, enhancing its memorability and brand alignment.
Now you're ready for the big moment. Click "Deploy" to begin the process of instantiating your token on your chosen blockchain network. This action will trigger a prompt from your connected wallet requesting transaction confirmation. Upon confirmation, your ERC-20 token will be live on the selected blockchain.
Managing Your ERC-20 Token with Max Transaction Limits
After successfully launching your ERC-20 token with maximum transaction limits using 20lab.app, you will gain access to an intuitive management dashboard. This comprehensive control panel provides a suite of tools to monitor and fine-tune your newly created token.
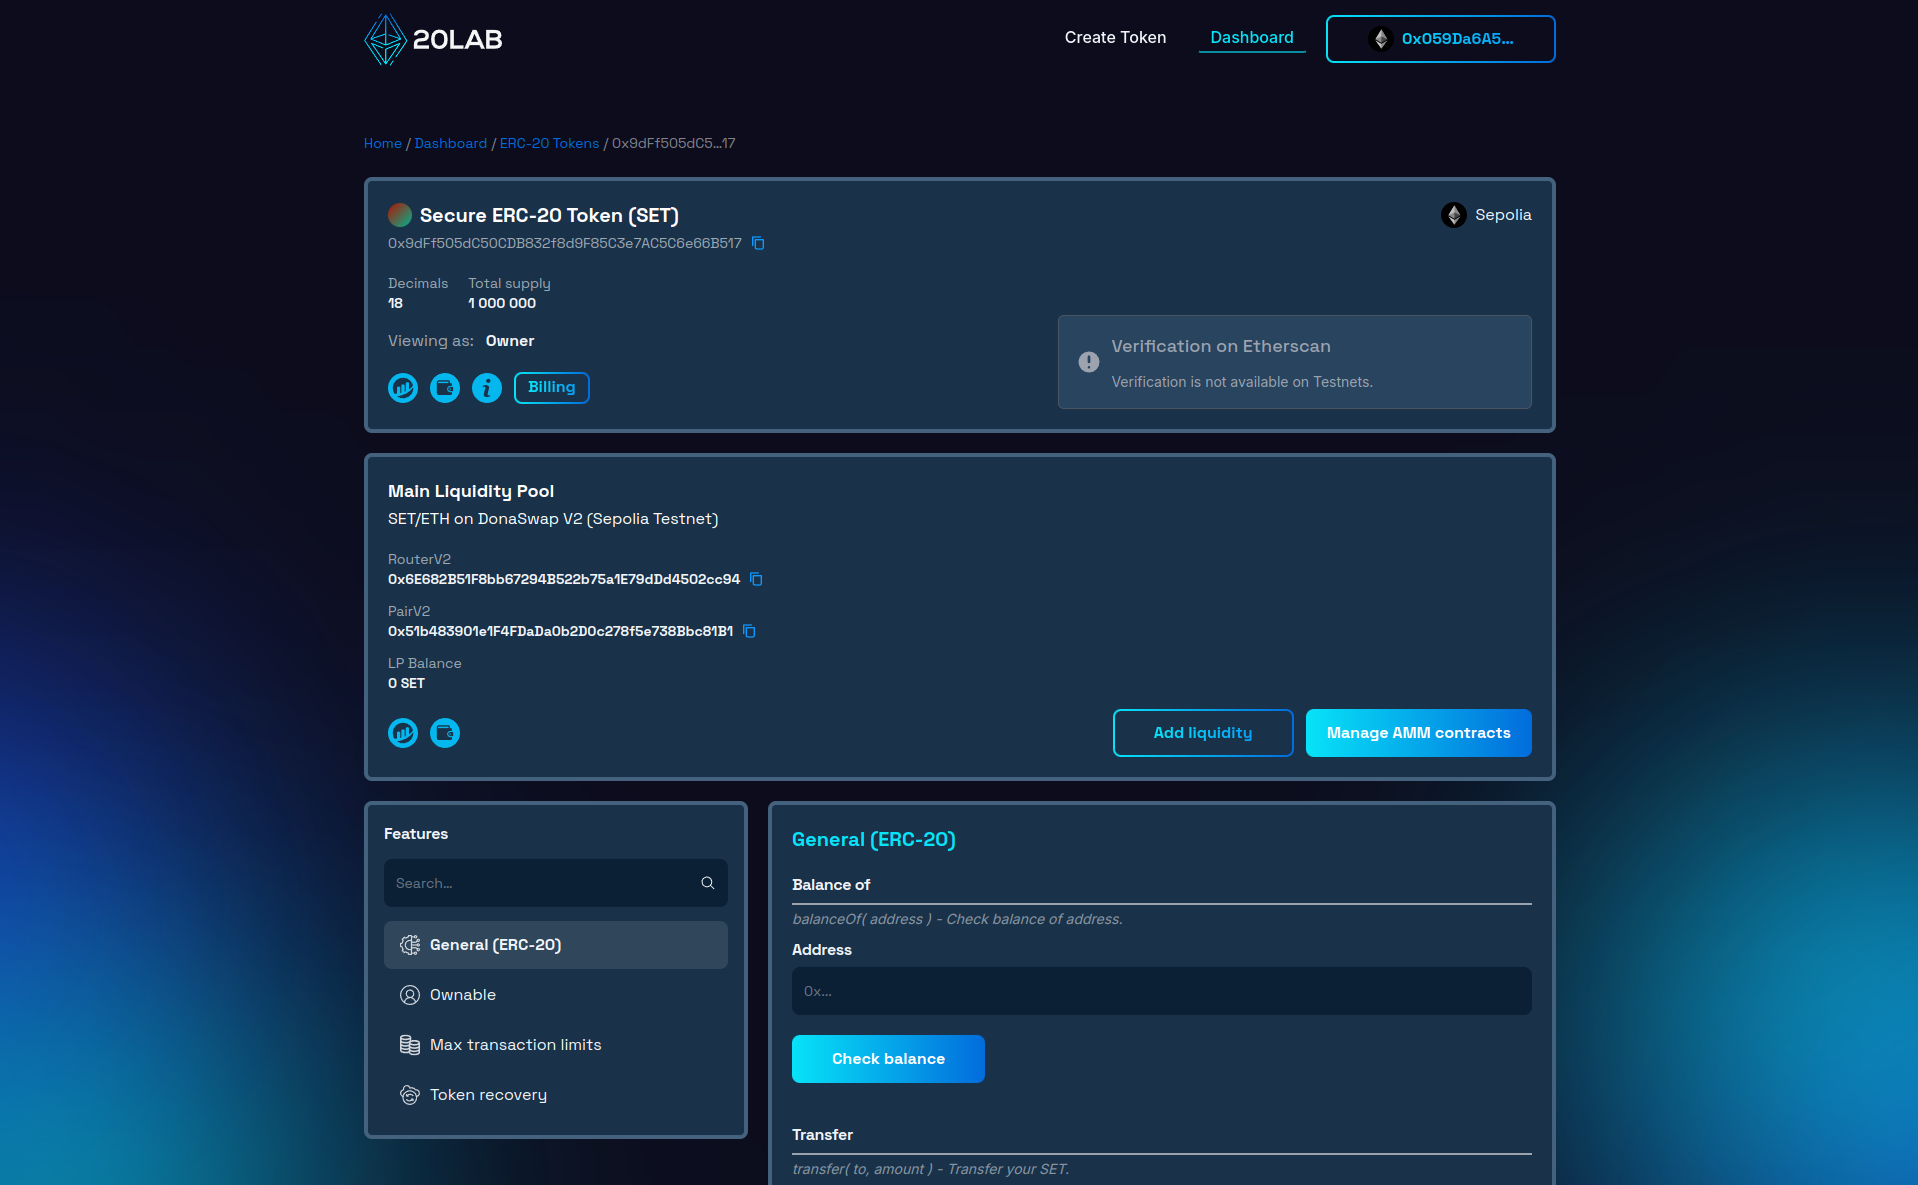
The dashboard provides a detailed view of key information about your token. At a glance, you can access critical details such as your token's blockchain address, total supply, token name, ticker symbol and decimal precision. This ensures that you're always aware of your token's fundamental metrics.
A critical component of the dashboard is the ownership management suite. As the token creator, you retain initial ownership unless delegated during the creation process. The "Ownable" section allows you to view current permissions, transfer ownership to a new address, or renounce ownership as needed.
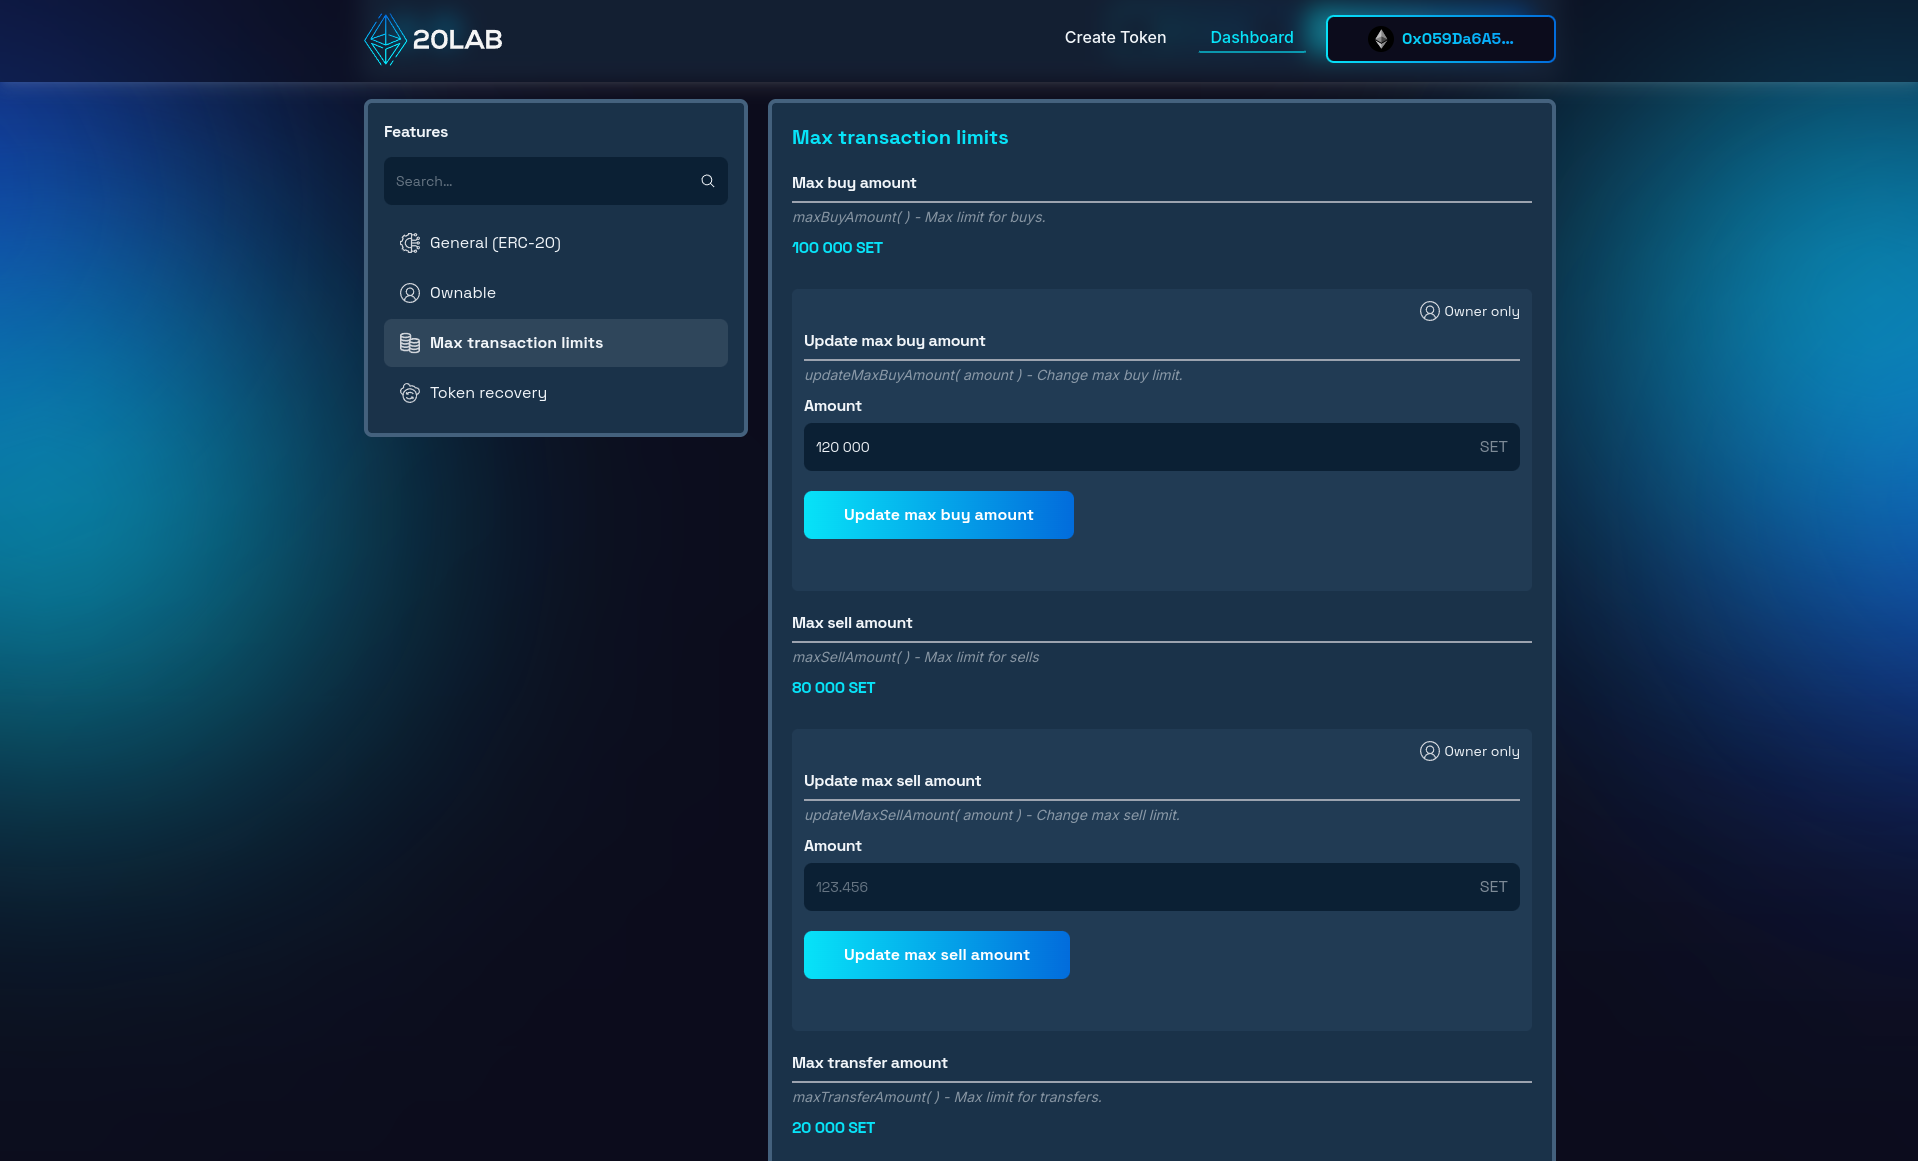
Since maximum transaction limits are built into your token's smart contract, a dedicated section of the dashboard allows you to monitor and adjust these limits - "Max Transaction Limits". This owner-restricted feature allows you to view and change the current limits for different transaction types (buys, sells and transfers, depending on which limits were chosen before token creation) and manage whitelisting from this limit.
You can check the addresses whitelisted by default in our documentation or directly in your token's dashboard.
Adjusting the maximum transaction limits is easy. You can enter new amounts for each limit type in the appropriate update fields and confirm the transaction from the token owner's wallet. This flexibility allows you to adapt to changing market conditions or project needs.
Additionally, if you've enabled the default exchange option, you can manage AMM pair contracts in the DEX section of the dashboard. This feature allows you to add or remove recognized exchange pairs, ensuring that your transaction limits work seamlessly across different decentralized exchanges if your token has liquidity on more than one trading pair.
Remember, while adjusting these limits can be beneficial, it's important to transparently communicate any changes to your token holders to maintain trust and stability in your token's ecosystem.
Testing Max Transaction Limits in Action
To understand how the maximum transaction limits work, let's explore a real-world scenario where tokens are transferred or traded within these limits.
Transferring Tokens
Whenever a user attempts to buy, sell, or transfer tokens, the max transaction limit feature automatically activates. This check is performed for each transaction unless the involved addresses are exempt from the limit. The token smart contract verifies that the transaction amount doesn't exceed the pre-defined maximum for its specific type (buy, sell, or transfer).
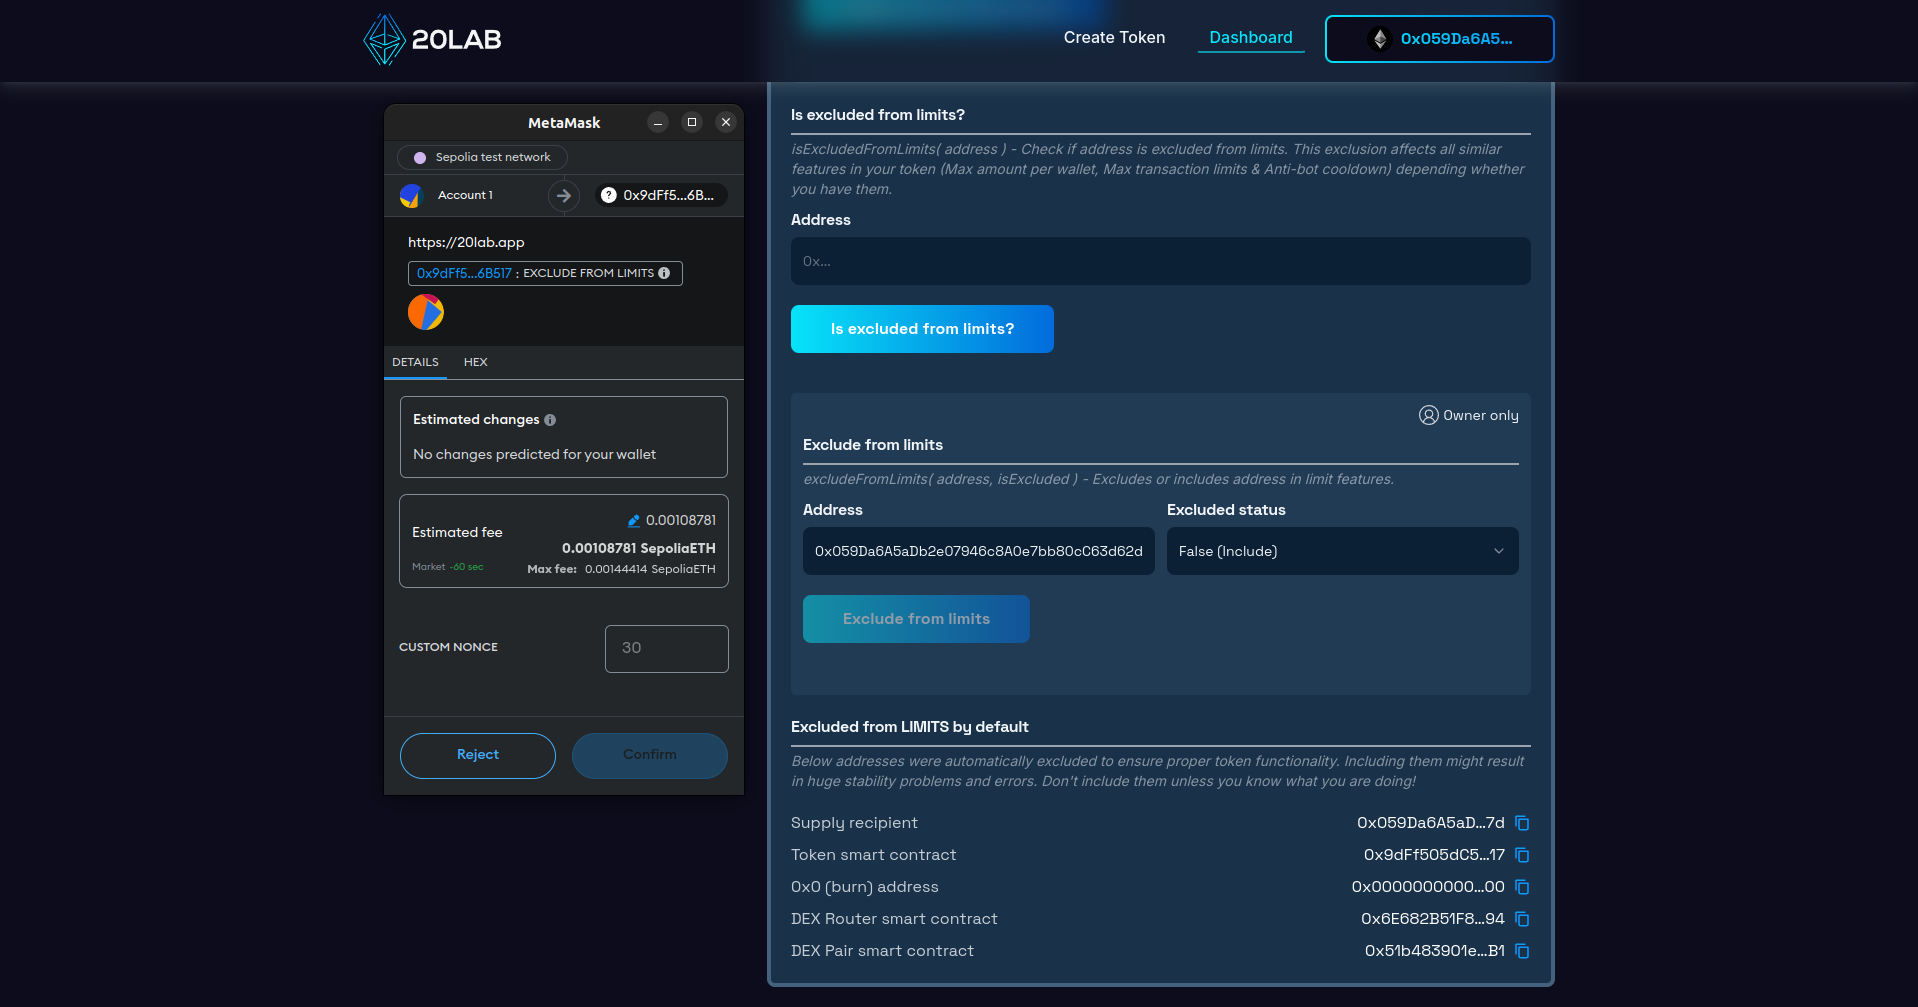
Let's try to send tokens to another wallet with an amount much higher than the set transfer limit. Since our current wallet is excluded from the limits by default, the easiest way to test the above is to temporarily include it in the max transaction limits.
Once the transaction is confirmed, we can proceed with the transfer limit check. Go to the "General (ERC-20)" section and find a transfer function.
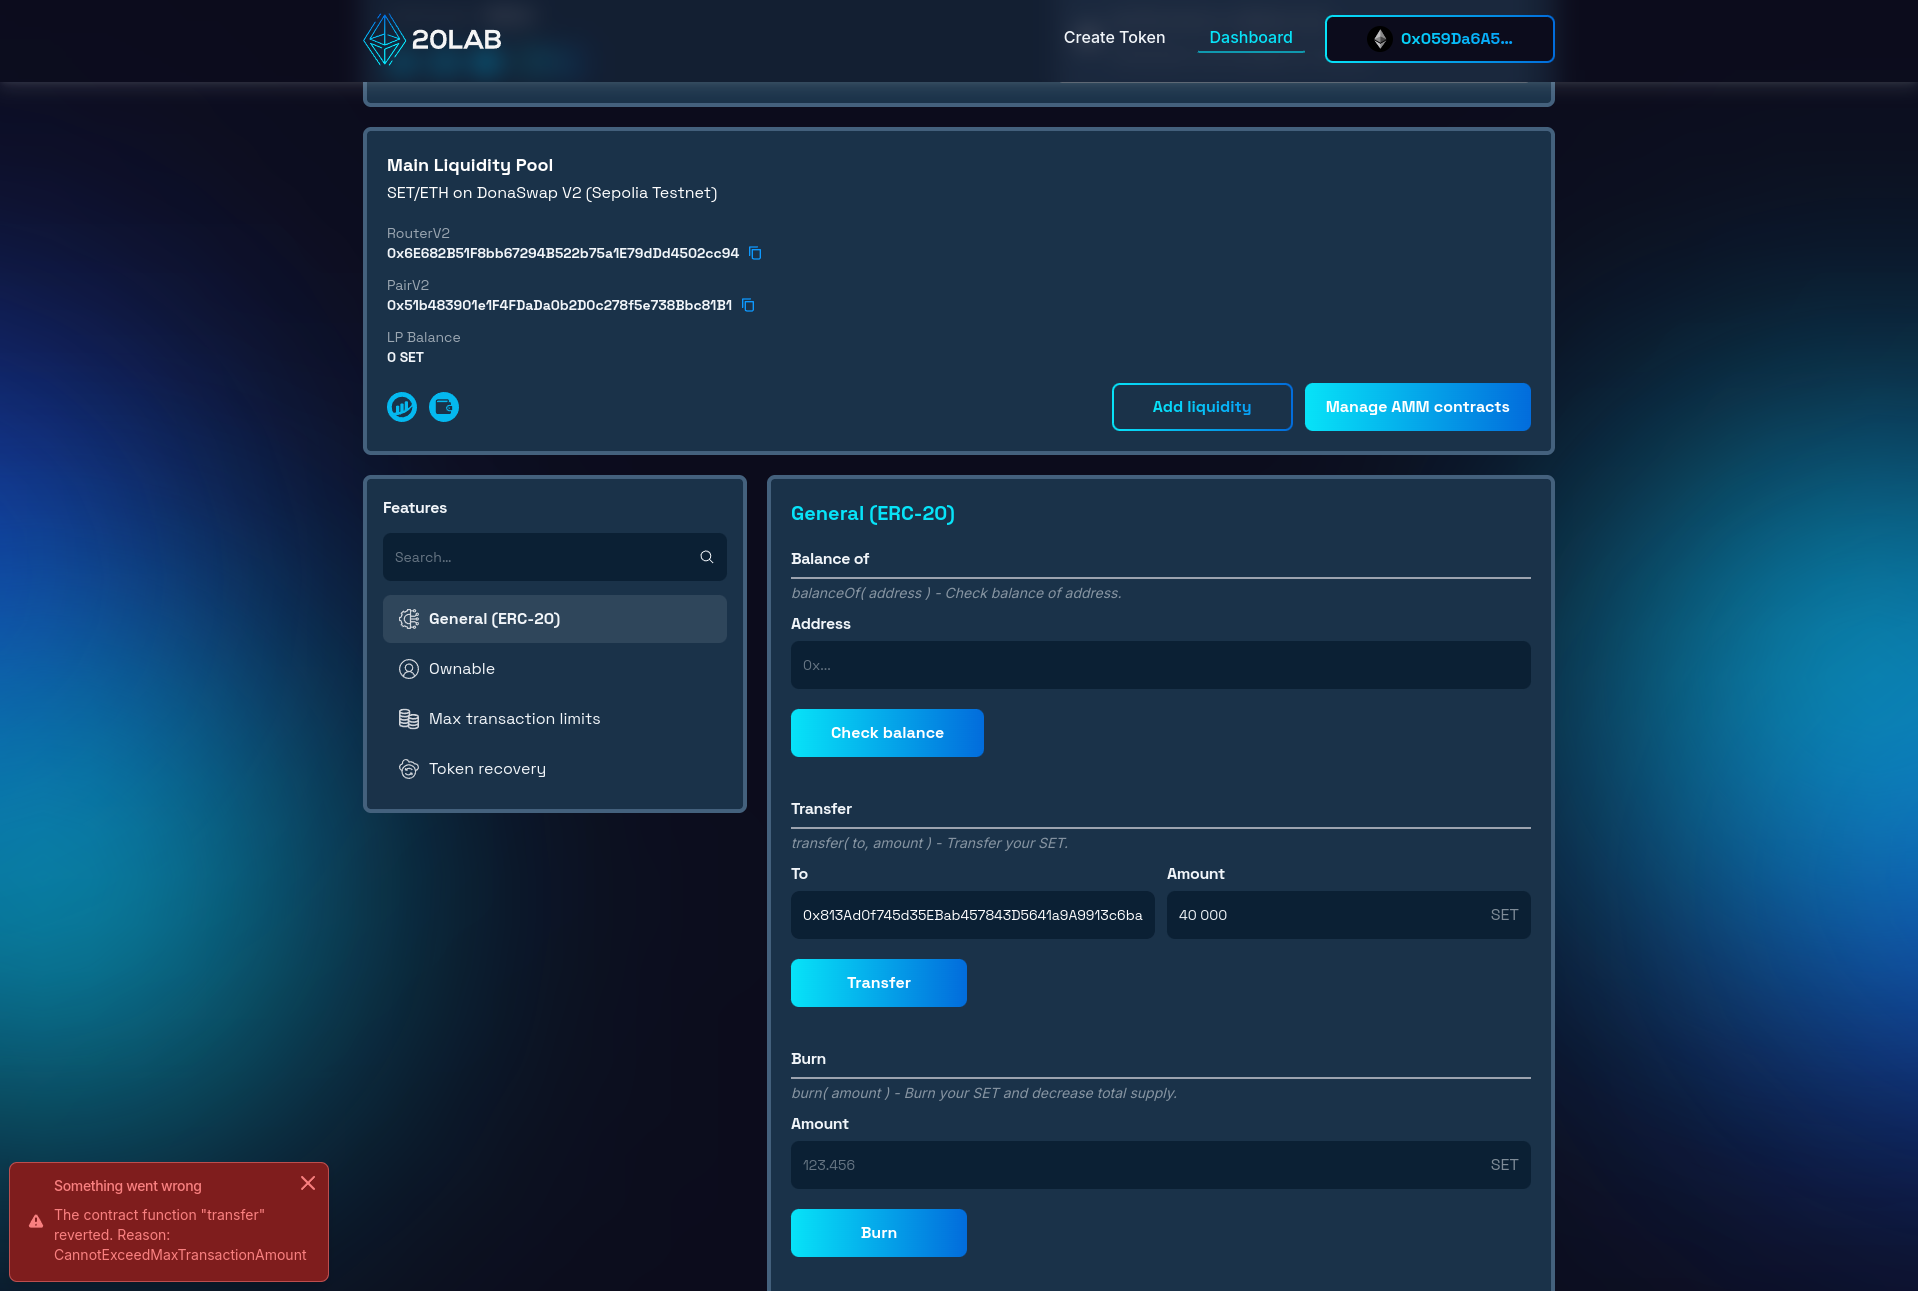
We can immediately see that transferring this amount caused an error due to exceeding the max transfer limit. Now, let's try a smaller amount that falls within the limit.
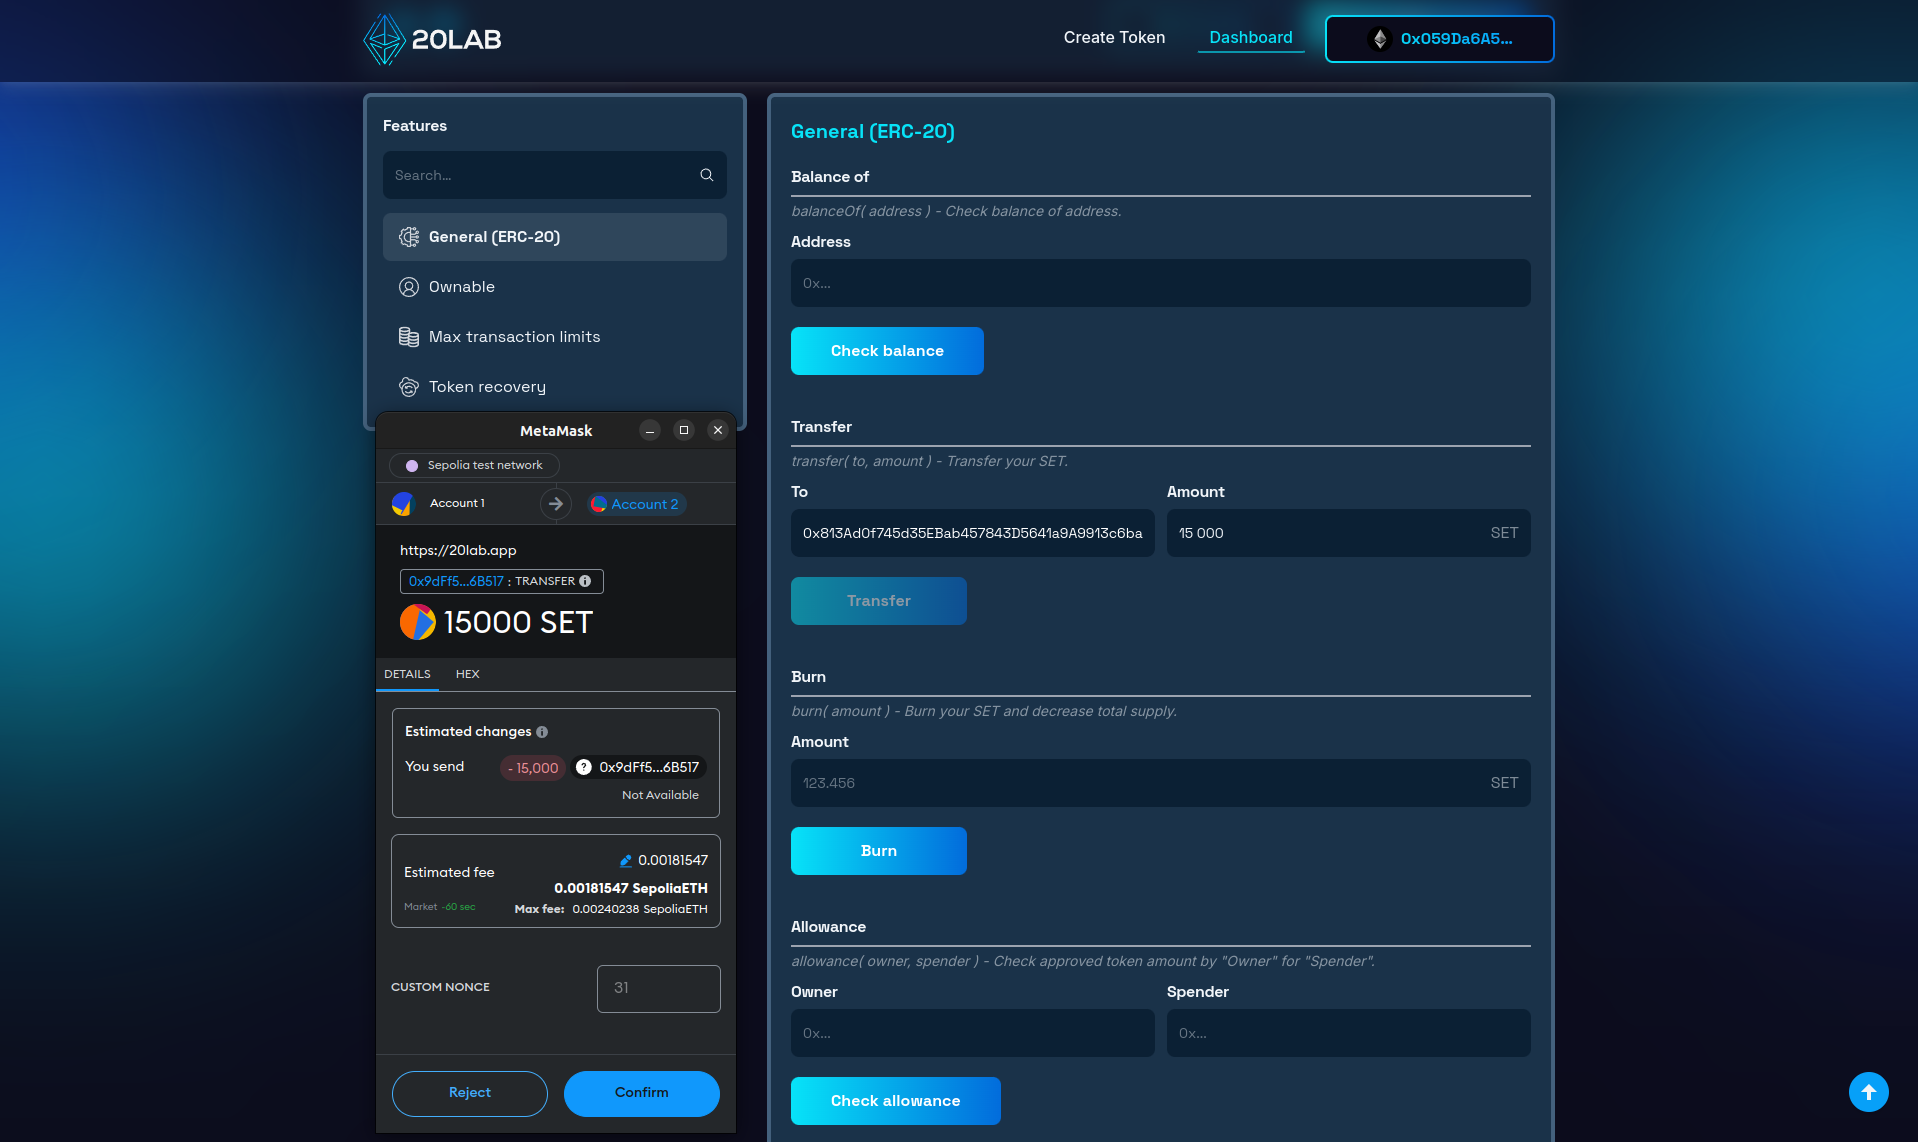
Here, sending 15,000 tokens goes through without a problem as it is under the 20,000 token limit we set for transfers.
Testing Buy and Sell Limits
If you've enabled separate buy and sell limits on the default exchange, you can test them in a similar way:
- For buy limits: Attempt to buy tokens on the default exchange. Transactions that exceed the buy limit will fail with an error.
- For sell limits: Attempt to sell tokens on the default exchange. Any sell order above the set limit will fail.
Keep in mind that these limits apply to individual transactions. Users can still accumulate or sell larger amounts over time through multiple smaller transactions. To change this behavior, you can explore the anti-bot feature, which adds a cooldown after a successful trade, effectively freezing the address for a predefined period of time. In this scenario, combining these 2 features may be a good decision.
Exclude Addresses From Limits
As mentioned above, in some cases you may want to include or exclude certain addresses (such as exchange wallets or team wallets) from these limits. This function is located at the bottom of the "Max Transaction Limits" section. Simply enter the address you wish to exclude or include, set the correct status, and confirm the transaction from the token owner's wallet.

Conclusion
Creating an ERC-20 token with transaction limits gives you more control over token movement and improves tokenomics for your ecosystem. Whether you're launching a new DeFi project, a community token or any other blockchain-based asset, the ability to limit individual transactions can be a powerful tool to ensure market stability and prevent large-scale dumping or manipulation.
Platforms like 20lab.app have made it easier than ever to create and manage tokens with advanced features like maximum transaction limits, allowing you to focus on the strategic aspects of your project rather than complex technical implementations. This feature helps maintain a balanced token economy, potentially increasing investor confidence and the long-term sustainability of your token project.
If you have any questions about creating or managing your ERC-20 token, don't hesitate to reach out to us via our Telegram channel.


